Don’t Look Now, But Your Necklace Is Listening

There was a time when the average person was worried about the government or big corporations listening in on their every word. It was a quaint era, full of whimsy and superstition. Today, a good deal of us are paying for the privilege to have constantly listening microphones in multiple rooms of our house, largely so we can avoid having to use our hands to turn the lights on and off. Amazing what a couple years and a strong advertising push can do.

So if we’re going to be funneling everything we say to one or more of our corporate overlords anyway, why not make it fun? For example, check out this speech-to-image necklace developed by [Stephanie Nemeth]. As you speak, the necklace listens in and finds (usually) relevant images to display. Conceptually this could be used as an assistive communication technology, but we’re cool with it being a meme display device for now.

Hardware wise, the necklace is just a Raspberry Pi 3, a USB microphone, and a HyperPixel 4.0 touch screen. The Pi Zero would arguably be the better choice for hanging around your neck, but [Stephanie] notes that there’s some compatibility issues with Node.js on the Zero’s ARM6 processor. She details a workaround, but says there’s no guarantee it will work with her code.

The JavaScript software records audio from the microphone with SoX, and then runs that through the Google Cloud Speech-to-Text service to figure out what the wearer is saying. Finally it does a Google image search on the captured words using the custom search JSON API to find pictures to show on the display. There’s a user-supplied list of words to ignore so it doesn’t try looking up images for function words (such as “and” or “however”), though presumably it can also be used to blacklist certain imagery you might not want popping up on your chest in mixed company.

We’d be interested in seeing somebody implement this software on a Raspberry Pi powered digital frame to display artwork that changes based on what the people in the room are talking about. Like in Antitrust, but without Tim Robbins offing anyone.

Turning That Old Hoverboard Into A Learning Platform

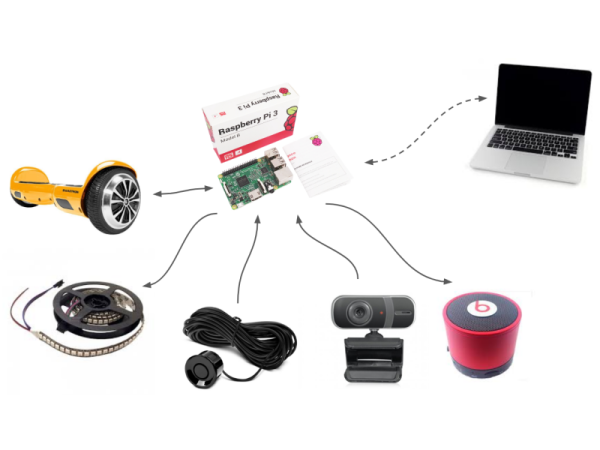
[Isabelle Simova] is building Hoverbot, a flexible robotics platform using Ikea plastic trays, JavaScript running on a Raspberry Pi and parts scavenged from commonly available hoverboards.

Self-balancing scooters a.k.a. Hoverboards are a great source of parts for such a project. Their high torque, direct drive brushless motors can drive loads of 100 kg or more. In addition, you also get a matching motor controller board, a rechargeable battery and its charging circuit. Most hoverboard controllers use the STM32F103, so flashing them with your own firmware becomes easy using a ST-link V2 programmer.

The next set of parts you need to build your robot is sensors. Some are cheap and easily available, such as microphones, contact switches or LDRs, while others such as ultrasonic distance sensors or LiDAR’s may cost a lot more. One source of cheap sensors are car parking assist transducers. An aftermarket parking sensor kit usually consists of four transducers, a control box, cables and display. Using a logic analyzer, [Isabelle] shows how you can poke around the output port of the control box to reverse engineer the data stream and decipher the sensor data. Once the data structure is decoded, you can then use some SPI bit-banging and voltage translation to interface it with the Raspberry Pi. Using the Pi makes it easy to add a cheap web camera, microphone and speakers to the Hoverbot.

Ikea is a hackers favourite, and offers a wide variety of hacker friendly devices and supplies. Their catalog offers a wide selection of fine, Swedish engineered products which can be used as enclosures for building robots. [Isabelle] zeroed in on a deep, circular plastic tray from a storage table set, stiffened with some plywood reinforcement. The tray offers ample space to mount the two motors, two castor wheels, battery and the rest of the electronics. Most of the original hardware from the hoverboard comes handy while putting it all together.

The software glue that holds all this together is JavaScript. The event-driven architecture of Node.js makes it a very suitable framework to use for Hoverbot. [Isabelle] has built a basic application allowing remote control of the robot. It includes a dashboard which shows live video and audio streams from the robot, buttons for movement control, an input box for converting text to speech, ultrasonic sensor visualization, LED lighting control, message log and status display for the motors. This makes the dashboard a useful debugging tool and a starting point for building more interesting applications. Check the build log for all the juicy details. Which other products from the Ikea catalog can be used to build the Hoverbot? How about a robotic Chair?

Continue reading “Turning That Old Hoverboard Into A Learning Platform”

Hackaday Prize Entry: Automated Wildlife Recognition

Trail and wildlife cameras are commonly available nowadays, but the Wild Eye project aims to go beyond simply taking digital snapshots of critters. [Brenda Armour] uses a Raspberry Pi to not only take photos of wildlife who wander into the camera’s field of view, but to also automatically identify and categorize the animals seen using a visual recognition API from IBM via the Node-RED infrastructure. The result is a system that captures an image when motion is detected, sends the image to the visual recognition API, and attempts to identify any wildlife based on the returned data.

The visual recognition isn’t flawless, but a recent proof of concept shows promising results with crows, a cat, and a dog having been successfully identified. Perhaps when the project is ready to move deeper into the woods, elements from these solar-powered networked birdhouses (which also use the Raspberry Pi) could help cut some cords.

Sticking With The Script For Cheap Plane Tickets

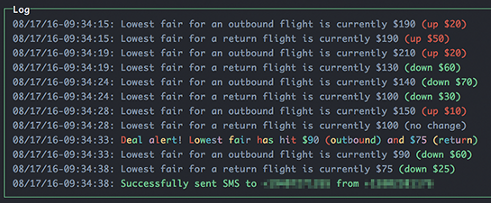
When [Zeke Gabrielse] needed to book a flight, the Internet hive-mind recommended that he look into traveling with Southwest airlines due to a drop in fares late Thursday nights. Not one to stay up all night refreshing the web page indefinitely, he opted to write a script to take care of the tedium for him.

Settling on Node.js as his web scraper of choice, numerous avenues of getting the flight pricing failed before he finally had to cobble together a script that would fill out and submit the search form for him. With the numbers coming in, [Grabrielse] set up a Twilio account to text him  once fares dropped below a certain price point — because, again, why not automate?

Continue reading “Sticking With The Script For Cheap Plane Tickets”

SDR And Node.js Remote-Controlled Monster Drift

Most old-school remote controlled cars broadcast their controls on 27 MHz. Some software-defined radio (SDR) units will go that low. The rest, as we hardware folks like to say, is a simple matter of coding.

So kudos to [watson] for actually doing the coding. His monster drift project starts with the basics — sine and cosine waves of the right frequency — and combines them in just the right durations to spit out to an SDR, in this case a HackRF. Watch the smile on his face as he hits the enter key and the car pulls off an epic office-table 180 (video embedded below).

Continue reading “SDR And Node.js Remote-Controlled Monster Drift”

Build Your Own P-Brain

I don’t think we’ll call virtual assistants done until we can say, “Make me a sandwich” (without adding “sudo”) and have a sandwich made and delivered to us while sitting in front of our televisions. However, they are not completely without use as they are currently – they can let you know the time, weather and traffic, schedule or remind you of meetings and they can also be used to order things from Amazon. [Pat AI] was interested in building an open source, extensible, virtual assistant, so he built P-Brain.

Think of P-Brain as the base for a more complex virtual assistant. It is designed from the beginning to have more skills added on in order to grow its complexity, the number of things it can do. P-Brain is written in Node.js and using a Node package called Natural, P-Brain parses your request and matches it to a ‘skill.’ At the moment, P-Brain can get the time, date and weather, it can get facts from the internet, find and play music and can flip a virtual coin for you. Currently, P-Brain only runs in Chrome, but [Pat AI] has plans to remove that as a dependency. After the break, [Pat AI] goes into some detail about P-Brain and shows off its capabilities. In an upcoming video, [Pat AI]’s going to go over more details about how to add new skills. Continue reading “Build Your Own P-Brain”

Objectifier: Director Of Domestic Technology

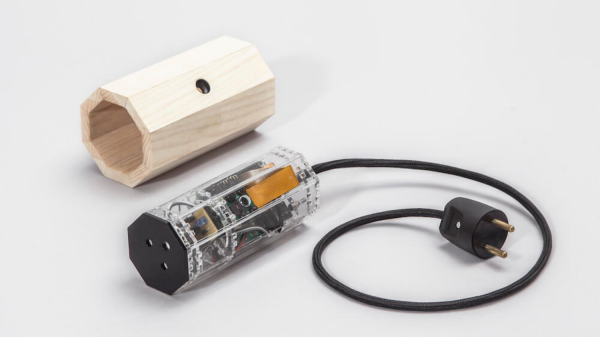
book-example[Bjørn Karmann]’s Objectifier is a device that lets you control domestic objects by allowing them to respond to unique actions or behaviour, using machine learning and computer vision. The Objectifier can turn on a table lamp when you open a book, and turn it off when you close the book. Switch on the coffee maker when you place the mug next to the pot, and switch it off when the mug is removed. Turn on the belt sander when you put on the safety glasses, and stop it when you remove the glasses. Charge the phone when you put a banana in front of it, and stop charging it when you place an apple in front of it. You get the drift — the possibilities are endless. Hopefully, sometime in the (near) future, we will be able to interact with inanimate objects in this fashion. We can get them to learn from our actions rather than us learning how to program them.

The device uses computer vision and a neural network to learn complex behaviours associated with your trigger commands. A training mode, using a phone app, allows you to train it for the On and Off actions. Some actions require more human effort in training it — such as detecting an open and closed book — but eventually, the neural network does a fairly good job.

The current version is the sixth prototype in the series and [Bjørn] has put in quite a lot of work refining the project at each stage. In its latest avatar, the device hardware consists of a Pi Zero, a Raspberry-Pi camera module, an SMPS power brick, a relay block to switch the output, a 230 V plug for input power and a 230 V socket outlet for the final output. All the parts are put together rather neatly using acrylic laser cut support pieces, and then further enclosed in a nice wooden enclosure.

On the software side, all of the machine learning part is taken care of using “Wekinator” — a free, open source software that allows building musical instruments, gestural game controllers, computer vision or computer listening systems using machine learning. The computer vision is handled via Processing. All the code is wrapped using openframeworks, with ml4A providing apps for working with machine learning.

All of the above is what we could deduce looking at the pictures and information on his blog post. There isn’t much detail about the hardware, but the pictures are enough to tell us all. The software isn’t made available, but maybe this could spur some of you hackers into action to build another version of the Objectifier. Check out the video after the break, showing humans teaching the Objectifier its tricks.

Continue reading “Objectifier: Director Of Domestic Technology”