Joel in his minecart

This Little Minecraft Mine Cart Of Mine

[Joel] of Joel Creates loves trains and Minecraft. So what better way to combine them than to make a real-life electric mine cart and ride it around?

At first glance, it seems pretty straightforward. Four wheels, each with a flange, mounted to a box with a motor. In practice, it was a little more complex than that. Just finding a spot of track to even ride on is tricky. Most “abandoned” tracks that you might see around your city often aren’t all that abandoned. Luckily for [Joel], he remembered an amusement park in the area that he went to as a kid, which he remembered having a decent amount of track. Additionally, the rails were smaller and closer to the scale of a real Minecraft track where one block is 1 meter. After calling up the owner and receiving permission, Joel began to build his cart.

First attempts to procure actual train wheels were foiled by cost and lead times, and simply CNCing a set of wheels was too expensive from a time and materials point of view. [Joel]’s first thought was about making an assembly out of two wheels to grip the rail, much like a roller coaster. However, there were dozens of switch points on the track at the park and several road crossings, both things that wouldn’t work with that sort of setup. Stumbling upon a bit of hacker inspiration, [Joel] turned to brake drums, which happen to be reasonably close to the correct size. They also have the superb quality of being relatively cheap and available. Almost all the parts were CNCed out of aluminum, plywood, or foam.

Given that the theme of the build was doing things to scale, [Joel] was mindful of the top speed of a minecart in the game, which is 8 meters per second or roughly 25 miles per hour, so he set that as his goal to hit. A beefy motor from an online warehouse and a lithium-ion pack allowed him to hit that easily; it was just a matter of doing so safely.

If you need even more Minecraft vehicles in your life, perhaps an RC boat might do the trick? Video after the break.


Continue reading “This Little Minecraft Mine Cart Of Mine”

Railroad Rail Transformed Into Blacksmith’s Anvil With The Simplest Of Tools

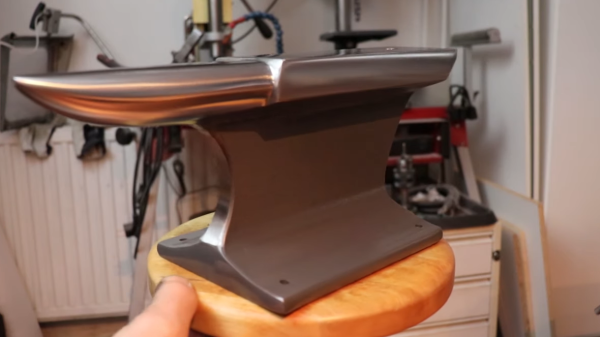
One of the biggest challenges facing the aspiring blacksmith is procuring the tools of the trade. And that means tackling the unenviable task of finding a decent anvil. Sure, one can buy an ASO — anvil-shaped object — at Harbor Freight, but a real anvil is much harder to come by. So perhaps the beginner smith’s first build should be this railroad rail to anvil conversion.

Repurposing sections of rail into anvils is hardly a new game, but [The Other Finnish Guy]’s build shows us just how little is needed in terms of specialized tooling to pull this off. Other than a file, the bulk of the work is done by angle grinders, which are used to cut off the curved crown of the rail section, cut the shape of the heel, and rough out the horn. Removing that much metal will not be a walk in the park, so patience — and a steady supply of cutting wheels and sanding discs — is surely required. But with time and skill, the anvil hidden inside the rail can be revealed and put to use.

We have questions about the final result, like its lack of a hardy hole and the fact that the face isn’t hardened. We wonder if some kind of induction heating could be used to solve the latter problem, or if perhaps a hardened plate could be welded into the top to make a composite anvil. Still, any anvil is better than no anvil. More on the anatomy and physiology of these tools can be had in [Jenny List]’s article on anvils, and her whole excellent series on blacksmithing is highly recommended. [Jenny]’s not the only smith we have on staff, though — [Bil Herd] has been known to smite a bit too.

Continue reading “Railroad Rail Transformed Into Blacksmith’s Anvil With The Simplest Of Tools”

Hyperloop: Fast, But At What Cost?

When it comes to travelling long distances, Americans tend to rely on planes, while the Chinese and Europeans love their high speed rail. However, a new technology promises greater speed with lower fares, with fancy pods travelling in large tubes held at near-vacuum pressures. It goes by the name of Hyperloop.

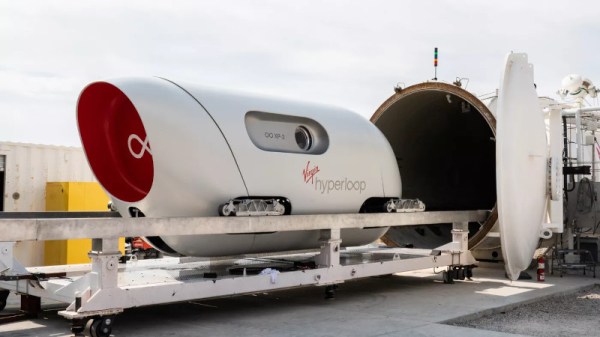
Virgin Hyperloop recently ran the first-ever passenger test of a Hyperloop vehicle, reaching 100 mph on a short test track.

Spawned from an “alpha paper” put together by Elon Musk in 2013, the technology is similar to other vactrain systems proposed in the past. Claiming potential top speeds of up to 760 mph, Hyperloop has been touted as a new high-speed solution for inter city travel, beating planes and high speed rail for travel time. Various groups have sprung up around the world to propose potential routes and develop the technology. Virgin Hyperloop are one of the companies at the forefront, being the first to run a pod on their test track with live human passengers, reaching speeds of 100 mph over a short 500 meter run.

It’s an exciting technology with a futuristic bent, but to hit the big time, it needs to beat out all comers on price and practicality. Let’s take a look at how it breaks down.

Continue reading “Hyperloop: Fast, But At What Cost?”

Sliding Screen Has Wheels, Will Travel

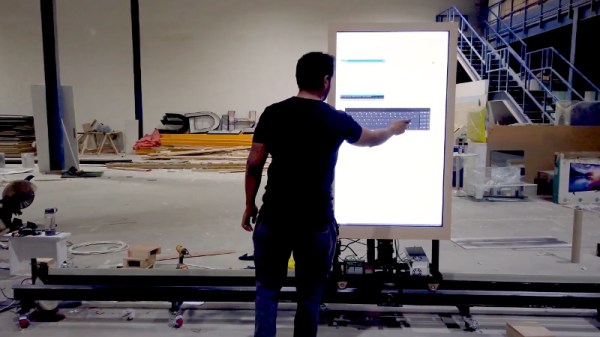
For a recent event, [MakerMan] was tasked with creating an interactive display that could move back and forth along an image of the Moscow skyline to highlight different points of interest. The end result is certainly gorgeous, but since this is Hackaday, we were more excited to see all the behind the scenes video of how it was built.

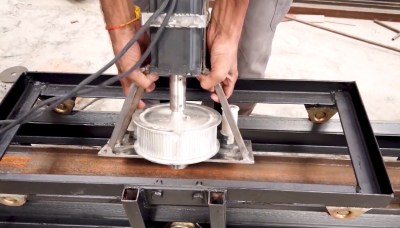
As with many of his projects, this one started with little more than scrap parts. Two metal I-beams were welded together to make a track, and a wheeled cart was fashioned to ride on it. Using a belt and pulley system that’s not unlike a scaled up version of what you might see on a desktop 3D printer, the motor in the cart is able to move the arrangement back and forth with minimal slop.

Installing the motor and pulley in the cart.

The cart actually holds all of the electronics in the project, including the power supplies, MA860H motor controller, a pair of endstop switches, and the Arduino that pulls it all together. A drag chain is used to keep the wires tight to the side of the rail without getting tangled up in anything.

[MakerMan] doesn’t explain much of the software side of this one, though we suppose he might only have been contracted to develop the hardware. But towards the end of the video you can see how the cart, now with large touch screen display mounted on top, moves back and forth when the appropriate commands are sent to the Arduino.

We’re not really sure what application such a contraption would have for the average hacker, but that doesn’t mean we can’t be jealous. There’s just something about huge illuminated screens that just speaks to us.

Continue reading “Sliding Screen Has Wheels, Will Travel”

A Tiny Train Departure Board, Just Like The Real Thing

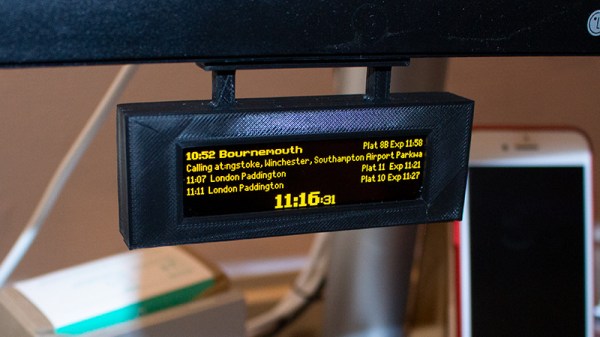
If you travel on the British rail system, you’ll be familiar with the ubiquitous orange dot-matrix departure display boards. At a glance they tell you the expected arrival times of the next few trains, where they are headed, and at the bottom the current time.  [Chris Crocker-White] was inspired by a Tweet to recreate one of these displays in miniature and hang it under his monitor.

The hardware is a Raspberry Pi Zero with an OLED screen, in a custom 3D-printed case. A soldered USB cable takes power from the monitor’s USB ports. Software wise it’s a demonstration vehicle for the Balena cloud service that pulls its data from their transport API, but the choice of dot matrix typeface is perfect and absolutely looks the part.

There is some question as to whether a project such as this one should need a cloud service as its backend, and of course it serves as a demonstration piece rather than a definitive way to enact a departure board. It does however bring a ready-packaged API for transport data, which given that many data sources can be opaque, is a useful feature.

Train time displays seem to be a popular choice on the Eastern side of the Atlantic, here’s another British one, and one from Ireland.

Thanks [Pyrofer] for the tip.

Using An FPGA To Navigate China’s Railroads

If you’re headed over to mainland China as a tourist, it’s possible to get to most of the country by rail. China is huge though, about the same size as the United States and more than twice the size of the European Union. Traveling that much area isn’t particularly easy. There are over 300 train terminals in China, and finding the quickest route somewhere is not obvious at all. This is an engineering challenge waiting to be solve, and luckily some of the students at Cornell Engineering have taken a stab at efficiently navigating China’s rail system using an FPGA.

The FPGA runs an algorithm for finding the shortest route between two points, called Dijkstra’s algorithm. With so many nodes this can get cumbersome for a computer to calculate, but the parallel processing of a dedicated FPGA speeds up the process significantly. The FPGA also includes something called a “hard processor system“, or HPS. This is not a soft-core, but dedicated computing hardware in the form of an ARM Cortex-A9. Testing showed that utilizing both the HPS and the FPGA can speed up the computation by up to ten times over a microcontroller alone.

This project goes into extreme detail on the methodology and the background of the math and coding involved, and is definitely worth a read if you’re interested in FPGAs or traveling salesman-esque problems. FPGAs aren’t the only dedicated hardware you can use to solve these kinds of problems though, if you have a big enough backpack while you’re traveling around China you could also use a different kind of computer.

Continue reading “Using An FPGA To Navigate China’s Railroads”

Worn Train Rails Get Judged By Laser

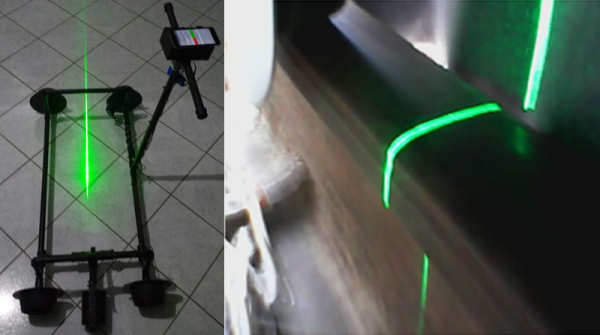
[Calango] is a railway technician, and for a school final project created the Rail Wear Surveillance Trolley (RWST) which is a delightfully designed device made mainly from PVC conduit with one job: travel down a segment of train track while shining a green laser onto the rail, and capture camera images. The trolley holds both the laser and the camera at just the right angles for the camera to capture a profile of the rail’s curved surface. The images are sent via Bluetooth to a smartphone for later analysis. Rail wear can be judged by checking how well the profile of the rail conforms to the ideal profile of an unworn segment. The trolley is manually pushed by an operator, but [Calango] says that ideally, it would be self-propelled and able to inspect a length of the track then return on its own.

The project was made on a tight budget, which led to some clever solutions like using a rotary encoder attached to a wheel as a makeshift distance sensor. If things get desperate enough, it’s even possible to roll your own rotary encoder with a 3D printer and two microswitches.