A property of radio waves is that they tend to reflect off things. Metal surfaces in particular act as good reflectors, and by studying how these reflections work, it’s possible to achieve all manner of interesting feats. [destevez] decided to have some fun with reflections from local air traffic, and was kind enough to share the results.
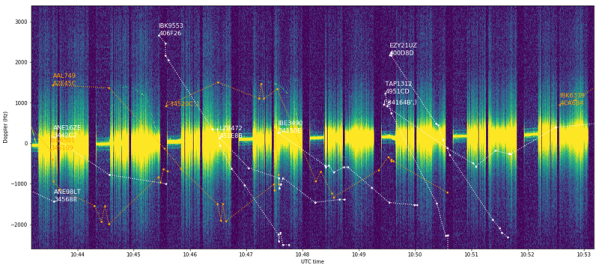
The project centers around receiving 2.3 GHz signals from a local ham beacon that have been reflected by planes taking off from the Madrid-Barajas airport. The beacon was installed by a local ham, and transmits a CW idenfication and tone at 2 W of power.
In order to try and receive reflections from nearby aircraft, [destevez] put together a simple but ingenious setup.
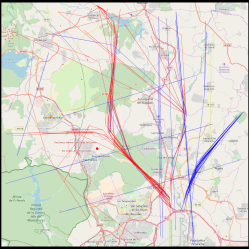
A LimeSDR radio was used, connected to a 9 dB planar 2.4 GHz WiFi antenna. This was an intentional choice, as it has a wide radiation pattern which is useful for receiving reflections from odd angles. A car was positioned between the antenna and the beacon to avoid the direct signal overpowering reflected signals from aircraft.
Data was recorded, and then compared with ADS-B data on aircraft position and velocity, allowing recorded reflections to be matched to the flight paths of individual flights after the fact. It’s a great example of smart radio sleuthing using SDR and how to process such data. If you’re thirsty for more, check out this project to receive Russian weather sat images with an SDR.
[Thanks to Adrian for the tip!]


![[Source: Wikipedia]](https://hackaday.com/wp-content/uploads/2015/08/350px-standing_wave_2.gif)
 Chances are, you take color for granted. Whether or not you give it much thought, color is key to distinguishing your surroundings. It helps you identify fire, brown recluse spiders, and the right resistor for the job.
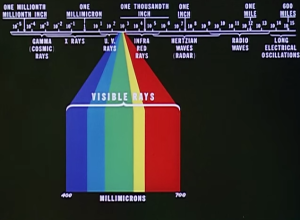 Each color that makes up the spectrum of visible rays has a particular wavelength. The five principal colors—red, yellow, green, blue, and violet—make possible thousands of shades and hues, but are only a small slice of the electromagnetic spectrum.


