The UA723 As A Switch Mode Regulator

If you are an electronic engineer or received an education in electronics that went beyond the very basics, there is a good chance that you will be familiar with the Fairchild μA723. This chip designed by the legendary Bob Widlar and released in 1967 is a kit-of-parts for building all sorts of voltage regulators. Aside from being a very useful device, it may owe some of its long life to appearing as a teaching example in Paul Horowitz and Winfield Hill’s seminal text, The Art Of Electronics. It’s a favourite chip of mine, and I have written about it extensively both on these pages and elsewhere.

The Fairchild switching regulator circuit. From the μA723 data sheet in their 1973 linear IC databook, page 194 onwards.

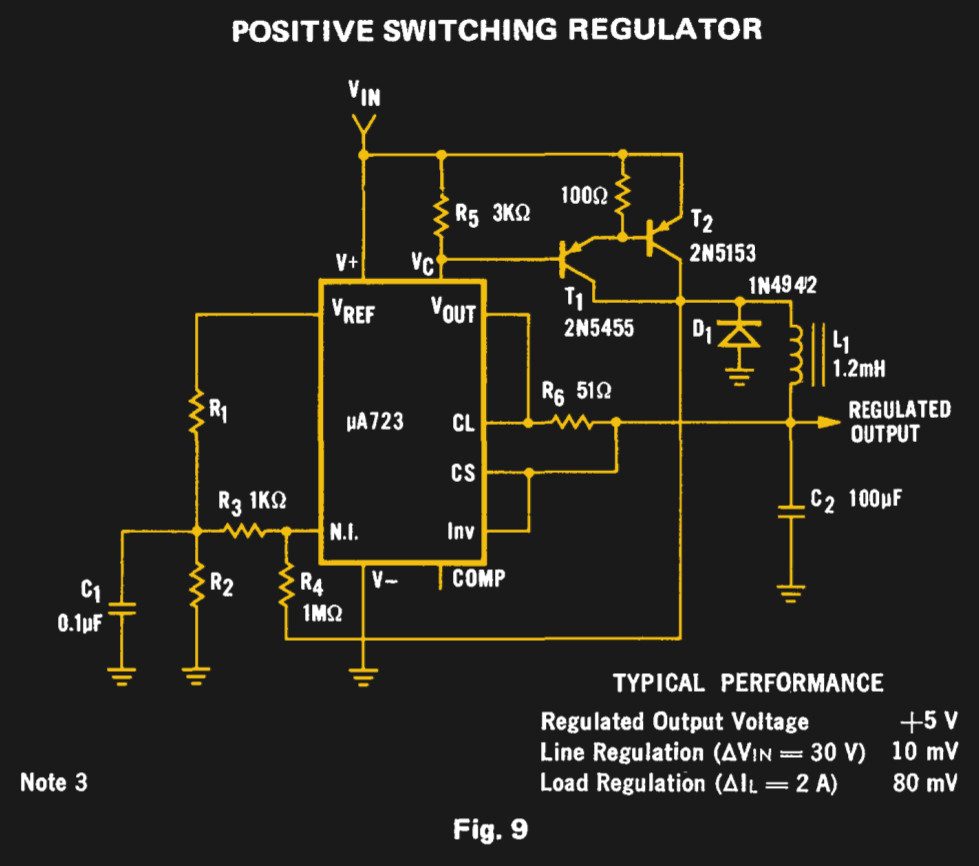
For all my experimenting with a μA723 over the decades there is one intriguing circuit on its data sheet that I have never had the opportunity to build. Figure 9 on the original Fairchild data sheet is a switching regulator, a buck converter using a pair of PNP transistors along with the diode and inductor you would expect. Its performance will almost certainly be eclipsed by a multitude of more recent dedicated converter chips, but it remains the one μA723 circuit I have never built. Clearly something must be done to rectify this situation.

Continue reading “The UA723 As A Switch Mode Regulator”

Laser Galvo Control Via Microcontroller’s DAC

Mirror galvanometers (‘galvos’ for short) are the worky bits in a laser projector; they are capable of twisting a mirror extremely quickly and accurately. With two of them, a laser beam may be steered in X and Y to form patterns. [bdring] had purchased some laser galvos and decided to roll his own control system with the goal of driving the galvos with the DAC (digital to analog) output of a microcontroller. After that, all that was needed to make it draw some shapes was a laser and a 3D printed fixture to hold everything in the right alignment.

The galvos came with drivers to take care of the low-level interfacing, and [bdring]’s job was to make an interface to translate the 0 V – 5 V output range of his microcontroller’s DAC into the 10 V differential range the driver expects. He succeeded, and a brief video of some test patterns is embedded below.

Continue reading “Laser Galvo Control Via Microcontroller’s DAC”

Create A Discord Webhook With Python For Your Bot

Discord is an IRC-like chat platform that all the young cool kids are hanging out on. Originally intended as a way to communicate during online games, Discord has grown to the point that there are servers out there for nearly any topic imaginable. One of the reasons for this phenomenal growth is how easy it is to create and moderate your own Discord server: just hit the “+” icon on the website or in the mobile application, and away you go.

As a long-time IRC guy, I was initially unimpressed with Discord. It seemed like the same kind of stuff we’ve had for decades, but with an admittedly slick UI. After having used it for a few months now and joining servers dedicated to everything from gaming to rocket science, I can’t say that my initial impression of Discord is inaccurate: it’s definitely just a modern IRC. But I’ve also come to the realization that I’m OK with that.

But this isn’t a review of Discord or an invitation to join the server I’ve setup for my Battlefield platoon. In this article we’re going to look at how easy it is to create a simple “bot” that you can plug into a Discord server and do useful work with. Since anyone can create a persistent Discord server for free, it’s an interesting platform to use for IoT monitoring and logging by simply sending messages into the server.

Continue reading “Create A Discord Webhook With Python For Your Bot”

High Speed Imaging Of Magnetic Fields

Some time before experimenting with MRI machines and building his own CT scanner, [Peter Jansen] wanted to visualize magnetic fields. One of his small side projects is building tricoders — pocket sensor suites that image everything — and after playing around with the magnetometer function on his Roddenberry-endorsed tool, he decided he had to have a way to visualize magnetic fields. After some work, he has the tools to do it at thousands of frames per second. It’s a video camera for magnetic fields, pushing the boundaries of both magnetic imaging technology and the definition of the word ‘camera’.

When we last looked at [Peter]’s Hall effect camera, the device worked, but it wasn’t necessarily complete. The original design used I2C I/O multiplexers for addressing each individual ‘pixel’ of the Hall effect array, limiting the ‘framerate’ of the ‘camera’ to somewhere around 30 Hz. While this would work for visualizing static magnetic fields, the more interesting magnetic fields around us are oscillating — think motors and transformers and such. A much faster magnetic camera was needed, and that’s what [Peter] set out to build.

Instead of an I/O expander, [Peter] re-engineered his design to use analog multiplexers and a binary counter to cycle through each pixel, one at a time. Basically, the new circuit uses two analog muxes for the columns and rows of the Hall effect array, a binary counter to cycle through each pixel at Megahertz speed, and a fast ADC to read each value. It is, bizarrely, the 1970s way of doing things; these are simple chips, and the controller (a Chipkit Max32) only needs to read a single analog value and clock the binary counter really fast.

With the new design, [Peter] is able to get extremely fast frame rates of about 2,000 Hz. That’s fast enough for some beautiful visualizations of spinning motors and transformers, seen in the video below. Further improvements may include three-axis magnetometers, which should allow for some spectacular visualizations similar to [Ted Yapo]’s 3D magnetic field scanner.

Continue reading “High Speed Imaging Of Magnetic Fields”

Arduino Keyboard Is Gorgeous Inside And Out

While the vast majority of us are content to plod along with the squishy chiclet keyboards on our laptops, or the cheapest USB membrane keyboard we could find on Amazon, there’s a special breed out there who demand something more. To them, nothing beats a good old-fashioned mechanical keyboard, where each key-press sounds like a footfall of Zeus himself. They are truly the “Chad” of the input device world.

But what if even the most high end of mechanical keyboards doesn’t quench your thirst for spring-loaded perfection? In that case, the only thing left to do is design and build your own. [Matthew Cordier] recently unveiled the custom mechanical keyboard he’s been working on, and to say it’s an elegant piece of engineering is something of an understatement. It may even look better inside than it does on the outside.

The keyboard, which he is calling z.48, is based around the Arduino Pro Micro running a firmware generated on kbfirmware.com, and features some absolutely fantastic hand-wiring. No PCBs here, just a rainbow assortment of wire and the patience of a Buddhist monk. The particularly attentive reader may notice that [Matthew] used his soldering iron to melt away the insulation on his wires where they meet up with the keys, giving the final wiring job a very clean look.

Speaking of the keys, they are Gateron switches with DSA Hana caps. If none of those words mean anything to you, don’t worry. We’re through the Looking Glass and into the world of the keyboard aficionado now.

Finally, the case itself is printed on a CR-10 with a 0.3 mm nozzle and 0.2 mm layers giving it a very fine finish. At 70% infill, we imagine it’s got a good deal of heft as well. [Matthew] mentions that a production case and a PCB are in the cards for the future as he hopes to do a small commercial run of these boards. In the meantime we can all bask in the glory of what passes for a prototype in his world.

We’ve seen some exceptionally impressive mechanical keyboards over the years, including the occasional oddity like the fully 3D printed one and even one that inexplicably moves around. But this build by [Matthew] has to be one of the most elegant we’ve ever come across.

Homebrew Wrist Brace Helps Beat Injury With Style

Repetitive motion injuries are no joke, often attended by crippling pain and the possibility of expensive surgery with a lengthy recovery. Early detection and treatment is the key, and for many wrist and hand injuries such as [ktchn_creations] case of “Blackberry thumb,” that includes immobilization with a rigid brace.

Sadly, the fiberglass brace her doctor left her with was somewhat lacking in the style department, and rather than being left with something unappealing to wear for half a year, she 3D-printed a stylish and functional wrist immobilizer. Starting in Autocad, she designed the outline of the brace, essentially an unwrapped version of the splint she started with. For breathability as well as aesthetics, a pattern of tessellated hexagons was used. The drawing was then exported to Fusion 360 for modeling and printing in black PLA. We were surprised to see that the brace was printed flat and later heat formed around her wrist, but that makes more sense than printing it in its final wrapped state. With a few velcro straps, the thermoformed brace was ready for service on the long road to recovery.

While [ktchn_creations] stipulates that looks were the motivator here, we’re not unaware that a 3D-printed brace might be more affordable than something dispensed by a doctor. But if you do build your own DIY appliance, whether for bracing your wrist, your knee, or your wayward teeth, you’ll want to run it past your health care provider, of course.

Harvesting Energy From The Earth With Quantum Tunneling

More energy hits the earth in sunlight every day than humanity could use in about 16,000 years or so, but that hasn’t stopped us from trying to tap into other sources of energy too. One source that shows promise is geothermal, but these methods have been hindered by large startup costs and other engineering challenges. A new way to tap into this energy source has been found however, which relies on capturing the infrared radiation that the Earth continuously gives off rather than digging large holes and using heat exchangers.

This energy is the thermal radiation that virtually everything gives off in some form or another. The challenge in harvesting this energy is that since the energy is in the infrared range, exceptionally tiny antennas are needed which will resonate at that frequency. It isn’t just fancy antennas, either; a new type of diode had to be manufactured which uses quantum tunneling to convert the energy into DC electricity.

While the scientists involved in this new concept point out that this is just a prototype at this point, it shows promise and could be a game-changer since it would allow clean energy to be harvested whenever needed, and wouldn’t rely on the prevailing weather. While many clean-energy-promising projects often seem like pipe dreams, we can’t say it’s the most unlikely candidate for future widespread adoption we’ve ever seen.