Bask In The Warm Glow Of DIY Incandescent Bulbs

With most of the apparatus and instruments we now take for granted yet to be developed, the early pioneers of the Electric Age had to bring a lot to the lab besides electrical skills. Machining, chemistry, and metallurgy were all basic skills that the inventor either had to have or hire in. Most of these skills still have currency of course, but one that was once crucial – glassblowing – has sadly fallen into relative obscurity.

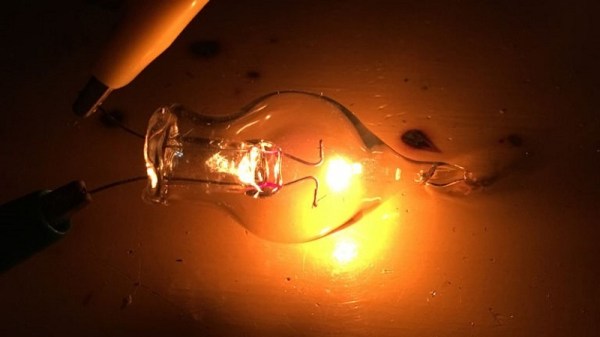
There are still practitioners of course, like [2SC1815] who is learning how to make homemade incandescent light bulbs. The Instructable is in both English and Japanese, and the process is explained in some detail. Basic supplies include soda-lime glass tubing and pre-coiled tungsten filaments. Support wires are made from Dumet, an alloy of iron, nickel, and cobalt with an oxidized copper cladding which forms a vacuum-tight seal with molten glass. The filament is crimped to the Dumet leads and pinched into a stem of glass tubing. A bulb is blown in another piece of tubing and the two are welded together, evacuated with a vacuum pump, and sealed. The bulbs are baked after sealing to drive off any remaining water vapor. The resulting bulbs have a cheery glow and a rustic look that we really like.

Of course, it’s not a huge leap from DIY light bulbs to making your own vacuum tubes. That’s how [Dalibor Farny] got started on his handmade Nixie business, after all.

Electronic hub barrette diagram

Hair Is Good Electronic Hub Real Estate

When it comes to wearables, there are a few places you can mount rechargeable batteries and largish circuit boards. Certainly, badges hanging from a lanyard are a favorite here on Hackaday. A belt is another option. [deshipu] has come up with a good location on your head, provided you have long hair that is. That’s the hair clasp or barrette. It can support a hefty mass, be relatively large, and doesn’t touch your skin.

Plusing LEDs barretteHis plan gets even better, namely to use it as a hub for other electronics on your head, giving as examples: mechatronic ears and LEDs on eyelashes, earrings, and neck collars. We’d include some sort of heads-up display on glasses too or perhaps some playful glasses windshield wipers.

Being able to solder the clasp to the circuit board was his first success and he’s since made a test barrette with pulsing LEDs which he’s distributed to others for evaluation. We really like his electronic hub idea and look forward to seeing where he takes it. For now, he’s done enough to have become a finalist in the Hackaday Human Computer Interface Challenge.

Building A Hardware Store Faraday Cage

Most Hackaday readers are no doubt familiar with the Faraday cage, at least in name, and nearly everyone owns one: if you’ve ever stood watching a bag of popcorn slowly revolve inside of a microwave, you’be seen Michael Faraday’s 1836 invention in action. Yet despite being such a well known device, the average hacker still doesn’t have one in their arsenal. But why?

It could be that there’s a certain mystique about Faraday cages, an assumption that their construction requires techniques or materials outside the realm of the home hacker. While it’s true that building a perfect Faraday cage for a given frequency involves math and careful attention to detail, putting together a simple model for general purpose use and experimentation turns out to be quick and easy.

As an exercise in minimalist hacking I recently built a basic Faraday cage out of materials sourced from Home Depot, and thought it would be interesting to not only describe its construction but give some ideas as to how one can put it to practical use in the home lab. While it’s hardly a perfect specimen, it clearly works, and it didn’t take anything that can’t be sourced locally pretty much anywhere in the world.

Continue reading “Building A Hardware Store Faraday Cage”

Bring Your Own Controller Kits Just Add Bluetooth

Known for their build quality and low latency, the [8bitdo] line of Bluetooth controllers are generally well liked among classic videogame devotees. They match modern conveniences like rechargeable batteries and Bluetooth connectivity with old school color schemes and the tried-and-true feel of a D-pad. All of their current offerings are modeled to invoke the same feel of console controllers of the past, however, for some there is no substitute for the original. For that type of hobbyist, the company created DIY Bluetooth mod kits in the form of drop-in replacement PCBs.

The featured mod kits are for the original NES controller, SNES controller, and 6-button Genesis Controller. They feature a 180 mAh Li-ion battery for an estimated 7.5 hours of gameplay, and a unique barrel plug type USB charging cable. The charging port fills the void left by the controller’s connection cable and also doubles a the LED status indicator. Though for the Sega Genesis mod kit, the charge port changes to a standard micro USB.

The [8bitdo] website boasts compatibility across Android, Linux, Mac, and Windows (drivers permitting) and even Nintendo Switch. With the addition of one of the company’s Retro Receivers, you are able to use the controllers on the original NES or SNES alongside their contemporary NES/SNES classic console counterparts.

Continue reading “Bring Your Own Controller Kits Just Add Bluetooth”

Hack My House: Raspberry Pi As Infrastructure

I finally had my own house. It was a repossession, and I bought it for a song. What was supposed to be a quick remodel quickly turned into the removal of most of the drywall in the house. There was a silver lining on this cloud of drywall dust and loose insulation. Rather than constantly retro-fitting cabling and gadgets in as needed, I could install everything ahead of time. A blank canvas, when the size of a house, can overwhelm a hacker. I’ve spent hours thinking through the infrastructure of my house, and many times I’ve wished for a guide written from a hacker’s perspective. This is that guide, or at least the start of it.

What do you want your smart house to do? And what do you want to be able to do in your smart house? For example, I wanted to be able to upgrade my cheap 120 V welder to a beefier 240 V model, so adding a 240 V plug in the garage was a must. As a bonus, that same 240 V circuit could be used for charging an electric car, if ever one is parked there.

“Ethernet everywhere” was my mantra. Try to imagine everywhere you might want to plug in a desktop, a laptop, an access point, or even a VoIP phone. I decided I wanted at least two Ethernet drops to each room, and tried to imagine the furniture layout in order to put them in convenient places.

Continue reading “Hack My House: Raspberry Pi As Infrastructure”

Adding Analog Touch To (Nearly) Any Mechanical Keyboard

The new hotness for DIY electronics is mechanical keyboards, and over the past few years we’ve seen some amazing innovations. This one is something different. It adds an analog sensor to nearly any mechanical key switch, does it with a minimal number of parts, and doesn’t require any modification of the switch itself. It’s a reddit thread and imgur post, but the idea is just so good we can overlook the documentation on this one.

The key development behind this type of sensor is realizing that nearly every mechanical keyswitch (Cherry MX, Kalth, Gateron) has a spring in the bottom. A spring is just a coil of wire, and an inductor is just a coil of wire, too. By putting a spiral trace on the PCB of a mechanical keyboard underneath the keyswitch, you can sense the inductance of this spring. This does require a little bit of additional hardware, in this case an LDC1614 inductance to digital converter, but this is an I2C-readable part that can, theoretically, be integrated rather easily with any mechanical keyboard PCB and firmware.

The downside to using the LDC1614 is that sampling is somewhat time-limited, with four channels or individual keys being polled at 500 Hz. This isn’t a problem if the use-case is adding analog to your WASD keys, but it may become a problem for an entire keyboard. Additionally, the LDC1614 is a slightly expensive part, at about $2 USD in quantity 1000. A fully analog keyboard using this technique is going to be pricey.

Right now, the proof-of-concept for this analog mechanical keyswitch is just a 0.1 mm flexible PCB that is shoehorned inbetween a Cherry MX red and a (normal) mechanical keyboard PCB. The next step in the development will be a 2×4 keypad with analog sensors, and opening up the hardware and firmware examples up under a GPL license.

Giant Connect Four Pits You Against The Computer

You can build a Connect Four solver in software, but it won’t be all that much fun. Now apply that same automation to a 15-foot-tall plywood version of the classic board game and you’ve just created a smile-making-machine for everyone within eyesight. Behold the Mono-Purpose Automated Robot Versed In Connnect4 (Marvin) which Ben and Jonathan dreamed up on their way home from Maker Faire last year, and made into their exhibit this year.

On the physical side of things they got really creative in lifting the discs and sorting them into the column chosen by the software brain of the game. A chain travels along one side with fingers every few feet. The fingers travel along the channel, lifting the discs. Those fingers are a couple of bolts, with some metal filler, all epoxied into one solid unit.

At the top of the disc elevator, and at the top position of each column in the gaming board, there are IR reflectance sensors which send feedback to the Arduino that drives the hardware. This proved a major issue during setup the day before the Faire. The reflectance sensors are just blasting out IR and not using a carrier signal. In direct sunlight, the detector was in a constant state of being tripped. After some trial and error, the logic for the sensors was flipped to detect the absence of sunlight by placing black plastic behind that top row of the board and putting duct tape over the IR emittors.

There’s a router and laptop rolled into the system. The Arduino makes an HTTP request to software on the laptop. In addition to determining where the next move should be made, the laptop is connected to a large screen which shows the current state of the gaming board. This is a head-to-head, human versus machine game. The human player drops their discs from the top of the board using a paint roller that hooks into a hole at the center of the disc. This way the player’s disc passes by the sensors, triggering the machine’s next move.

It’s a clever build and due to the sheer size it’s pretty awesome they were able to get it to the Faire from Philadelphia. Don’t miss the video after the break that shows off the fun and excitement of this gaming giant.

Continue reading “Giant Connect Four Pits You Against The Computer”