Super-Blue CNC Part Fixturing

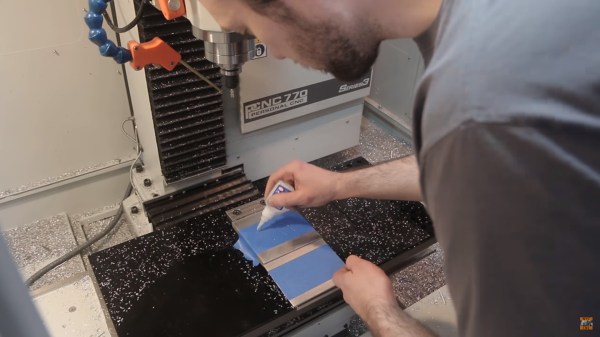
Simple clamps are great if you need to keep the pressure on two parallel surfaces, but if you have an irregular plane, or you need to cut through it, clamps are not the correct tool. The folks at [NYC CNC] feature a video with a clever hack borrowing from other disciplines. Painters tape is applied to the top of a level mounting surface in the machine and then burnished. The same is done to the bottom of the workpiece. Superglue is drizzled between the tape layers and pressed together so now the stock is held firmly below the toolhead.

Some parts are machined in the video, which can be seen below, and the adhesion holds without any trouble. One of the examples they cut would be difficult to hold without damage or stopping the machine. The accepted wisdom is that superglue holds well to a slightly porous surface like tape, but it doesn’t like do as well with smooth surfaces like metal. Removing residue-free tape at the end of a cut is also cleaner and faster than glue any day.

If you have yet to cut your teeth, you can watch our very own Elliot Williams getting introduced to CNC machines or a portable machine even a child can use.

Continue reading “Super-Blue CNC Part Fixturing”

It’s Raining Chinese Space Stations: Tiangong-1

China’s first space station, Tiangong-1, is expected to do an uncontrolled re-entry on April 1st, +/- 4 days, though the error bars vary depending on the source. And no, it’s not the grandest of all April fools jokes. Tiangong means “heavenly palace”, and this portion of the palace is just one step of a larger, permanent installation.

But before detailing just who’ll have to duck when the time comes, as well as how to find it in the night sky while you still can, let’s catch up on China’s space station program and Tiangong-1 in particular.

Continue reading “It’s Raining Chinese Space Stations: Tiangong-1”

Dumb Down Your Xiaomi Smart Lamp With A Custom Firmware

Undoubtedly, the ESP8266’s biggest selling point is its WiFi capability for a ridiculously low price. Paranoid folks probably await the day its closed-source firmware bits will turn against humanity in a giant botnet, but until then, hobbyists and commercial vendors alike will proceed putting them in their IoT projects and devices. One of those devices is the Yeelight desk lamp that lets you set its color temperature and brightness via mobile app.

[fvollmer] acquired such a lamp, and while he appreciated its design and general concept, he wasn’t happy that it communicates with external servers. So he did the only reasonable thing and wrote his own firmware that resembles the original functionality, but leaves out the WiFi part. After all, the ESP8266 has still a lot to offer in its core essence: a full-blown 32-bit microcontroller with support for the most common, hobbyist-friendly SDKs.

The lamp’s color temperature and brightness are set with a rotary encoder / push button combo switch, and the LEDs themselves are controlled via PWM. All things considered, it’s a rather straightforward endeavour, for which [fvollmer] chose the standalone C SDK. And in the end, it’s not like he’s unreasonably cautious to keep some control over his household items.

Eavesdropping On A VGA Monitor’s Conversations

Did you ever wonder what your monitor and your computer are talking about behind your back? As it turns out, there’s quite a conversation going on while the monitor and the computer decide how to get along, and sniffing out VGA communications can reveal some pretty fascinating stuff about the I²C protocol.

To reverse engineer the configuration information exchanged between a VGA monitor and a video card, [Ken Shirriff] began by lopping a VGA cable in two. The inside of such cables is surprisingly complex, with separate shielding wires for each color and sync channel and a host of control wires, all bundled in multiple layers of shielding foil and braid to reduce EMI. [Ken] identified the clock and data lines used for the I²C interface and broke those out into a PocketBeagle for analysis using the tiny Linux machine’s I²C tools.

With a Python script to help decode the monitor’s Extended Display Identification Data (EDID) data, [Ken] was able to see everything the monitor knows about itself — manufacturer, serial number, all the supported resolution modes, and even deprecated timing and signal information left over from the days when CRTs ruled the desktop. Particularly interesting are the surprisingly limited capabilities of a VGA display in terms of color reproduction, as well as [Ken]’s detailed discussion on the I²C bus in general and how it works.

We always enjoy these looks under the hood that [Ken] is so good at, and we look forward to his reverse engineering write-ups. His recent efforts include a look at core memory from a 50-year old mainframe and reverse engineering at the silicon level.

Emulating A Complete Commodore 64

When the Commodore 64 was released in 1982, it was a masterpiece of engineering. It had capabilities far outstripping other home computers, and that was all due to two fancy chips inside the C64. The VIC-II, the video chip for the C64, had sprites and scrolling, all stuffed into a single bit of silicon. The SID chip was a complete synthesizer on a chip. These bits of silicon made the C64 the best selling computer of all time, but have also stymied efforts to emulate a complete C64 system on a microcontroller.

[Frank Bösing] has just managed to emulate an entire C64 on a Teensy 3.6. The Teensy uses an exceptionally powerful microcontroller, but this is a labor of love and code.

The inspiration for this project comes from a reverse-engineered SID chip that was ported to the Teensy 3.2. The SID chip is the make it or break it feature of any C64 emulation, but the Teensy 3.2 didn’t have enough RAM for the most recent versions of reSID. With the release of the Teensy 3.6, [Frank] figured the increased amount of RAM would allow a complete C64 system, so he built it.

The new C64 emulator uses a Teensy 3.6, with a small add-on ‘shield’ (or whetever we’re calling them) to provide connectors for joysticks and the Commodore IEC bus. There’s audio out, support for USB keyboards, and support for an IL9341 SPI display or a regular ‘ol VGA display.

The entire development of this Commodore emulator has been documented over on the PJRC forums, and all the code is over on GitHub. It’s a fantastic piece of work, and as the video (below) shows, this is a real Commodore 64 that fits in your pocket.

Continue reading “Emulating A Complete Commodore 64”

Improved camera slider controls

Improving Controls For A Camera Slider Kit

We’ve all gone through it. You buy a kit or even an assembled consumer item, and it’s either not quite right or it’s only a part of what you need. Either you do a fix, or you add to it. In [Jeremy S. Cook’s] case, he’d been working for a while with a camera slider kit which came with just the slider. He’d added a motor and limit switches but turning it on/off and reversing direction were still done by manipulating alligator clips. Now he’s put together some far better, and more professional-looking controls.

He started by replacing the DC motor with a servo motor modified for continuous rotation. Then he built a circuit around an Arduino Nano for controlling the motor and put it all in a carefully made box which he bolted to the side of the slider. A switch built into the box turns it on and off, and a potentiometer sets the direction of the slider. While not necessarily new, we do like when we see different approaches being taken, and in this case, he’s using magnets to not only hold the case’s cover on for easy access, but also a couple of them to hold the 9-volt battery in place. Check out his construction process and the new slider in action in the video below.

Continue reading “Improving Controls For A Camera Slider Kit”

An LED Effect For Every Occasion

Quality software development examples can be hard to come by. Sure, it’s easy to pop over to Google and find a <code> block with all the right keywords, but having everything correctly explained can be hit or miss. And the more niche the subject, the thinner the forum posts get. Bucking the downward trend [HansLuijten] provides an astoundingly thorough set of LED strip patterns in his comprehensive post titled Arduino LED strip effects.

Don’t let the unassuming title lead you astray from the content, because what’s on offer goes beyond your average beginner tutorial on how to setup a strand of NeoPixels. [HansLuijten] is thorough to a fault; providing examples for everything from simple single color fades and classic Cylon eyes to effects that look like meteors falling from the sky. Seriously! Check out the videos on their webpage. Those chasing lights you see around theater signs? Check. Color twinkle and sparkle? Check. Color wipes and rainbow fades? Check, and check. Continue reading “An LED Effect For Every Occasion”