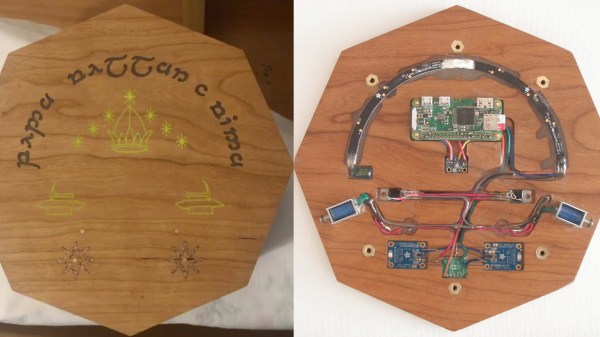
The octagonal wooden box described in the project. On the left, outer surface of the box is shown, with "Say Friend And Come In" inscription, as well as a few draings (presumably from Lord of The Rings) and two metallic color stars that happen to serve as capacitative sensor electrodes. On the right, underside of the lid is shown, with all the electronics involved glued into CNC-machined channels.

Say Friend And Have This Box Open For You

Handcrafted gifts are special, and this one’s no exception. [John Pender] made a Tolkien-inspired box for his son and shared the details with us on Hackaday.io. This one-of-a-kind handcrafted box fulfills one role and does it perfectly – just like with the Doors of Durin, you have to say ‘friend’ in Elvish, and the box shall unlock for you.

This box, carefully engraved and with attention paid to its surface finish, stands on its own as a gift. However, with the voice recognition function, it’s a project complicated enough to cover quite a few fields at once – woodworking, electronics, and software. The electronics are laid out in CNC-machined channels, and LED strips illuminate the “Say Friend And Come In” inscriptions once the box is ready to listen. If you’re wondering how the unlocking process works, the video embedded below shows it all.

Two solenoids keep the lid locked, and in its center is a Pi Zero, the brains of the operation. With small batteries and a power-hungry board, power management is a bit intricate. Two capacitive sensors and a small power management device are always powered up. When both of the sensors are touched, a power switch module from Pololu wakes the Pi up. It, in turn, takes its sweet time, as fully-fledged Linux boards do, and lights up the LED strip once it’s listening.

Continue reading “Say Friend And Have This Box Open For You” →
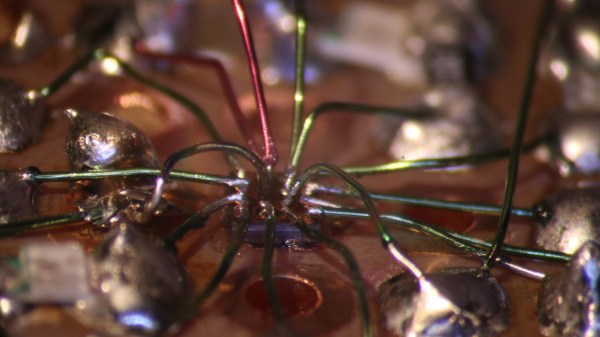
The BGA chip in question flipped onto a piecce of breadboard, all its pins broken out with magnet wire.

Heroic Efforts Give Smallest ARM MCU A Breakout, Open Debugger

In today’s episode of Diminutive Device Technology Overview, [Sprite_TM] is at it again – this time conquering the HC32L110. A few weeks ago, we have highlighted the small ARM Cortex M0+ microcontroller, which is outstanding because of its exceptionally small size. We also pointed out a few hurdles, among them – hard-to-approach SDK and documentation, and difficulties making and assembling a PCB for such a small BGA. Today, we witness how [Sprite_TM] bulldozed through all of these hurdles for all of us, and added a few pictures to our collective “outrageous soldering” galleries while at it.

First, he figured out an example layout for this MCU that’s achievable for us even on a cheapest 2-layer board from JLCPCB, keeping distances within the generic tolerance standards by snubbing out a few pins. As a result, we only lose access to four GPIOs – those will have to be kept as inputs, so that nothing burns out. However, that’s the kind of tradeoff we are okay making if it helps us keep our PCB small and lightweight for projects where these factors matter. After receiving the resulting board, he also recorded a short tutorial on soldering such packages at home with a mere hot air gun and a few bare necessities like flux and tweezers – embedded below.

It doesn’t end there, however, as he decided to work around the GPIO fanout limitation in a non-intended way. Evidently, [Sprite_TM] decided to have some fun, taking a piece of regular 0.1″ spacing protoboard and deadbugging the chip with magnet wire, much to our amusement. The resulting contraption, pictured above, worked – and this is ever something you’d like to be able to achieve yourself in times of dire need, whether you make something work or simply to be entertained by making use of a cursed mounting technique, there’s an one-hour-long livestream recording of how this magnet wire contraption came to be. And, of course, that wasn’t the last thing to be shared.

Continue reading “Heroic Efforts Give Smallest ARM MCU A Breakout, Open Debugger” →

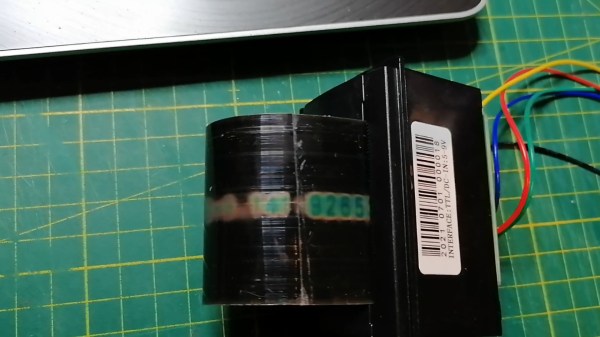
Thermal printer with a loop of thermochromic foil inserted in it, printing digits of Pi on the loop.The digits gradually disappear from the foil as it exits the printer.

Celebrating The Infinity Of Pi Day With Thermochromic Foil

It might take you some time to understand what’s happening in the video that Hackaday alum [Moritz Sivers] shared with us. This is [Moritz]’s contribution for this year’s Pi Day – a machine that shows digits of Pi in a (technically, not quite) infinite loop, and shows us a neat trick we wouldn’t have thought of.

The two main elements of this machine are a looped piece of thermochromic foil and a thermal printer. As digits are marked on the foil by the printer’s heating element, they’re visible for a few seconds until the foil disappears from the view, only to be eventually looped back and thermally embossed anew. The “Pi digits calculation” part is offloaded to Google’s pi.delivery service, a π-as-a-Service endpoint that will stream up to 50 trillion first digits of Pi in case you ever need them – an ESP8266 dutifully fetches the digits and sends them off to the thermal printer.

This machine could print the digits until something breaks or the trillions of digits available run out, and is an appropriate tribute to the infinite nature of Pi, a number we all have no choice but to fundamentally respect. A few days ago, we’ve shown a similar Pi Day tribute, albeit a more self-sufficient one – an Arduino calculating and printing digits of Pi on a character display! We could’ve been celebrating this day for millennia, if Archimedes could just count a little better.

Continue reading “Celebrating The Infinity Of Pi Day With Thermochromic Foil” →

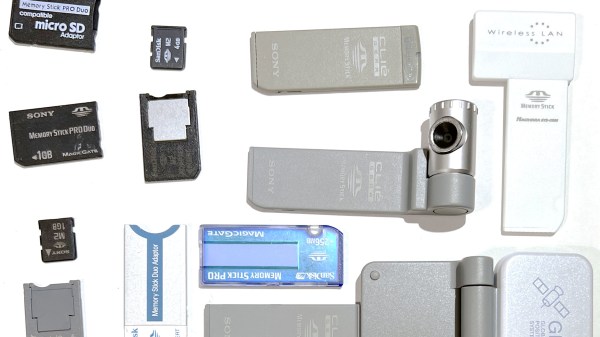
An assortment of MemoryStick cards and devices, some of them, arguably cursed, like a MemoryStick-slot-connected camera.

Hacker Challenges MemoryStick To A Fight And Wins

It’s amazing when a skilled hacker reverse-engineers a proprietary format and shares the nitty-gritty with everyone. Today is a day when we get one such write-up – about MemoryStick. It is one of those proprietary formats, a staple of Sony equipment, these SD-card-like storage devices were evidently designed to help pad Sony’s pockets, as we can see from the tight lock-in and inflated prices. As such, this format has always remained unapproachable to hackers. No more – [Dmitry Grinberg] is here with an extensive breakdown of MemoryStick protocol and internals.

If you ever want to read about a protocol that is not exactly sanely designed, from physical layer quirks to things like inexplicable large differences between MemoryStick and MemoryStick Pro, this will be an entertaining read for hackers of all calibers. Dmitry doesn’t just describe the bad parts of the design, however, as much as that rant is entertaining to read – most of the page is taken by register summaries, struct descriptions and insights, the substance about MemoryStick that we never got.

One sentence is taken to link to a related side project of [Dmitry] that’s a rabbithole on its own – he has binary patched MemoryStick drivers for PalmOS to add MemoryStick Pro support to some of the Sony Clie handhelds. Given the aforementioned differences between non-Pro and Pro standards, it’s a monumental undertaking for a device older than some of this site’s readers, and we can’t help but be impressed.

To finish the write-up off, [Dmitry] shares with us some MemoryStick bit-banging examples for the STM32. Anyone who ever wanted to approach MemoryStick, be it for making converter adapters to revive old tech, data recovery or preservation purposes, or simply hacker curiosity, now can feel a bit less alone in their efforts.

We are glad to see such great hacking on the MemoryStick front – it’s much needed, to the point where our only article mentioning MemoryStick is about avoiding use of the MemoryStick slot altogether. [Dmitry] is just the right person for reverse-engineering jobs like this, with extensive reverse-engineering history we’ve been keeping track of – his recent reverse-engineering journey of an unknown microcontroller in cheap E-Ink devices is to behold.

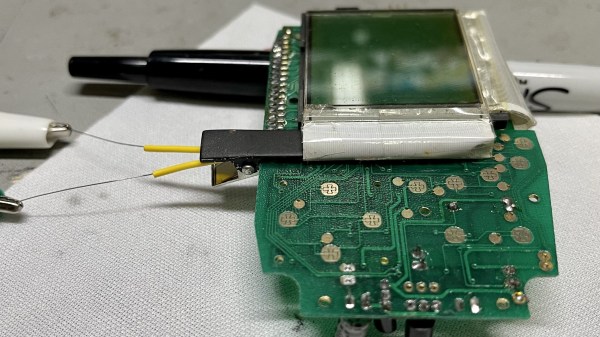
The hairclip-embedded tool being used on a Tiger 99x game console, clipped onto a spot where the plastic ribbon meets the LCD panel itself, heating it up

World’s Smallest Hair Straightener For Fixing Old LCD Ribbons

[Stephen] writes to us about an LCD repair tool he has created. We’ve all seen old devices with monochrome LCDs connected by thin film, where connections between the PCB and the LCD have deteriorated and the LCD would no longer show parts of the picture. This is a connection heating gadget, that [Stephen] affectionately dubs as World’s Smallest Hair Straightener, made specifically to bring cool old tech back to life.

A resin-printed mold houses a coil of Kanthal wire, easy to source and simple to make. He reuses a hair clip as a housing for the heating element, which also provides pressure needed to squish the film-printed conductive traces into the LCD as the adhesive melts. High-temperature epoxy brings the two together, and with a variable power supply, this tool successfully brought an old Tiger 99x handheld back to life.

This hack was made possible, in part, because of [JohnDevin Duncan] in Hackaday comment section sharing his experience on repairing LCD ribbons back in 2015, giving valuable insights on the problem that we initially thought would be solve-able with a soldering iron. The knowledge shared was distilled by [Stephen] into a tool that we all can now use when we encounter a device we really, really want to revive.

Last time we covered this topic, quite a few hackers popped up with their stories and suggestions. Old game console fix stories are a staple here on Hackaday, a few pop to mind – this high-effort trace repair of a water-damaged GameBoy cartridge, a badly designed NES cartridge socket reinvention, and this GameBoy LCD sunburn damage restoration guide.

Three flowers in a corner of a darkened room, shining in different colors.

LED Flower Bouquet Is A Radiant Hacker Desk Decoration

[Jeremy Cook] writes to us about a project of his – a bouquet of LED cube flowers. The flowers are PCB cubes made out of small castellated PCBs, each of those having an individually addressable LED in its center. Castellations hold the cubes together mechanically, and thanks to a cleverly chosen pinout, only two different kinds of PCB need to be ordered for building such a flower!

As a vase for these flowers, he decided to use a glass bottle – which would need a cutout to fit a ESP8266-powered NodeMCU board, a controller of choice for the project. After a few different approaches for cutting glass all resulted in the bottles cracking, he gave up on the “clean cut” idea and reused one of the broken bottles, gluing it back together well enough for the aesthetic to work.

[Jeremy] tells us that he’s had help from a hack we covered back in 2017 – using a diode for level shifting, as the ESP8266’s 3.3 V level signals aren’t a good match for WS2812 inputs. From there, the WLED firmware for the ESP8266 ties everything together beautifully. It’s clear that [Jeremy] had a field day designing this, toying with all the ideas and approaches!

Colorful LEDs are a must-have for decorating hacker homes. From a bouquet of flowers, you might find yourself sketching a castellated PCB tile design, and next thing you know, you’ve created a beautiful system of LED triangle tiles. Some PCB fabs scoff at castellations, and if that’s the case, you might as well finish the job yourself.

Continue reading “LED Flower Bouquet Is A Radiant Hacker Desk Decoration” →

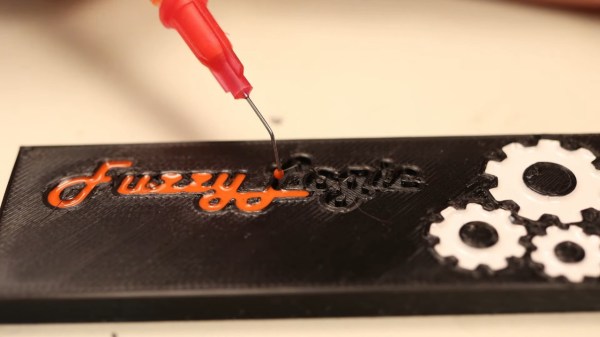
Syringe with diluted nail polish used to fill into cursive "FuzzyLogic" letters extruded into a surface of a 3D-printed block of plastic, as a demonstration.

Brighten Up Your Prints With This Nail Polish Approach

It’s not enough to 3D-print a part – there’s a myriad of things you can do from there! [FuzzyLogic] shows us his approach of adding inlay labels, icons and text to a 3D print, by extruding them into the print and filling the resulting cavity with nail polish! This makes for colorful and useful prints, as opposed to dull single-color parts we typically end up with.

The devil’s in the details, and [FuzzyLogic] has got the details down to a technique. Nail polish has to be diluted with acetone so that it flows well, and a particular combination of syringe and needle will be your friend here. Of course, don’t forget to factor surface tension in – even with well-diluted nail polish, you cannot make the grooves too thin. A bit more acetone on a q-tip helps in case of any happy little accidents, and a coat of clear acrylic spray paint seals the lettering firmly in place. The five-minute video tells you all about these things and a quite few more, like the basics of extruding text and icons in a typical CAD package, and has a bit of bonus footage to those watching until the end.

Adding markings to our prints is a lovely finishing touch! If you’re looking for more of that, here’s a custom tool-changing printer with a pen attachment making beautiful custom enclosures for the Pocket Operator.

Continue reading “Brighten Up Your Prints With This Nail Polish Approach” →