Raspberry Pi Hitches A Ride In A 1989 BMW Dashboard

It probably won’t surprise you to find out that a 1989 BMW 325i doesn’t have much in the way of electronic gadgetry onboard. In fact, what passes for an in-dash “computer” in this vintage Beemer is just a digital clock with a rudimentary calendar function. Not content to waste his precious dashboard space any longer, [Ryan Henderson] used his time in quarantine to replace the clock module with a Raspberry Pi.

Nestled in a custom laser-cut housing is a touch screen LCD module that connects directly to the GPIO header of a Pi Zero. Combined with some Python code, this provides a very slick multipurpose interface for pretty much anything [Ryan] wants. Right now he’s got it hooked up to a GPS receiver so he can figure out things like speed and acceleration, but the only real limit on what this little drop-in upgrade can do is how much code you want to sit down and write.

Thankfully, it sounds like [Ryan] has done a lot of the hard work for you. He’s put together a Python library that allows the user to easily draw analog gauges on the screen. The faces are parametrically sized, and even have custom minimum/maximum marks. Of course if you’d rather just throw some text and images on the screen, that’s accomplished easily enough with existing libraries such as PyGame.

[Ryan] says he’s also working on some code to better integrate the Pi into the vehicle’s systems by way of a Bluetooth OBD2 adapter. In the most basic application that would allow you to throw various bits of engine data up on the screen, but on more modern cars, you could potentially tap into the CAN bus and bend it to your will.

While the physical size and shape of this particular modification is clearly focused on this model and year of BMW, the general concepts could be applied to any car on the road. [Ryan] has recently started a GitHub repository for the project and hopes to connect with others who are interested in adding a little modern complexity convenience to their classic rides.

The reality is that cars become more dependent on their onboard computers with each passing year. Already we’re seeing Tesla owners struggle with cooked flash chips, and things are likely to get worse before they get any better. While undoubtedly there are some that would rather keep their daily driver as simplistic as possible, we’re encouraged by projects like this that at least let owners computerize their cars on their own terms.

NRF52 Weather Station Gives Forecast With Style

We’re no strangers to DIY environmental monitors around these parts, in fact, it seems like that’s one of the most common projects hackers take on when confronted with the power of a modern Internet-connected microcontroller. But among such projects, this miniature nRF52-based weather station built by [Andrew Lamchenko] is among the most polished we’ve seen.

Externally, this looks as though it could easily be a commercial product. The graphical interface on the ePaper display is very well designed, delivering plenty of data while still looking attractive enough to hang in the kitchen. The enclosure is 3D printed, but [Andrew] poured enough elbow grease into sanding and polishing the front that you might not realize it at first glance.

Internally it uses the popular BME280 sensor to detect temperature, humidity, and barometric pressure, though the custom PCB is also compatible with the similar SI7021 and HTU21D sensors if you want to switch things up.

That said, you really want the ability to measure pressure, as it allows the firmware to do its own basic weather forecasting. All the collected data is beamed out over Bluetooth Low Energy (BLE), where it can be collected by the open source MySensors IoT framework, but we imagine it wouldn’t take much work to integrate it into your home automation system of choice.

As excited as we might be about the prospect of repurposing things such as electronic shelf labels, we’re happy to see the prices for general purpose electronic paper screens finally dropping to the point where projects of this caliber are within the means of the hacker crowd.

Continue reading “NRF52 Weather Station Gives Forecast With Style”

Roomba Gets Alexa Support With An ESP8266 Stowaway

The modern home is filled with plenty of “smart” devices, but unfortunately, they don’t always speak the same language. The coffee maker and the TV might both be able to talk to your phone through their respective apps, but that doesn’t necessarily mean the two appliances can work together to better coordinate your morning routine. Which is a shame, since if more of these devices could communicate with each other, we’d be a lot closer to living that Jetsons life we were promised.

Luckily, as hardware hackers we can help get our devices better acquainted with one another. A recent post by [MyHomeThings] shows how the ESP8266 can bridge the gap between a Roomba and Amazon’s Alexa assistant. This not only allows you to cheaply and easily add voice control to the robotic vacuum, but makes it compatible with the Amazon’s popular home automation framework. This makes it possible to chain devices together into complex conditional routines, such as turning off the lights and activating the vacuum at a certain time each night.

The hack depends on the so-called Roomba Open Interface, a seven pin Mini-DIN connector that can be accessed by partially disassembling the bot. This connector provides power from the Roomba’s onboard batteries as well as a two-way serial communications bus to the controller.

By connecting a MP1584EN DC-DC converter and ESP8266 to this connector, it’s possible to send commands directly to the hardware. Add a little glue code to combine this capability with a library that emulates a Belkin Wemo device, and now Alexa is able to stop and start the robot at will.

We’ve seen this sort of trick used a few times before to add backdoor Alexa support to various gadgets, and it’s always interesting to see what kind of unusual hardware folks are looking to make an integral part of their smart home.

Teardown: Go Warmer USB Rechargeable Hand Heater

Under normal circumstances, if an electronic gadget in your pocket suddenly became hot to the touch, it would be cause for alarm. But not so with the Go Warmer. This lozenge shaped device is not only a USB power bank that can keep your mobile devices topped up, but is also doubles as a miniature heater that the manufacturer claims can bring its surface temperature up to 48 °C (120 °F) for several hours. You can hold in in your hand, put it in your pocket, maybe even sit on it if you’re particularly daring. The possibilities are endless, at least until the 4,000 mAh battery runs down.

For $14.99 USD, the Go Warmer certainly isn’t much of a deal when compared to other battery packs. Even if it does come with a swanky velveteen carrying pouch. But is it a good deal for one that can heat itself up without exploding? Let’s crack this metallic egg and find out.

Continue reading “Teardown: Go Warmer USB Rechargeable Hand Heater”

Explore The Cosmos With This DIY Digital Telescope

Getting a closer look at the Moon isn’t particularly difficult; even an absolute beginner can point a cheap telescope towards our nearest celestial neighbor and get some impressive views. But if you’re looking to explore a bit farther, and especially if you want to photograph what you find out there amongst the black, things can get complicated (and expensive) pretty quick.

While building this 3D printed automated telescope designed [Greg Holloway] isn’t necessarily cheap, especially once you factor in what your time is worth, the final product certainly looks to be considerably streamlined compared to most of what’s available in the commercial space. Rather than having to lug around a separate telescope, tripod, motorized tracker, and camera, you just need this relatively compact all-in-one unit.

It’s taken [Greg] six months to develop his miniature observatory, and it shows. The CAD work is phenomenal, as is the documentation in general. Even if you’re not interested in peering into the heavens, perusing the Instructables page for this project is well worth your time. From his tips on designing for 3D printing to information about selecting the appropriate lens and getting it mated to the Raspberry Pi HQ Camera, there’s a little something for everyone.

Of course if you are looking to build your own motorized “GOTO” telescope, then this is must-read stuff. [Greg] has really done his homework, and the project is a fantastic source of information about motor controllers, wiring, hand controllers, and the open source firmware you need to tie it all together. Many of the ideas he’s outlined here could be applicable to other telescope projects, or really, anything that needs to be accurately pointed to the sky. If you’d like to get started with night sky photography and aren’t picky about what kind of things you capture, we’ve seen a number of projects that simply point a camera towards the stars and wait for something to happen.

[Thanks to Eugene for the tip.]

Get Apple To Track Your Bluetooth Devices For You

Apple’s “Find My” service allows users to track their missing devices by leveraging a worldwide network of location-aware iGadgets. With millions of iPhones and Macs out in the wild listening for the missing device’s Bluetooth advertisements and relaying their findings to the Cupertino Mothership, it’s a highly effective way of tracking hardware so long as it stays in relatively urban areas. Unfortunately, the system is completely proprietary and non-Apple devices aren’t invited to play.

Or at least, that used to be the case. A project recently released by the [Secure Mobile Networking Lab] called OpenHaystack demonstrates how generic devices can utilize Apple’s Find My network by mimicking the appropriate Bluetooth Low Energy (BLE) broadcasts. Currently they have a firmware image for the BBC micro:bit, as well as a Python script for Linux, that will allow you to spin up an impromptu Find My target. But the team has also published all the information required to implement similar functionality on other BLE-capable devices and microcontrollers, so expect the list of supported hardware to grow shortly.

Diagram showing how the Apple Find My system works
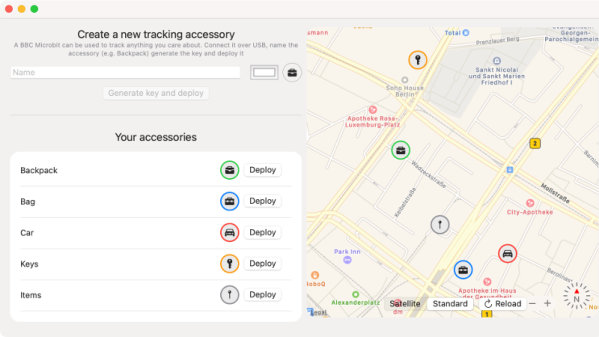
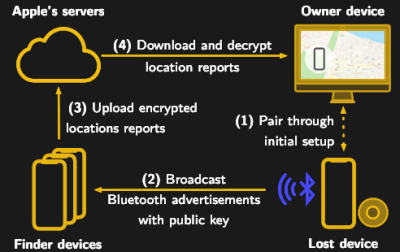
Somewhat ironically, while OpenHaystack allows you to track non-Apple devices on the Find Me tracking network, you will need a Mac computer to actually see where your device is. The team’s software requires a computer running macOS 11 (Big Sur) to run, and judging by the fact it integrates with Apple Mail to pull the tracking data through a private API, we’re going to assume this isn’t something that can easily be recreated in a platform-agnostic way. Beyond the occasional Hackintosh that might sneak in there, it looks like Tim Cook might have the last laugh after all.

It’s not immediately clear how difficult it will be for Apple to close this loophole, but the talk of utilizing a private API makes us think there might be a built-in time limit on how long this project will be viable. After all, Big Tech doesn’t generally approve of us peons poking around inside their machinations for long. Though even if Apple finds a way to block OpenHaystack, it’s expected the company will be releasing “AirTags” sometime this year which will allow users to track whatever objects they like through the system.

RetroArch Open Hardware Aims For Plug-and-Play

At its core, the RetroArch project exists to make it easier to play classic games on more modern hardware. The streamlined front-end with its tailored collection of emulators helps take the confusion out of getting your favorite game from decades past running on whatever gadget you please, from your smartphone to the venerable Raspberry Pi. But there’s always room for improvement.

In a recent blog post, the folks behind RetroArch took the wraps off of an exciting hardware project that’s been in the works for about a year now. Referred to simply as “RetroArch Open Hardware”, the goal is to develop a fully open source cartridge adapter that will integrate seamlessly with the RetroArch software. Just plug in your original cartridge, and the game fires right up like back in the good old days.

Now to be clear, this isn’t exactly a new idea. But the team at RetroArch explain that previous devices that blurred the line between hardware and emulation have been expensive, hard to find, and worst of all, proprietary. By creating an open hardware project, they hope to truly unleash this capability on the community. Instead of having to deal with one vendor, multiple companies will be free to spin up their own clones and potentially even improve the core design. Should none of the ones on the market fit your particular needs, you’d even be free to build your own version,

What’s more, the gadget will also make it easier to create your own ROMs from cartridges you own. By appearing to the operating system as a USB Mass Storage device, users can literally drag and drop a game ROM to their computer’s desktop. No arcane software fired off from the command line; as much as we might enjoy such things, it’s not exactly intuitive for the gaming community at large. The same technique will also allow users to backup their saved progress before it’s inevitably lost to the ravages of time. The device demonstrated by the team currently only works on Nintendo 64 games, but presumably compatibility with be expanded to other cartridges in the future.

Over the years, we’ve seen a number of hombrew devices designed to read and copy game cartridges. We’ve even seen some rather polished examples that were released as open hardware. But those devices never had the public backing of such a well known group in the emulation scene, and we’re excited to see what kind of development and adoption can be spurred on by this level of legitimacy.

[Thanks to Nick for the tip.]