Drill Jig Helps Mount WeMos D1 Mini

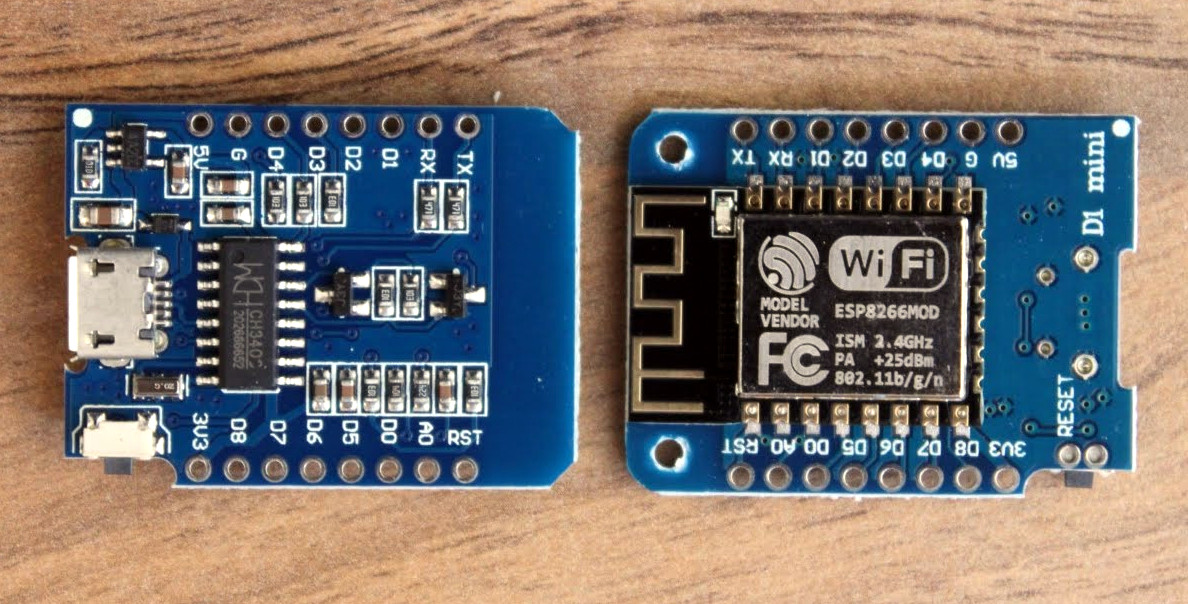
As far as ESP8266 boards go, the WeMos D1 Mini is a great choice if you’re looking to get started with hackerdom’s microcontroller du jour. It’s small, well supported, and can be had ridiculously cheap. Often going for as little as $3 USD each, we buy the things in bulk just to have spares on hand. But that’s not to say it’s a perfect board. For one, it lacks the customary mounting holes which would allow you to better integrate it into finished products.

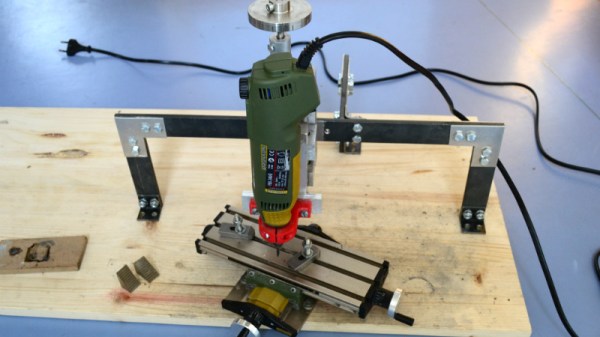
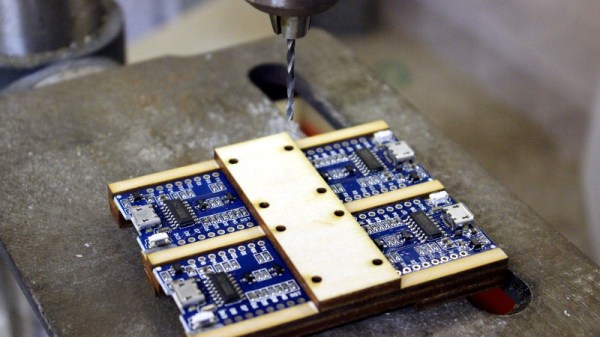
This minor annoyance was enough to spring [Martin Raynsford] into action. He noticed there was some open area on the D1 Mini’s PCB where it seemed he could drill through to add his own mount points, but of course popping holes in a modern PCB can be risky business. There’s not a lot of wiggle room between success and heartbreak, and it’s not like the diminutive D1 Mini is that easy to hold down to begin with. So he designed a laser-cut jig to allow him to rapidly add mounting holes to his D1 Mini’s assembly line style.

For those who might be skeptical, [Martin] reports he’s seen no adverse effects from drilling through the board, though does admit it’s possible the close proximity of the metal screw heads to the ESP8266’s antenna may have a detrimental effect. That said, he’s tested them in his projects out to 25 m (82 feet) with no obvious problems. He’s using a 2 mm drill bit to make his hole, and M2 x 6 mm machine screws to hold the boards down.

The jig design is released as a SVG and DXF for anyone with a laser cutter to replicate, but it shouldn’t be too difficult to extrude those designs in the Z dimension for hackers who haven’t yet jumped on the subtractive manufacturing bandwagon.

When a project makes the leap from prototype to in-house production, designing and building jigs become an essential skill. From flashing firmware to doing final checkout, the time and effort spent building a jig early on will pay for itself quickly in production.

Maker Faire NY: Developing For The Final Frontier

The cost of getting a piece of hardware into space is now cheaper than ever, thanks in no small part to the rapid progress that’s been made by commercial launch providers such as SpaceX. In the near future, as more low-cost providers come online, it should get even cheaper. Within a few years, we could be seeing per kilogram costs to low Earth orbit that are 1/10th what they were on the Space Shuttle. To be sure, this is a very exciting time to be in the business of designing and building spacecraft.

But no matter how cheap launches to orbit get, it’ll never be cheaper than simply emailing some source code up to the International Space Station (ISS). With that in mind, there are several programs which offer students the closest thing to booking passage on a Falcon 9: the chance to develop software that can be run aboard the Station. At the 2018 World Maker Faire in New York we got a chance to get up close and personal with functional replicas of the hardware that’s already on orbit, known in space parlance as “ground units”.

On display was a replica of one of the SPHERES free-flying satellites that have been on the ISS since 2006. They are roughly the size of a soccer ball and utilize CO2 thrusters and ultrasonic sensors to move around inside of the Station. Designed by MIT as a way to study spaceflight techniques such as docking and navigation without the expense and risk of using a full scale vehicle, the SPHERES satellites are perhaps the only operational spacecraft to have never been exposed to space itself.

MIT now runs the annual “Zero Robotics” competition, which tasks middle and high school students with solving a specific challenge using the SPHERES satellites. Competitors run their programs on simulators until the finals, which are conducted using the real hardware on the ISS and live-streamed to schools.

We also saw hardware from “Quest for Space”, which is a company offering curricula for elementary through high school students which include not only the ground units, but training and technical support when and if the school decides to send the code to the matching hardware on the Station. For an additional fee, they will even work with the school to design, launch, and recover a custom hardware experiment.

Their standard hardware is based on off-the-shelf platforms such as Arduino and LEGO Mindstorms EV3, which makes for an easy transition for school’s existing STEM programs. The current hardware in orbit is setup for experiments dealing with heat absorption, humidity, and convection, but “Quest for Space” notes they change out the hardware every two years to provide different experiment opportunities.

Projects such as these, along with previous efforts such as the ArduSat, offer a unique way for the masses to connect with space in ways which would have been unthinkable before the turn of the 21st century. It’s still up for debate if anyone reading Hackaday in 2018 will personally get a chance to slip Earth’s surly bonds, but at least you can rest easy knowing your software bugs can hitch a ride off the planet.

RTL-SDR Paves Way To Alexa Controlled Blinds

You’d be forgiven for occasionally looking at a project, especially one that involves reverse engineering an unknown communication protocol, and thinking it might be out of your league. We’ve all been there. But as more and more of the devices that we use are becoming wireless black boxes, we’re all going to have to get a bit more comfortable with jumping into the deep end from time to time. Luckily, there are no shortage of success stories out there that we can look at for inspiration.

A case in point are the wireless blinds that [Stuart Hinson] decided would be a lot more useful if he could control them with his Amazon Alexa. There’s plenty of documentation on how to get Alexa to do your bidding, so he wasn’t worried about that. The tricky part was commanding the wireless blinds, as all he had to go on was the frequency printed on the back of the remote.

Luckily, in the era of cheap RTL-SDR devices, that’s often all you need. [Stuart] plugged in his receiver and fired up the incredibly handy Universal Radio Hacker. Since he knew the frequency, it was just a matter of tuning in and hitting the button on the remote a couple times to get a good capture. The software then broke it down to the binary sequence the remote was sending out.

Now here’s where [Stuart] lucked out. The manufacturers took the easy way out and didn’t include any sort of security features, or even bother with acknowledging that the signal had been received. All he needed to do was parrot out the binary sequence with a standard 433MHz transmitter hooked up to an ESP8266, and the blinds took the bait. This does mean that anyone close enough can take control of these particular blinds, but that’s a story for another time.

We took a look at the Universal Radio Hacker a year or so back, and it’s good to see it picking up steam. We’ve also covered the ins and outs of creating your own Alexa skills, if you want to get a jump on that side of the project.

Can You “Take Back” Open Source Code?

It seems a simple enough concept for anyone who’s spent some time hacking on open source code: once you release something as open source, it’s open for good. Sure the developer might decide that future versions of the project close up the source, it’s been known to happen occasionally, but what’s already out there publicly can never be recalled. The Internet doesn’t have a “Delete” button, and once you’ve published your source code and let potentially millions of people download it, there’s no putting the Genie back in the bottle.

But what happens if there are extenuating circumstances? What if the project turns into something you no longer want to be a part of? Perhaps you submitted your code to a project with a specific understanding of how it was to be used, and then the rules changed. Or maybe you’ve been personally banned from a project, and yet the maintainers of said project have no problem letting your sizable code contributions stick around even after you’ve been kicked to the curb?

Due to what some perceive as a forced change in the Linux Code of Conduct, these are the questions being asked by some of the developers of the world’s preeminent open source project. It’s a situation which the open source community has rarely had to deal with, and certainly never on a project of this magnitude.

Is it truly possible to “take back” source code submitted to a project that’s released under a free and open source license such as the GPL? If so, what are the ramifications? What happens if it’s determined that the literally billions of devices running the Linux kernel are doing so in violation of a single developer’s copyright? These questions are of grave importance to the Internet and arguably our way of life. But the answers aren’t as easy to come by as you might think.

Continue reading “Can You “Take Back” Open Source Code?”

Building A Hardware Store Faraday Cage

Most Hackaday readers are no doubt familiar with the Faraday cage, at least in name, and nearly everyone owns one: if you’ve ever stood watching a bag of popcorn slowly revolve inside of a microwave, you’be seen Michael Faraday’s 1836 invention in action. Yet despite being such a well known device, the average hacker still doesn’t have one in their arsenal. But why?

It could be that there’s a certain mystique about Faraday cages, an assumption that their construction requires techniques or materials outside the realm of the home hacker. While it’s true that building a perfect Faraday cage for a given frequency involves math and careful attention to detail, putting together a simple model for general purpose use and experimentation turns out to be quick and easy.

As an exercise in minimalist hacking I recently built a basic Faraday cage out of materials sourced from Home Depot, and thought it would be interesting to not only describe its construction but give some ideas as to how one can put it to practical use in the home lab. While it’s hardly a perfect specimen, it clearly works, and it didn’t take anything that can’t be sourced locally pretty much anywhere in the world.

Continue reading “Building A Hardware Store Faraday Cage”

Maker Faire NY: Where Robots Come Out To Play

There was an unbelievable amount of stuff on display at the 2018 World Maker Faire in New York. Seriously, an unreal amount of fantastically cool creations from all corners of the hacker and maker world: from purely artistic creations to the sort of cutting edge hardware that won’t even be on the rest of the world’s radar for a year or so, and everything in between. If you’ve got a creative bone in your body, this is the place for you.

But if there was one type of creation that stood out amongst all others, a general “theme” of Maker Faire if you will, it was robotics. Little robots, big robots, flying robots, battling robots, even musical robots. Robots to delight children of all ages, and robots to stalk the darkest corners of their nightmares. There were robots for all occasions. Probably not overly surprising for an event that has a big red robot as its mascot, but still.

There were far too many robots to cover them all, but the following is a collection of a few of the more interesting robotic creations we saw on display at the event. If you’re the creator of one of the robots we didn’t get a chance to get up close and personal with in our whirlwind tour through the Flushing Meadows Corona Park, we only ask that you please don’t send it here to exact your revenge. We’re very sorry. (Just kidding, if you have a robot to show off drop a link in the comments!)

Continue reading “Maker Faire NY: Where Robots Come Out To Play”

A Three Axis Mill For The End Of The World

A mill is one of those things that many hackers want, but unfortunately few get their hands on. Even a low-end mill that can barely rattle its way through a straight cut in a piece of aluminum is likely to cost more than all the other gear on your bench. A good one? Don’t even ask. So if something halfway decent is out of your price range, you might as well throw caution to the wind and build one.

That’s more or less the goal behind this extremely basic three axis mill built by [Michael Langeder]. Designed around a cheap rotary tool, it’s hard to imagine a more simplistic mill. Almost all the components are stuff you could pick up from the local hardware store, or probably even the junk pile if you were really in a pinch. It won’t be the best looking piece of gear in your shop, but it’s good enough to learn the basics on and just might be able to bootstrap a second-generation mill RepRap-style.

Made out of scrap blocks of aluminum and some threaded rod, the Z axis itself represents the bulk of the work on this project. It gives the user fine control over the height of the rotary tool by way of a large knob on the top. It’s held over the work piece with some flat steel bars and corner brackets rather hastily cut out of aluminum sheet.

While the tool holder is 3D printed, you could probably hack something up out of a block of wood if you didn’t have access to a printer. The only part of the mill that’s really “cheating” is the cross slide table, but at least they can be had for relatively cheap. If you really wanted to do this with junk bin finds, you could always replicate the Z axis design for X and Y.

If you’re not looking for something quite so austere, we’ve covered slightly more advanced DIY mills in the past. You could always go in the opposite direction and put a cross slide vise on your drill press, but do so at your own risk.