Plastic Strips Protect Ball Screws On This Homebrew CNC Router

It’s a fact of life for CNC router owners — swarf. Whether it’s the fine dust from a sheet of MDF or nice fat chips from a piece of aluminum, the debris your tool creates gets everywhere. You can try to control it at its source, but swarf always finds a way to escape and cause problems.

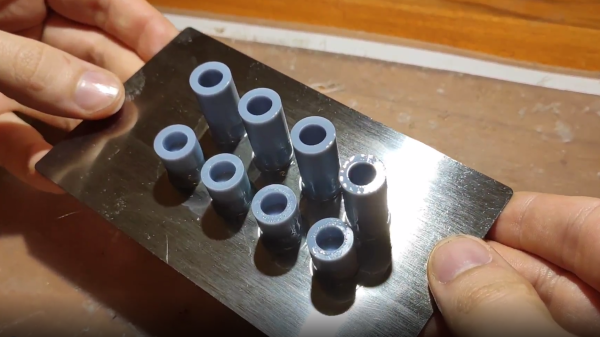
Unwilling to deal with the accumulation of chips in the expensive ball screws of his homemade CNC router, [Nikodem Bartnik] took matters into his own hands and created these DIY telescopic ball screw covers. Yes, commercial ball screw covers are available, but they are targeted at professional machines, and so are not only too large for a homebrew machine like his but also priced for pro budgets. So [Nikodem] recreated their basic design: strips of thin material wound into a tight spring that forms a tube that can extend and retract. The first prototypes were from paper, which worked but proved to have too much friction. Version 2 was made from sheets of polyester film, slippery enough to get the job done and as a bonus, transparent. They look pretty sharp, and as you can see in the video below, seem to perform well.

It’s nice to see a build progress to the point where details like this can be addressed. We’ve been following [Nikodem]’s CNC build for years now, and it really has come a long way.

Continue reading “Plastic Strips Protect Ball Screws On This Homebrew CNC Router”

The Game Boy Camera, Or: How I Learned To Stop Worrying And Love The Pixels

Never underestimate the power of nostalgia. In an age when there are more megapixels stuffed in the sensor of a smartphone camera than the average computer display can even represent, why would jagged images from a 20-year-old grayscale camera with pixels numbering in the thousands still grab attention? Maybe what’s old is new again, and the coolness factor of novelty is something that can’t be quantified.

The surprise I had last Monday when I saw my Twitter notifications is maybe only second to the feeling I had when I was invited to become a Hackaday contributor. I’d made a very simple web app which mimics a Game Boy Camera using the camera from your phone or desktop, and it got picked up by people so much that I’m amazed my web host is still holding. Let’s look at why something seemingly so simple gained so much traction.

Continue reading “The Game Boy Camera, Or: How I Learned To Stop Worrying And Love The Pixels”

The Art Of Nixies Hack Chat

Join us on Wednesday, October 28th at noon Pacific for The Art of Nixies Hack Chat with Dalibor Farný!

When they were invented in the 1950s, Nixie tubes were a huge leap forward in display technology. In the days before affordable LEDs made seven-segment displays a commodity, there were few alternatives to the charming glow of the clear and legible characters inside Nixies. Sturdy and reliable, the cold-cathode displays found their way into everything from scientific instruments to test equipment, and even some of the earliest computers and the equipment that formed the foundation of the Space Race sported the venerable tubes.

But time marches on, and a display that requires high voltage and special driver circuits isn’t long for a world where LEDs are cheap and easy to design with. Nixies fell from favor through the late 1960s and 1970s, to the point where new tubes were only being made by the Russians, until that supply dried up as well. Rediscovered by hobbyists for use in quirky clocks and other displays, any stock left over from the Nixie’s heyday are quickly being snapped up, putting the tubes on the fast track to unobtainium status.

That’s not to say that you can’t get brand new Nixie tubes, of course. Artisanal manufacturers like Dalibor Farný have taken the Nixie to a whole new level, with big, beautiful tubes that are handcrafted from the best materials. Reviving the somewhat lost art of Nixie manufacturing wasn’t easy, but the tubes that Dalibor makes in a castle in the Czech Republic now find their way into cool clocks and other builds around the world. He’ll join us on the Hack Chat to dive into the art and science of Nixies, and what’s going on with his mysterious “Project H”.

join-hack-chatOur Hack Chats are live community events in the Hackaday.io Hack Chat group messaging. This week we’ll be sitting down on Wednesday, October 28 at 12:00 PM Pacific time. If time zones baffle you as much as us, we have a handy time zone converter.

Click that speech bubble to the right, and you’ll be taken directly to the Hack Chat group on Hackaday.io. You don’t have to wait until Wednesday; join whenever you want and you can see what the community is talking about.

Continue reading “The Art Of Nixies Hack Chat”

Improved Flexible Build Plate For SLA Is Ready To Rock

The Elegoo Mars is an affordable SLA (resin-based) 3D printer, and there are probably few that have seen more mods and experimentation than [Jan Mrázek]’s machine. The final design of his DIY flexible build plate is a refinement of his original proof of concept, which proved a flexible build platform can be every bit as useful on an SLA printer as it is for FDM; instead of chiseling parts off a rigid build platform, simply pop the flexible steel sheet off the magnetic base and flex it slightly for a much easier part removal process. His original design worked, but had a few rough edges that have since been ironed out.

[Jan]’s magnetic build platform.
We love how [Jan] walks through all of the design elements and explains what worked and what didn’t. For example, originally he used a galvanized steel sheet which was easy enough to work with, but ended up not being a viable choice because once it’s bent, it stays bent. Spring steel is a much better material for a flexible build platform, but is harder for a hobbyist to cut.

Fortunately, it’s a simple job for any metal fabrication shop and [Jan] got a variety of thicknesses cut very cheaply. It turns out that the sweet spot is 0.3 mm (although 0.2 mm is a better choice for particularly fragile parts.) [Jan] also suggests cutting the sheet a few millimeters larger than the build platform; it’s much easier to peel the sheet off the magnetic base when one can get a fingertip under an edge, after all.

The magnetic base that the steel sheet sticks to is very simple: [Jan] converted a stock build platform by mounting an array of 20 x 20 x 1 mm magnets with 3M adhesive mounting tape. He was worried that resin might seep in between the magnets and cause a problem, perhaps even interfering with the adhesive; but so far it seems to be working very well. Resin is viscous enough that it never penetrates far into the gaps, and no effect on the adhesive has been observed so far.

Watch how easily parts are removed in the short video embedded below, in which [Jan] demonstrates his latest platform design.

Continue reading “Improved Flexible Build Plate For SLA Is Ready To Rock”

Xbox PlayStation Logos Wood Grain

Console Identity In The Age Of PlayStation 5 And Xbox Series

Consoles are obsolete the minute they are released. The onward march of silicon innovation ensures that consoles never are able to keep up with the times, but technical superiority rarely results in being remembered. That kind of legacy is defined by the experiences a device provides. A genre defining game, a revolutionary approach to media, or a beloved controller can be enough to sway popular opinion. But really…it all boils down to a box. All the spurious promises of world-class hardware specs, all the overly ambitious software ship dates, and even the questionable fast-food crossover promotions exist in service to the box. The boxes vying for attention in 2020 A.D. are the PlayStation 5 (PS5) and Xbox Series X/S/Seriessss (XSX or whatever the common nomenclature eventually shakes out to be). These boxes likely represent the minimum spec for the next decade in big-budget video games, however, it is the core identity of those consoles that will define the era.

Continue reading “Console Identity In The Age Of PlayStation 5 And Xbox Series”

A Teleprompter For The Rest Of Us

Sometimes it’s so easy to become tied up in a world of microcontrollers and complex mechanical linkages that we forget the simplest of hacks can be the most elegant. [Lex Kravitz]’s teleprompter is a good example, delivering the measured style of a professional addressing the studio camera to the laptop owner with a built-in camera nestled above their screen.

Just because this teleprompter is simply a mirror and a piece of clear plastic doesn’t mean that it’s a poor quality implementation though. It’s housed in a smart two-piece 3D-printed frame that hooks over the top of the monitor and locates with an area of screen into which you can place your teleprompter software. This is a world into which we haven’t previously delved, so aside from the array of Windows freeware that pops up in a Google search we found there are a few opensource offerings. There is TeleKast which appears to be no longer updated, and Imaginary Teleprompter, which even has an online version you can try in a web browser.

[Lex] is no stranger to these pages, having most recently appeared as part of our PPE testing Hack Chat.

Complete Flight Sim Controller Set With 3D Printing And Hall-Effect Sensors.

[Tom Stanton] has been playing Microsoft Flight Simulator a lot recently, and decided his old desktop joystick needed an upgrade. Instead of just replacing it with a newer commercial model, he built a complete controller system with a long joystick that pivots at floor level, integrated rudder pedals and a throttle box. You can see it in action after the break.

The throw of the joystick is limited by [Tom]’s legs and chair, with only 12° of travel in either axis, which is too small to allow for high resolution with a potentiometer. Instead, he used hall effect sensors and a square magnet for each axis, which gives good resolution over a small throw angle. The pivot that couples the two rudder pedals also makes use of a hall effect sensor, but needs more travel. To increase the size of the magnetic field, [Tom] mounted two magnets on either side of the sensor with their poles aligned. To center the rudder pedals and joystick, a couple of long tension springs were added.

The joystick (left) and rudder pedals (right) magnet configurations with a hall effect sensor.

A normal potentiometer was used in the throttle lever, and [Tom] also added a number of additional toggle switches and buttons for custom functions. The frame of the system is built with T-slot extrusions, so components can quickly moved to fit a specific user, and adjust the preload on the centering springs. All the electronic components are wired to an Arduino Micro, and thanks to a joystick library, the code is very simple.

At a total build cost of £212/$275 it’s certainly not what anyone would call cheap, but it’s less than what you’d pay for a commercial offering. All the design files and build details are linked in the second video if you want to build your own.

The flight sim controller builds are coming in thick and fast with the release of the latest MS Flight Simulator. With 3D printing you can augment an Xbox controller with a joystick and throttle, or just use tape and a few electronic components turn a desk drawer into a flight yoke.