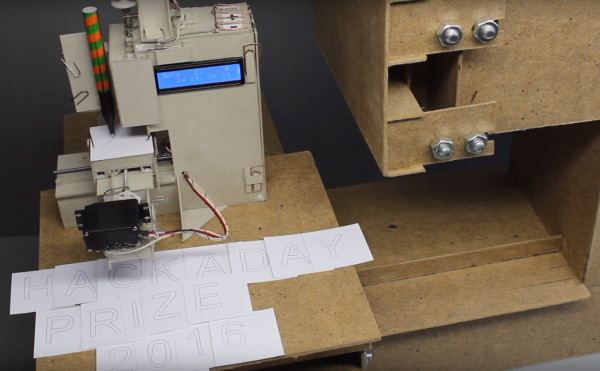
Electric Dump Truck Tricycle Is No Toy

There are some utility bicycles on the market, some with electric motors to help carry a good bit of cargo. If you really need to haul more weight than a typical grocery-getter like this, you’ll want to look into a tricycle for higher capacity loads. Nothing you’ll find will match this monstrous electric tricycle hand-built by [AtomicZombie] out of junkyard parts, though. It’s a mule.

Since [AtomicZombie] sourced most of the underpinnings of this build from the junkyard, it’s based on an old motorcycle frame combined with the differential from a pickup truck, with a self-welded frame. He’s using an electric motor and a fleet of lead acid batteries for the build (since weight is no concern) and is using a gear reduction large enough to allow him to haul logs and dirt with ease (and dump them with the built in dump-truck bed), and even pull tree stumps from the ground, all without taxing the motor.

[AtomicZombie] documented every step of the build along the way, and it’s worth checking out. He uses it as a farm tractor on his homestead, and it is even equipped with a tow hitch to move various pieces of equipment around. Unlike a similar three-wheeled electric contraption from a while back, though, this one almost certainly isn’t street legal, but it’s still a blast!

Continue reading “Electric Dump Truck Tricycle Is No Toy”

Automate The Freight: Platooning

On yet another one of those long, pointless road trips that seemed to punctuate my life starting when I got my license, I was plying the roads somewhere in eastern Pennsylvania with a friend. He told me that on long trips he’d often relieve the boredom by finding another car from the same state as his destination, and then just follow it. I wasn’t sure then how staring at the same car, hour after hour, mile after mile, would do anything but increase the boredom while making you look sort of creepy, but it seemed to work for him.

What works for college kids in cars also works for long-haul truckers, and the concept of a convoy has long been a fact of life on the road and a part of popular culture. Hardly a trip on the US Interstate goes by without seeing a least two truckers traveling in close formation, partly for companionship and mutual support but also for economic reasons. And now technology is poised to take convoying to the next level, as platooning becomes yet another way to automate the freight.

Continue reading “Automate The Freight: Platooning”

Spin Me Right Round, Baby: Generator Building Experiments For Mere Mortals

How many of you plan to build a wind-powered generator in the next year? Okay, both of you can put your hands down. Even if you don’t want to wind your coils manually, learning about the principles in an electric generator might spark your interest. There is a lot of math to engineering a commercial model, but if we approach a simple version by looking at the components one at a time, it’s much easier to understand.

For this adventure, [K&J Magnetics] start by dissect a commercial generator. They picked a simple version that might serve a campsite well, so there is no transmission or blade angle apparatus to complicate things. It’s the parts you’d expect, a rotor and a stator, one with permanent magnets and the other with coils of wire.

The fun of this project is copying the components found in the commercial hardware and varying the windings and coil count to see how it affects performance. If you have ever wound magnet wire around a nail to make an electromagnet, you know it is tedious work so check out their 3D printed coil holder with an embedded magnet to trigger a winding count and a socket to fit on a sewing machine bobbin winder. If you are going to make a bunch of coils, this is going to save headaches and wrist tendons.

They use an iterative process to demonstrate the effect of multiple coils on a generator. The first test run uses just three coils but doesn’t generate much power at all, even when spun by an electric drill. Six windings do better, but a dozen finally does the trick, even when turning the generator by hand. We don’t know about their use of cheap silicone diodes though, that seems like unintentional hobbling, but we digress.

Making turbine blades doesn’t have to be a sore chore either, and PVC may be the ticket there, you may also consider the vertical axis wind turbine which is safer at patio level. Now, you folks building generators, remember to tip us off!

Continue reading “Spin Me Right Round, Baby: Generator Building Experiments For Mere Mortals”

Shop-Made Tools Turn Cheap Steel Into Telescoping Tubes

Beginning metalworkers are often surprised at just how cheap steel can be. It’s a commodity made by the gigaton, and there are always plenty of extra pieces and scraps left over from big projects that are available for pennies a pound. But what you’ve got is often not what you need, especially when it’s steel tubing with welded seams that prevents one tube from fitting inside another.

[Jason Marburger] from Fireball Tool has some great tips for cleaning interior welds in steel tubing. The first part of the video below details manual methods for cleaning off seam welds, including chiseling, sanding with a narrow belt sander, and grinding them down with a die grinder. Those all work well, but only for short lengths of tubing. Longer tubes need special treatment, which is where the clever tools [Jason] designed come in handy.

By attaching a chunk of high-speed steel to a slug made from the next size tube down and driving it through the tube to be cleaned with a hefty piece of threaded rod, he basically created ain internal shaper to shave the weld down. It works like a charm, as does the tool he made for round tubing by laying a bead of hard facing welding rod around the edge of a mild steel slug. Driving this tool into the seamed round tubing with a shop press cleaned up the weld nicely too.

Hats off to [Jason] for coming up with a couple of great shop tips to keep in mind. We’ve seen similar expedient tools for metalworking lately, like this homemade die-punching tool and a linear track to keep your plasma cutter in line.

Continue reading “Shop-Made Tools Turn Cheap Steel Into Telescoping Tubes”

Giving The Amstrad CPC A Voice And A Drum Kit

Back in the ’80s, home computers weren’t capable of much in terms of audio or multimedia as a whole. Arguably, it wasn’t until the advent of 16-bit computers such as the Amiga that musicians could make soundtrack-quality music without having to plug actual studio gear up to their machines. [Michael Wessel] is trying to bring some of that and many more features to the Amstrad CPC with his ambitious LambdaSpeak 3 project, an expansion card built completely up from scratch and jam-packed with features.

First, and likely giving it its name, is the speech synthesizer. [Michael] has made an emulation mode where his card can act just like the original SSA-1 expansion, being able to be controlled by the same software as back then. By default, the card offers this mode with an Epson S1V30120 daughterboard (which is based on DECTalk synthesis), however for further authenticity you also have the option of fitting it with an SP0256-AL2 chip, the same one used in the original Amstrad hardware in 1985.

As for the more musical part of the project, the board supports 4-channel PCM playback, much like the Amiga’s sound offering. This can be used for a drum machine sequencer program, and it has an Amdrum mode, emulating another expansion from the original Amstrad days. Sample playback can also be used alongside the speech synthesis as shown here, with random allophone beats that wouldn’t sound out of place in a Kraftwerk recording. Finally, by using the UART interface included on the LambdaSpeak, you can also turn the CPC itself into a synth by giving it MIDI in/out and interfacing a controller in real time with the computer’s AY-3-8912 sound chip.

If you like modern expansions giving old computers new life, did you know that you can get just about any retro computer online, perhaps a TRS-80, an Amiga and even a Psion Organizer? And if you’re interested in just using old systems’ sound chips with modern USB MIDI controllers, it’s easy to make a microcontroller do all the heavy lifting.

Continue reading “Giving The Amstrad CPC A Voice And A Drum Kit”

KVM Foot Switch In A Few Steps

[Radishmouse], despite the handle, is not a mouse guy. Give him a keyboard and he will get around just fine in any OS or program. As it is, he’s got a handful of ThinkPads, each running a different OS. He wanted to be able to switch his nice mechanical keyboard between two laptops without the hassle of unplugging and replugging the thing. His solution: a DIY KVM foot switch.

He’s been learning about electronics and 3D design, and this problem was the perfect opportunity to dig in and get his hands dirty. After learning enough about the USB protocol and switches to figure out what had to happen, he made a prototype from a pâte tub. Though undeniably classy, this vessel would never survive the rigors of foot-stomping in feline territory. Fortunately, [radishmouse] has also been learning about 3D design. After some trial and error, he came up with a sturdy, curvy 3D-printed two-piece enclosure. We particularly like the blocks built into the bottom piece that shore up the USB ports.

There are lots of reasons to build input controls for those under-utilized appendages at the ends of your legs. You could control your ‘scope with a probe in each hand, or use a foot switch to relocate an inconvenient power button.

Via [r/functionalprint]

EL Wire Makes For A Great Faux-Neon Sign

Neon signs are attractive, but require specialised tools and skills for their manufacture. If you don’t have time to learn glass blowing and source the right gasses, you’re pretty much out of luck. However, EL wire can give a similar aesthetic, and with an off-the-shelf power supply it is easy to hook up and get working. [sjm4306] combined this with 3D printing for a quick and easy build.

The project starts by selecting a Nintendo 64 neon sign as a basis for the design. An image of the sign was traced in Inkscape, and an outline imported into CAD software. From there, a frame was designed with posts for the EL wire to wrap around, and holes for it to pass through to the back of the sign. The frame was then 3D printed, and laced with EL wires in the requisite colors.

The final result is impressive, with the EL wire serving as a great small-scale simulacrum of neon tubes. It’s a construction method that should scale as large as your 3D printed assemblies can go, too. If you need to get to grips with how it works, there’s a tutorial available for working with EL wire. Video after the break.

Continue reading “EL Wire Makes For A Great Faux-Neon Sign”