Get Nostalgic With These GameCube Themed Joy-Cons

There are a lot of good reasons to think fondly of the Nintendo GameCube. Metroid Prime and Rogue Leader knocked it out of the park. The Game Boy Player was cool. There’s even something to be said for having a convenient carrying handle on a system designed for couch multiplayer. But if you ask anyone who played Nintendo’s sixth generation console what part they missed the least, it would probably be the controller. With all the visual flair of a Little Tikes playset and ergonomics designed for an octopus, it’s a controller that works well for first-party Nintendo titles and little else.

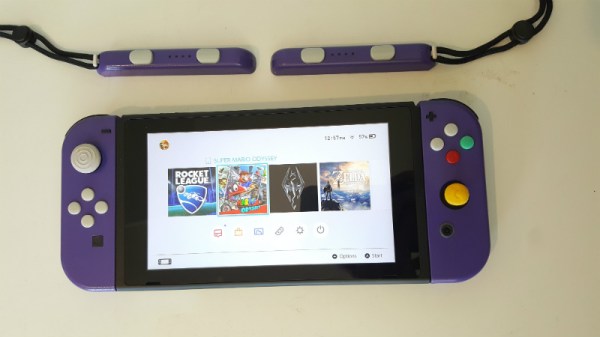
So it’s probably for the best that these Switch Joy-Cons created by [Madmorda] focus on recreating the aesthetics of the GameCube controller for Nintendo’s latest money-printing machine rather than its feel. With a surprising amount of work required to create them, these definitely count as a labor of love by someone who yearns for the days when gaming was more…cubic.

To start with, nobody makes Joy-Con cases in that signature GameCube purple so [Madmorda] had to paint them herself. The longevity of a painted controller is somewhat debatable, but the finish certainly looks fantastic right now.

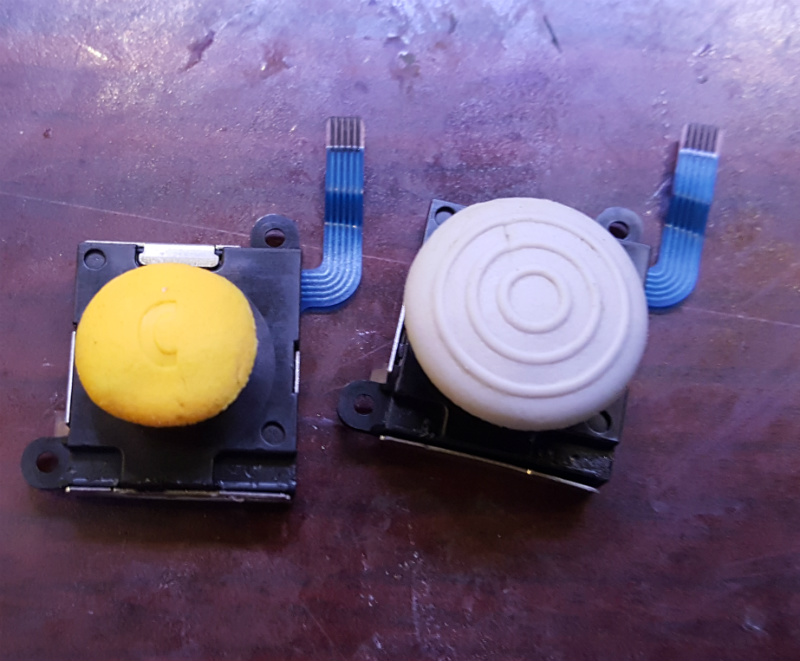
For the left analog stick [Madmorda] was able to use the cap from a real GameCube controller, which fit perfectly. Apparently, Nintendo has been pretty happy with their analog stick sizing decisions for the last two decades or so. The right analog stick was another story, however, and she had to cut the shaft down to size with a Dremel to get the cap to fit.

Finally, molds were made of the original face buttons, which were then used to cast new buttons with colored resin to match the GameCube color scheme. Since the original Switch buttons don’t have indented lettering to get picked up by the mold, she had to laser etch them. This little detail goes a long way to selling the overall look.

The final result looks great, and compared to previous attempts we’ve seen to bring some of that early 2000’s Nintendo style to the Switch, this one is certainly less destructive. Check them out in action after the break!

Continue reading “Get Nostalgic With These GameCube Themed Joy-Cons”

Gameduino + Mystorm = Oscilloscope!

There has to be more than one of us who over the years since the launch of systems like the original Game Boy have eyed up these handheld platforms and thought “You could make a really neat little oscilloscope with that!” But the commercial systems are closed-source, locked down, and proprietary, so in many cases there’s little easy prospect of such a device being created.

Fortunately though, there are now very accessible handheld gaming platforms, and [James Bowman], the creator of the Gameduino series of boards, writes in to tell us about an oscilloscope project for the Gameduino 3 created by [Lawrie Griffiths]. It uses a Mystorm FPGA board with an AN108 analogue board, and while the heavy lifting of acquisition is handled by the FPGA it is left to the Mystorm’s STM32 to talk to the Gameduino. There are a few teething troubles such as the Gameduino complaining when it is fed data too quickly, but the result is an effective 8 MHz bandwidth instrument with a touchscreen interface. He does however admit that the interface is a little fiddly at the moment. All the code is available via GitHub, so should you wish to pursue this particular avenue yourself, you can.

The Mystorm has made more than one appearance here over the years, and we’re sure we’ll see more. We saw it emulating a small OLED display to put Arduboy graphics on the big screen, for example, and implementing a complete Acorn BBC Micro home computer.

This Thermal Printer Has Serious Game

[Dhole], like the fox, isn’t the first to connect his computer to a Game Boy printer but he has done a remarkable job of documenting the process so well that anyone can follow. The operation is described well enough that it isn’t necessary to scrutinize his code, so don’t be put off if C and Rust are not your first choices. The whole thing is written like a story in three chapters.

The first chapter is about hacking a link cable between two Game Boys. First, he explains the necessity and process of setting the speed of his microcontroller, a NUCLEO-F411RE development board by STMicroelectronics. Once the rate is set, he builds a sniffer by observing the traffic on the cable and listens in on two Game Boys playing Tetris in competition mode. We can’t help but think that some 8-bit cheating would be possible if Tetris thought your opponent instantly had a screen overflowing with tetrominoes. Spying on a couple of Game Boys meant that no undue stress was put on the printer.

Chapter two built on the first chapter by using the protocol to understand how the printer expects to be spoken to. There is plenty of documentation about this already, and it is thoughtfully referenced. It becomes possible to convince a Game Boy that the connected microcontroller is a printer so it will oblige by sending an image. Since there isn’t a reason to wait for printing hardware, the transfer is nearly instantaneous. In the image above, you can see a picture of [Dhole] taken by a Game Boy camera.

The final chapter, now that all the protocols are understood, is also the climax where the computer and microcontroller convince the printer they are a Game Boy that wants to print an image. In the finale, we get another lesson about measuring controller frequency without an oscilloscope. If you are looking for the hack, there it is. There is a handful of success in the form of old receipts with superimposed grayscale images since virgin thermal printer paper by Nintendo costs as much as a used printer.

This story had a happy ending but grab your reading glasses for the smallest Game Boy and here’s someone who wrote their own Game Boy color game.

Microgamer Is A Micro:Bit Handheld Console

The BBC micro:bit single board ARM computer aimed at education does not feature as often as many of its competitors  in these pages. It’s not the cheapest of boards, and interfacing to it in all but the most basic of ways calls for a slightly esoteric edge connector. We’re then very pleased to see that edge connector turned from a liability into a feature by [Fabien Chouteau] with his handheld console, he uses micro:bits preprogrammed with different games in the manner of game cartridges in commercial consoles.

The micro:bit sits in its edge connector on the underside of a handheld PCB above a pair of AAA batteries, while on the other side are an OLED display and the usual set of pushbuttons. It’s a particularly simple board as the micro:bit contains all the circuitry required to support its peripherals.

He’s coded the games using the Arduino IDE with a modified version of the Arduboy2 library that allows him to easily port Arduboy games written for Arduino hardware. It’s a work in progress as there are a few more features to incorporate, but the idea of using micro:bits as cartridges is rather special. There is a video of the console in action, which we’ve placed below the break.

Continue reading “Microgamer Is A Micro:Bit Handheld Console”

Cramming A Pi Zero Into A Cheap Handheld Game

At this point, we’ve seen the Raspberry Pi jammed into what amounts to every retro game system, handheld or otherwise, that was ever released. While they’re always fun builds, invariably somebody will come along who is upset that the original hardware had to be gutted to create it. It seems as if with each post, a classic gaming aficionado out there has his or her heart broken just a bit more. Will no one put an end to the senseless slaughter of Game Boys?

As it so happens, not all hardware modders are such unconscionable brutes. [Starfire] recently sent his latest creation into the tip line, and it’s designed specifically to address the classic gaming massacre in which Hackaday has so shamefully been a collaborator.  His build sacrifices a portable Genesis built by AtGames, and turns it into a Raspberry Pi Zero portable running RetroPie.

Opening up the back panel of his portable Pi shows an incredible amount of hardware smashed into the tiny package. Beyond the obvious Pi Zero, there’s a iUniker 2.8-inch LCD, a 2,200 mAh battery, a two-port USB hub, a Teensy microcontroller, a USB sound card, an audio amplifier, a LiPo charging module, and a boost converter. [Starfire] measured peak power consumption to be 500 mA, which should give about a 3.5 hour run time on the 2,200 mAh battery.

This is all the more impressive when you realize the original AtGames PCB is still in the system, albeit with the center cut out for the Pi’s LCD to fit in. Rather than having to figure out a new way to handle input, [Starfire] simply connected the existing inputs to the digital pins on the Teensy and used some code to convert that into USB HID for the Pi. A few case modifications were necessary, namely the removal of the battery compartment from the back panel and covering up the original SD card slot and ports; but otherwise the finished product looks completely stock.

If you don’t mind tearing into a real Game Boy to make your portable Pi, you can check out a few of the stand out examples which we’ve covered here in the past.

Continue reading “Cramming A Pi Zero Into A Cheap Handheld Game”

The King Of All Game Genies In An Arduino

While Nintendo is making a killing on nostalgic old consoles, there is a small but dedicated group of hackers still working with the original equipment. Since the original NES was rolled out in the 80s, though, there are a few shortcomings with the technology. Now, though, we have Arduinos, cheap memory, and interesting toolchains. What can we do with this? Absolutely anything we want, like playing modern video games on this antiquated system. [uXe] added dual-port memory to his ancient NES console, opening up the door to using the NES as a sort of video terminal for an Arduino. Of course, this is now also the King of All Game Genies and an interesting weekend project to boot.

Most NES cartridges have two bits of memory, the PRG and CHR ROMs. [uXe] is breaking out the cartridge connector onto an exceptionally wide rainbow ribbon cable, and bringing it into a custom Arduino Mega shield loaded up with two 16K dual-port RAM chips. These RAM chips effectively replace the PRG and CHR ROMs Since these are dual-port RAM chips, they can be written to by the Arduino and read by the NES simultaneously.

The NES sees one port of the RAM and can read and write from it while the Arduino still has access to make changes to the other post while that’s happening. A trick like this opens up a whole world of possibilities, most obviously with tiling and other graphics tricks that can push beyond the console’s original capabilities. [uXe] is currently playing Arduboy games on the NES — a really neat trick to pull off. Well done [uXe]!

Be sure to check out the video below of the NES running some games from the Arduboy system. It seems to integrate seamlessly into the hardware, so if you’ve always had a burning desire to fix crappy graphics on some of your favorite games, or run some special piece of software on an NES, now might just be your time to shine.

Continue reading “The King Of All Game Genies In An Arduino”

SegaPi Zero Shows Game Gear Some Respect

If you were a gamer in 1991, you were presented with what seemed like an easy enough choice: you could get a Nintendo Game Boy, the gray brick with a slightly nauseating green-tinted screen that was already a couple of years old, or you could get yourself a glorious new Sega Game Gear. With full color display and games that were ported straight from Sega’s home consoles, it seemed like the Game Gear was the true future of portable gaming. But of course, that’s not how things actually went. In reality, technical issues like abysmal battery life held the Game Gear back, and conversely Nintendo and their partners were able to squeeze so much entertainment out of the Game Boy that they didn’t even bother creating a true successor for it until nearly a decade after its release.

While the Game Gear was a commercial failure compared to the Game Boy back in the 1990s and never got an official successor, it’s interesting to think of what may have been. A hypothetical follow-up to the Game Gear was the inspiration for the SegaPi Zeo created by [Halakor]. Featuring rechargeable batteries, more face buttons, and a “console” mode where you can connect it to a TV, it plays to the original Game Gear’s strengths and improves on its weaknesses.

As the name implies the SegaPi Zero is powered by the Raspberry Pi Zero, and an Arduino Pro Micro handles user input by tactile switches mounted behind all the face buttons. A TP4056 charging module and step-up converter are also hiding in there, which take care of the six 3.7 lithium-Ion 14500 batteries nestled into the original battery compartments. With a total capacity of roughly 4,500 mAh, the SegaPi Zero should be able to improve upon the 3 – 4 hour battery life that helped doom the original version.

There’s no shortage of projects that cram a Raspberry Pi into a classic game system, but more often than not, they tend to be Nintendo machines. It could simply be out of nostalgia for Nintendo’s past glories, but personally we’re happy to see another entry into the fairly short list of Sega hacks.