Casio Computer Rebuild Puts New Wine In An Old Bottle

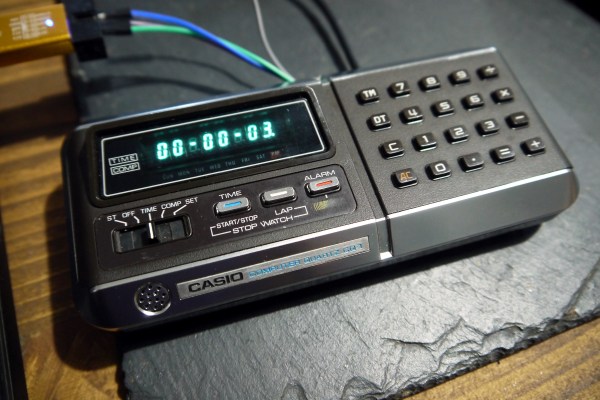
With a glut of vintage consumer electronics available from eBay it should be easy to relive your glory days, right? Unfortunately the march of time means that finding gear is easy but finding gear that works is not. So was the case when [Amen] acquired not one, but two used calculator/computer units hoping to end up with one working device. Instead, he went down the rabbit hole of redesigning his own electronics to drive the Casio QT-1 seen here.

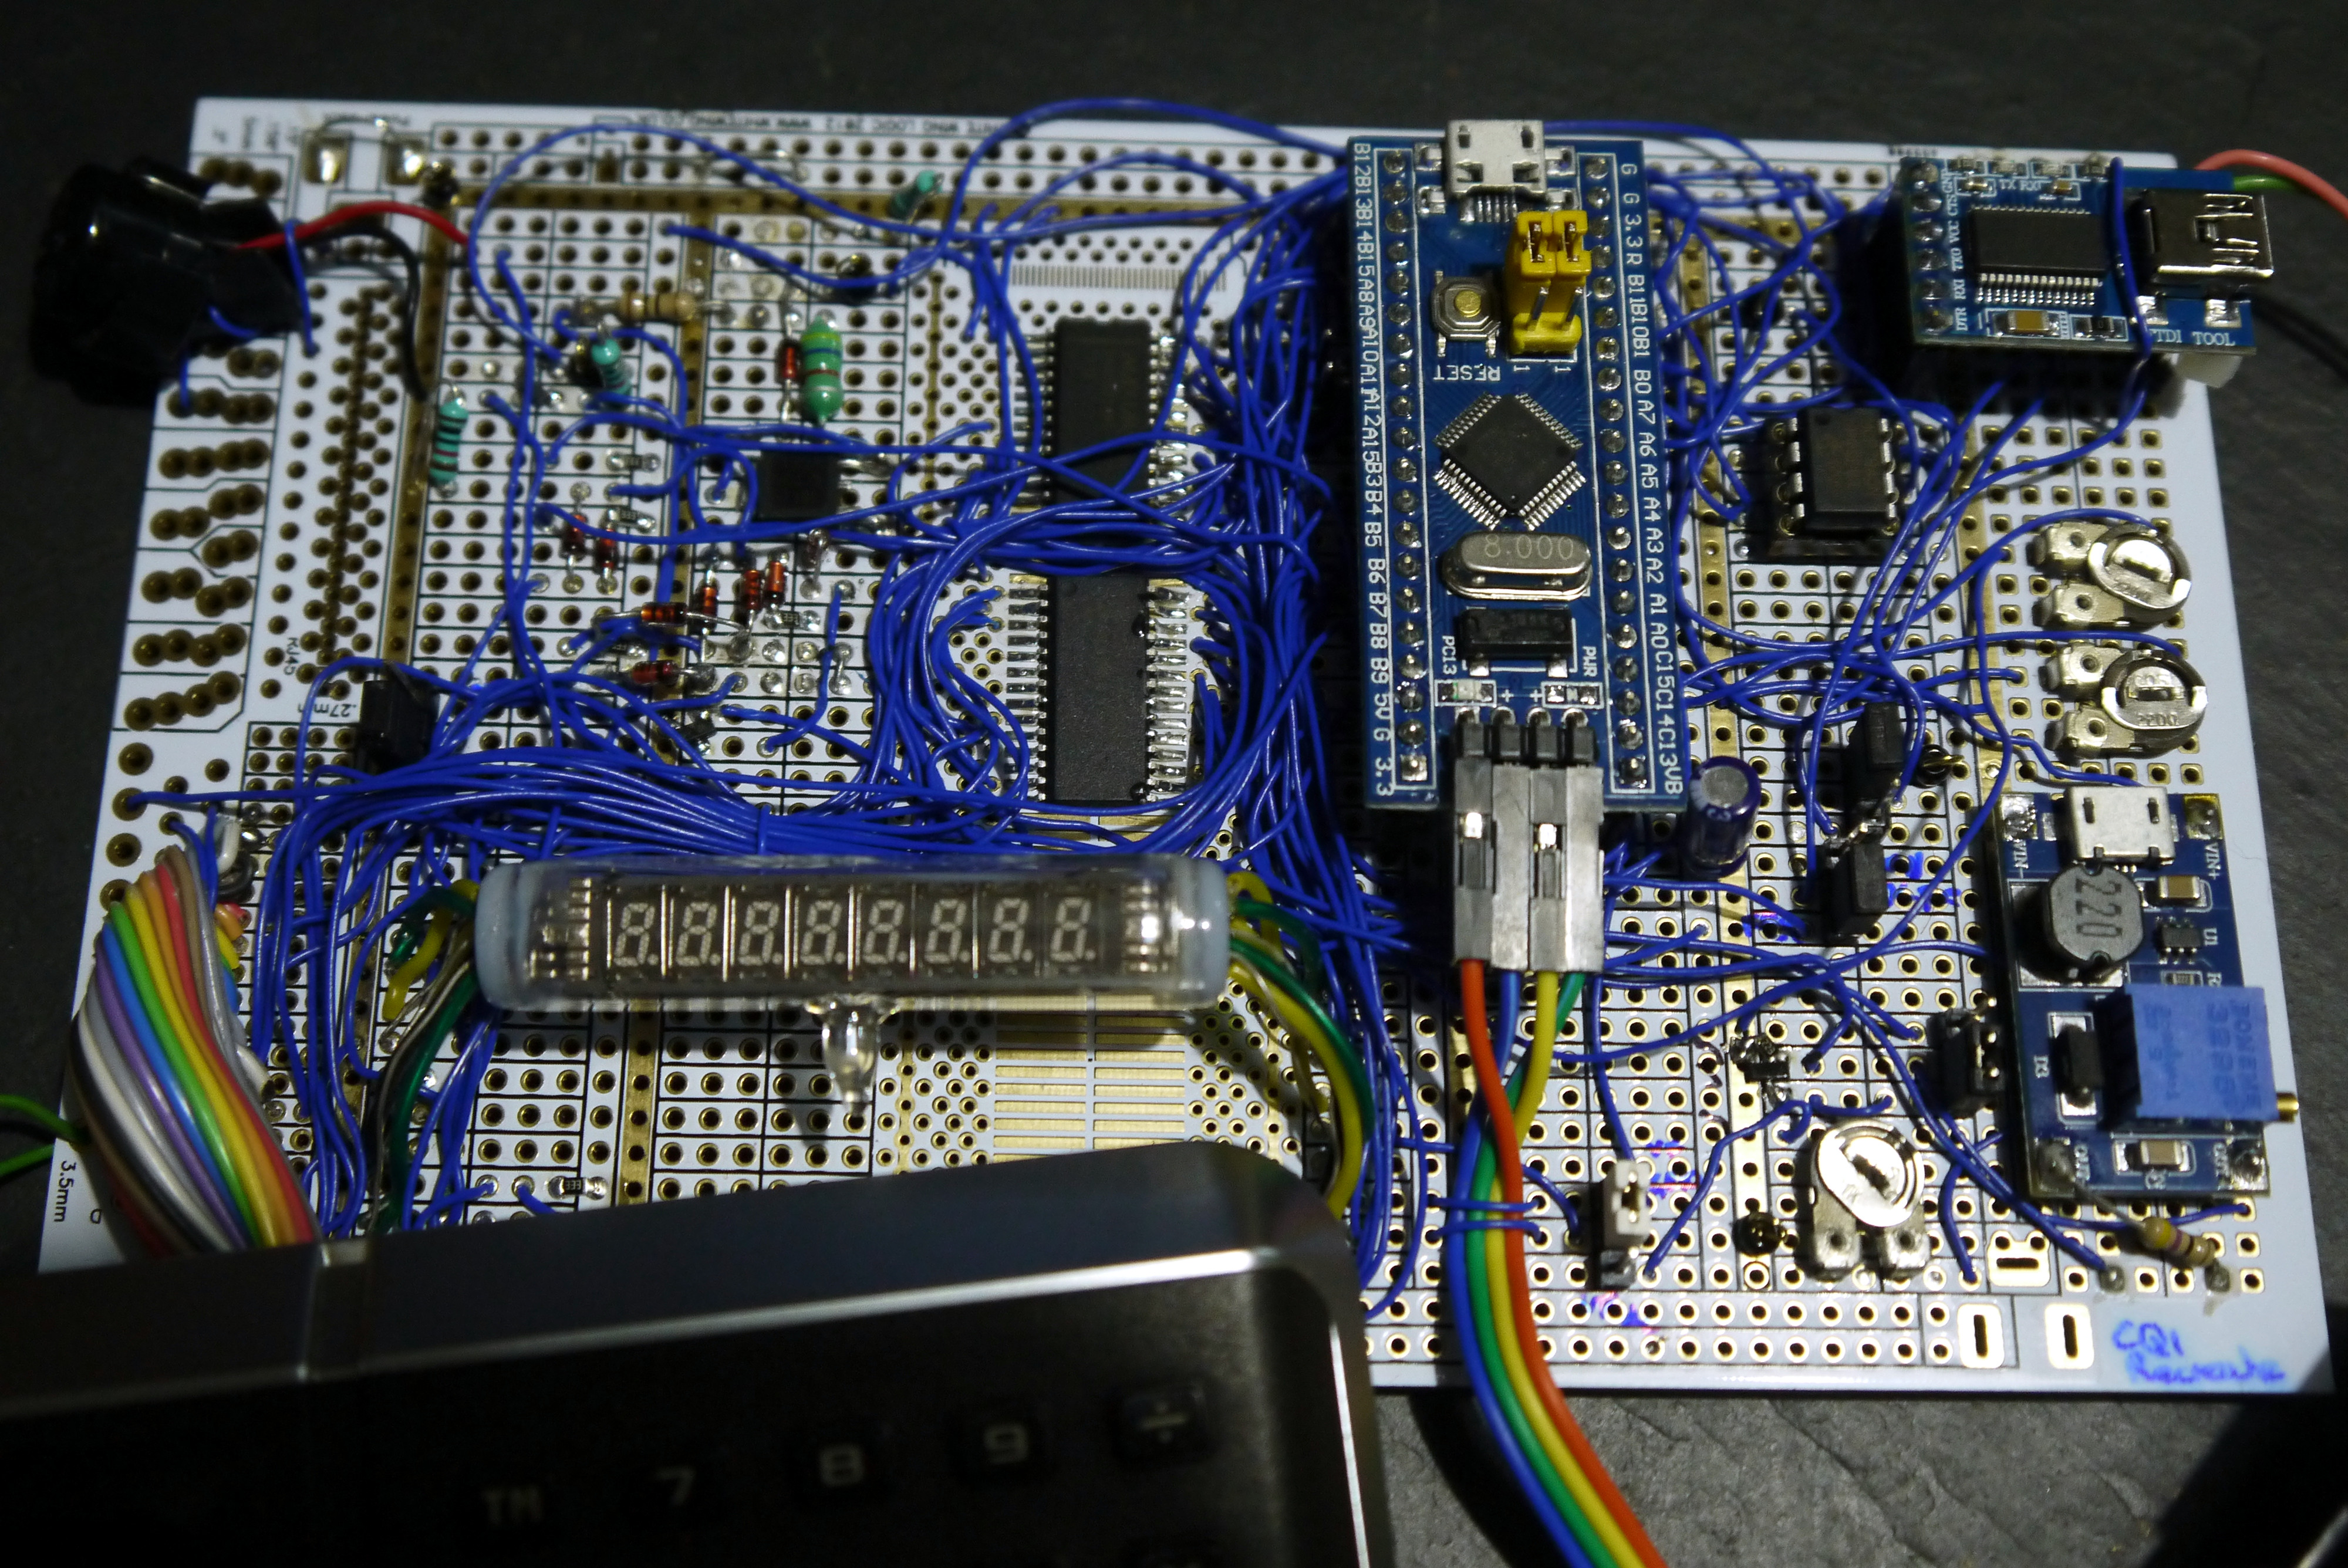
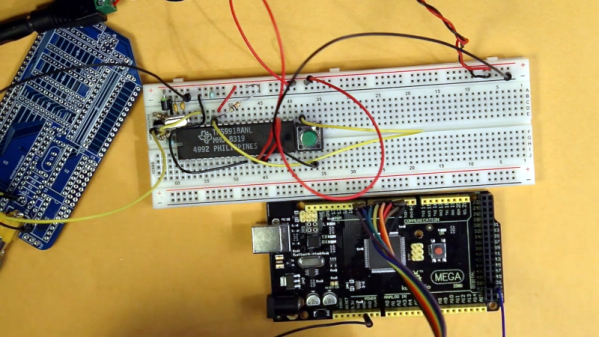
Especially interesting is the prototyping process for the replacement board. [Amen] used a “BluePill” STM32 microcontroller board at its heart, and used point-to-point soldering for the rest of the circuitry on a rectangle of protoyping board. That circuit is non-trivial, needing a 23 V source to drive the original VFD from the computer, a battery-backed real-time-clock (MCP7940), and a GPIO expander to scan the keys on the keypad.

It worked great, but couldn’t be cut down to fit in the case. The solution was a PCB designed to fit the footprint of the original. The modern guts still need more firmware work and a couple of tweaks like nudging that 23 V rail a bit higher to 26 V for better brightness, but the work already warrants a maniacal cry of “It’s Alive!”.

This isn’t [Amen’s] first rodeo. Back in March we looked in on another vintage Casio refurb that sniffed out the display protocol.

The ZX Microdrive: Budget Data Storage, 1980s Style

An enduring memory for most who used the 8-bit home computers of the early 1980s is the use of cassette tapes for program storage. Only the extremely well-heeled could afford a disk drive, so if you didn’t fancy the idea of waiting an eternity for your code to load then you were out of luck. If you had a Sinclair Spectrum though, by 1983 you had another option in the form of the unique Sinclair ZX Microdrive.

This was a format developed in-house by Sinclair Research that was essentially a miniaturized version of the endless-loop tape carts which had appeared as 8-track Hi-Fi cartridges in the previous decade, and promised lightning fast load times of within a few seconds along with a relatively huge storage capacity of over 80 kB. Sinclair owners could take their place alongside the Big Boys of the home computer world, and they could do so without breaking the bank too much.

Continue reading “The ZX Microdrive: Budget Data Storage, 1980s Style”

Commodore 64 Mini Man Makes Matching Mini Monitor

While putting together a retro computer is a great project and can teach a lot about the inner workings of electronics, hooking that 70s- or 80s-era machine up to a modern 144 Hz 1440p display tends to be a little bit anticlimactic. To really recreate the true 8-bit experience it’s important to get a CRT display of some sort, but those are in short supply now as most are in a landfill somewhere now. [Tony] decided to create a hybrid solution of sorts by 3D printing his own Commodore replica monitor for that true nostalgia feel.

This build is a matching mini scale replica of the Commodore 1702 monitor, a color monitor produced by Commodore specifically for their machines. At the time it was top-of-the-line and even included an early predecessor of the S-Video method of video signalling. This monitor was modeled in Fusion 360 and then sent to the 3D printer for assembly, then populated with a screen with a period-correct 4:3 aspect ratio, required electronics for handling the Commodore’s video signal, and even includes an upgrade over the original monitor: stereo speakers instead of the single-channel speaker that was featured in the 80s.

While this monitor doesn’t use a CRT, it’s an impressive replica nonetheless, right down to the Commodore serial number sticker on the back. If you need a Commodore 64 to go along with it, there are plenty of possibilities available to consider like this emulated C64 on a Raspberry Pi or these refurbished OEM Commodores.

Continue reading “Commodore 64 Mini Man Makes Matching Mini Monitor”

TV Output From Arduino — 1980s Style!

We’ll admit it, we’re all spoiled. A few bucks can now buy a computer that would have been the envy of everyone back in the late 1970s or early 1980s. So it’s no surprise that [krallja] was able to use an old-style video output chip to drive a TV with an Arduino. The TMS9918A is a venerable output device, and if the old computers could drive it then it makes sense that a modern computer could too. You can see a video of the whole experiment, below.

The Internet has also spoiled us, in that it’s dead simple to find datasheets for nearly anything, even these old chips. The only real problem with such aged silicon is that they typically expect a processor with a data and address bus, but most microcontrollers now keep all of that internal. But with enough fast I/O you can simulate a bus just fine. For now, the experiment just cycles through the color output.

Continue reading “TV Output From Arduino — 1980s Style!”

Game Boy Plays Forever

For those of us old enough to experience it first hand, the original Game Boy was pretty incredible, but did have one major downside: battery consumption. In the 90s rechargeable batteries weren’t common, which led to most of us playing our handhelds beside power outlets. Some modern takes on the classic Game Boy address these concerns with modern hardware, but this group from the Delft University of Technology and Northwestern has created a Game Boy clone that doesn’t need any batteries at all, even though it can play games indefinitely.

This build was a proof-of-concept for something called “intermittent computing” which allows a computer to remain in a state of processing limbo until it gets enough energy to perform the next computation. The Game Boy clone, fully compatible with the original Game Boy hardware, is equipped with many tiny solar panels which can harvest energy and is able to halt itself and store its state in nonvolatile memory if it detects that there isn’t enough energy available to continue. This means that Super Mario Land isn’t exactly playable, but other games that aren’t as action-packed can be enjoyed with very little impact in gameplay.

The researchers note that it’ll be a long time before their energy-aware platform becomes commonplace in devices and replaces batteries, but they do think that internet-connected devices that don’t need to be constantly running or powered up would be a good start. There are already some low-powered options available that can keep their displays active when everything else is off, so hopefully we will see even more energy-efficient options in the near future.

Thanks to [Sascho] for the tip!

Continue reading “Game Boy Plays Forever”

Reverse Engineering A Module From A Vacuum Tube Computer

It’s best to admit upfront that vacuum tubes can be baffling to some of the younger generation of engineers. Yes, we get how electron flow from cathode to anode can be controlled with a grid, and how that can be used to amplify and control current. But there are still some things that just don’t always to click when looking at a schematic for a tube circuit. Maybe we just grew up at the wrong time.

Someone who’s clearly not old enough to have ridden the first wave of electronics but still seems to have mastered the concepts of thermionic emission is [Usagi Electric], who has been doing some great work on reverse engineering modules from old vacuum tube computers. The video below focuses on a two-tube pluggable module from an IBM 650, a machine that dates clear back to 1954. The eBay find was nothing more than two tube sockets and a pair of resistors joined to a plug by a hoop of metal. With almost nothing to go on, [Usagi] was still able to figure out what tubes would have gone in the sockets — the nine-pin socket was a big clue — and determine that the module was likely a dual NAND gate. To test his theory, [Usagi] took some liberties with the original voltages used by IBM and built a breakout PCB. It’s an interesting mix of technologies, but he was able to walk through the truth table and confirm that his module is a dual NAND gate.

The video is a bit long but it’s chock full of tidbits that really help clear up how tubes work. Along with some help from this article about how triodes work, this will put you on the path to thermionic enlightenment.

Continue reading “Reverse Engineering A Module From A Vacuum Tube Computer”

Miniature Faux Floppy For 8-Bit Atari Looks The Part

There’s plenty of fun to be had with retrocomputers of yesteryear, but for modern users, it can be something of a culture shock. Going back to floppy disks after all these years is a reminder of just how far storage technology has come in terms of speed, reliability, and of course, capacity. Luckily, there are ways to combine the best of both worlds.

Floppy drive emulators for classic computers are of course nothing new, but we think this one [c0pperdragon] has put together is worthy of a closer look. Not only does the ATmega32U4 based emulator have an exceptionally low part count, but the code has been written in the Arduino IDE. Both features make it easy for new players to duplicate and revise the design should they feel so inclined. In a pinch you could even implement it on a breadboard with a garden variety Arduino.

The emulator is housed in a 3D printed enclosure designed to look like an era-appropriate Atari 1050 Disk Drive, except you’re using SD cards instead of floppies. The firmware can mimic two physical drives and supports up to 100 disk images on each SD card. The user interface is about as simple as it gets, with two push buttons and a pair of seven-segment LEDs to indicate which disk image is currently loaded up.

We’ve seen some very elaborate disk emulators over the years, but there’s something compelling about how straightforward this version is. If it helps a few more people experience the unique joys of retrocomputing, it’s a win in our book.