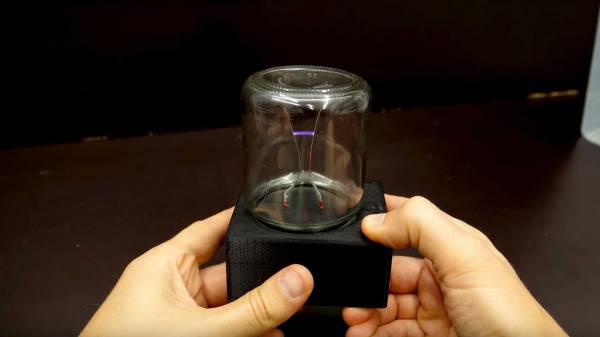
OpenSCAD Handles The Math In 3D Printed Holder For Magnetic Spheres

3D printed holder mounted to bike wheel, fitting precisely 38 magnetic spheres around its perimeter. Tedious math? Not if you make OpenSCAD do it.

Off-the-shelf components are great; the world and our work simply wouldn’t be the same without. But one of the constraints is that one has to design around them, and that’s what led [Antonio Ospite] to create a parametric design in OpenSCAD for a 3D printed holder which snugly fits a number of magnetic spheres around its diameter.

If that sounds a bit esoteric, it will become much clearer in the context of [Antonio]’s earlier work in making a DIY rotary encoder out of a ring of magnetic spheres. He found that such a ring in front of two Hall effect sensors was low in cost, high in precision, and thanks to 3D printing it also had a lot of potential for customizing. But hampering easy design changes was the need for the spheres to fit snugly around whatever shape was chosen for the hardware, which meant constraints on the encoder diameter.

In this case, [Antonio] wished to create an encoder that could be attached to a bicycle wheel but needed to know what outer diameter would best fit a ring of magnetic balls perfectly, given that the balls were each 5 mm. OpenSCAD did the trick, yielding a design that fit the bike wheel and spokes while perfectly nestling 38 magnetic balls around the outside edge with a minimum of wasted space.

OpenSCAD is a CAD program that’s really more like a programming language than anything else. For those who are not familiar with it, [Brian Benchoff] walked through how to make a simple object in OpenSCAD, and [Elliot] has sung the praises of a few advanced functions. Now that this project makes DIY encoders easier, perhaps they could be used to add intuitive new controls to OpenSCAD itself.

4-Mation Fish eats fish

Time-Stretching Zoetrope Animation Runs Longer Than It Should

3D printers have long since made it easy for anyone to make 3-dimensional zoetropes but did you know you can take advantage of a 4th dimension by stretching time? Previously the duration of a zoetrope animation would be however long it took for the platform to rotate once. To make it more interesting to watch for longer, you filled out the scene by creating concentric rings of animations. [Kevin Holmes], [Charlie Round-Turner], and [Johnathan Scoon] have instead come up with a way to make their animations last for multiple rotations, longer than three in one example. If you’re not at all familiar with these 3D zoetropes, you might want to check out this simpler version first.

4-Mation Fish eats Fish zoetropeTheir project name is 4-Mation but they call the time-stretching technique, animation multiplexing. One way to implement it is to use one long spiral beginning in the center and ending on the platform’s periphery. It’s the spiral path which make the animation last longer.

In their Fish eating Fish animation, the spiral is of a small fish which exits a clam at the center and gets progressively larger as it spirals outward until it swallows another fish located in a ring at the periphery. Of course when you look at it with a properly timed strobe light, there is no spiral. Instead, it appears as though a bunch of fish move more-or-less radially out from the center. The second video embedded below walks through the animation step-by-step, making it easier to follow the intricacies of what’s going on.

Other features include built-in strobe lighting and both manual and phone app control. This project is a product for a kickstarter campaign and so normally, details of the electronics would be absent. But clearly [Kevin] is familiar with Hackaday and sent in some additional info which you can find below, along with the videos.

Continue reading “Time-Stretching Zoetrope Animation Runs Longer Than It Should”

A Peek At The Mesmerizing Action Of A Cycloidal Drive

Cycloidal drives are fascinating pieces of hardware, and we’ve seen them showing up in part due to their suitability for 3D printing. The open source robot arm makers [Haddington Dynamics] are among those playing with a cycloidal drive concept, and tucked away in their August 2018 newsletter was a link they shared to a short but mesmerizing video of a prototype, which we’ve embedded below.

A 10:1 Cycloidal Drive [Source: Wikipedia, image public domain]
A cycloidal drive has some similarities to both planetary gearing and strain-wave gears. In the image shown, the green shaft is the input and its rotation causes an eccentric motion in the yellow cycloidal disk. The cycloidal disk is geared to a stationary outer ring, represented in the animation by the outer ring of grey segments. Its motion is transferred to the purple output shaft via rollers or pins that interface to the holes in the disk. Like planetary gearing, the output shaft rotates in the opposite direction to the input shaft. Because the individual parts are well-suited to 3D printing, this opens the door to easily prototyping custom designs and gearing ratios.

[Haddington Dynamics] are the folks responsible for the open source robot arm Dexter (which will be competing in the Hackaday Prize finals this year), and their interest in a cycloidal drive design sounds extremely forward-thinking. Their prototype consists of 3D printed parts plus some added hardware, but the real magic is in the manufacturing concept of the design. The idea is for the whole assembly to be 3D printed, stopping the printer at five different times to insert hardware. With a robot working in tandem with the printer, coordinating the print pauses with automated insertion of the appropriate hardware, the result will be a finished transmission unit right off the print bed. It’s a lofty goal, and really interesting advancement for small-scale fabrication.

Continue reading “A Peek At The Mesmerizing Action Of A Cycloidal Drive”

Giant 3D Printed Lock Helps Teach Picking

Despite what the media might tell you, picking locks isn’t just for spies and guys wearing balaclavas. Those who pick as a hobby, or even competitively, think of locks as logic puzzles. Each lock is a unique challenge, and defeating it requires patience, dexterity, and perhaps most importantly the experience that comes from regular practice. But where does one start if they want to get into the world of recreational lock picking, also known as locksport?

Many people begin their journey on a practice lock, usually made of clear plastic so you can see its inner-workings. That’s fine for the individual, but what if you’re trying to demonstrate lock picking to a group? [John Biggs] may have the solution for you, assuming you’ve got the time and material. His huge 3D printed cutaway lock, and appropriately sized tools, allow even the folks in the back of the room to see how basic picking techniques work.

A print of this size is nothing to sneeze at; a quick peek on the reference printer here at the Hackaday Chamber of Secrets indicates you’re probably looking at the better part of 20 hours to print everything out. Once printed you’ll likely need to take a file and some sandpaper to all the surfaces to make sure things operate smoothly. It doesn’t appear to be a terribly challenging print all things considered, but we wouldn’t call it a beginner’s project either.

The only non-printed part in this design is the springs, which [John] mentions he hasn’t quite found the solution for yet. They need to be fairly weak or else the lock is too hard to pick, but springs large enough to work with the pins are usually pretty strong. This might be a perfect application for some custom wound springs.

After you’ve mastered the PLA lock, it might be time to make your own picks and see if anyone is giving free lock picking workshops in your area.

Rover V2 Handles Stairs As Easily As The Outdoors

Rover V2 is an open-source, 3D-printable robotic rover platform that has seen a lot of evolution and development from its creator, [tlalexander]. There are a number of interesting things about Rover V2’s design, such as the way the wheel hubs themselves contain motors and custom planetary gearboxes. This system is compact and keeps weight down low to the ground, which helps keep a rover stable. The platform is all wheel drive, and moving parts like the suspension are kept high up, as far away from the ground as possible. Software is a custom Python stack running on a Raspberry Pi that provides basic control.

The Rover V2 is a full mechanical redesign of the previous version, which caught our attention with its intricate planetary gearing inside the wheel hubs. [tlalexander]’s goal is to create a robust, reliable rover platform for development that, thanks to its design, can be mostly 3D printed and requires a minimum of specialized hardware.

A Remotely Controlled Kindle Page Turner

One of the biggest advantages of e-readers such as the Kindle is the fact that it doesn’t weigh as much as a traditional hardcover book, much less the thousands of books it can hold in digital form. Which is especially nice if you drop the thing on your face while reading in bed. But as light and easy to use as the Kindle is, you still need to hold it in your hands and interact with it like some kind of a baby’s toy.

Looking for a way to operate the Kindle without having to go through the exhaustive effort of raising their hand, [Alex Mikes] designed and built a clip-on device that makes using Amazon’s e-reader even easier. At the press of a button, the device knocks on the edge of the screen which advances the book to the next page. Going back a page will still require you to extend your meaty digit, but that’s your own fault for standing in the way of progress.

The 3D printed case holds an Arduino and RF receiver, as well as a small servo to power the karate-chop action. There’s no battery inside, meaning the device needs to stay plugged in via a micro USB connection on the back of the case. But let’s be honest: if you’re the kind of person who has a remote-controlled Kindle, you probably aren’t leaving the house anytime soon.

To fool the Kindle into thinking a human finger is tapping the screen, the page turner’s arm has a stylus tip on the end. A channel is designed into the 3D printed arm for a wire to run from the tip to the Arduino’s ground, which triggers the capacitive screen to register a touch.

All joking aside, the idea holds promise as an assistive technology for individuals who are unable to lift an e-reader or operate its touch screen controls. With the Kindle held up in a mount, and this device clipped onto the side, anyone who can push a button (or trigger the device in whatever method they are physically capable) can read a book on their own. A simple pleasure that can come as a huge comfort to a person who may usually be dependent on others.

In the past we’ve seen physical buttons printed for touch screens, and an Arduino used to control a touch screen device. But this particular combination of physical and electrical interaction is certainly a unique way to tackle the problem without modifying the target device.

Replacement Audi Plastics Thanks To 3D Printing

Old cars can be fun, and as long as you drive something that was once moderately popular, mechanical parts can be easy enough to come by. Things like filters, spark plugs, idle air solenoids – they’re generally available for decades after a car is out of production as long as you know where to look. However, plastics can be much harder to come by. 20 to 30 years into a car’s lifetime, and you’ll be hard pressed to find a radio surround or vent trim in as-new condition – they’ve all long ago succumbed to the sun and air like the cracked and discoloured piece in your own car. What is a hacker to do? Bust out the 3D printer, of course!

[Stephen Kraus] has developed a series of parts for his Audi, ready to print on the average home 3D printer. There’s the triple gauge mount which fits in the radio slot for that classic tuner look, to the printed wheel caps which are sure to come in handy after you’ve lost the originals. There are even useful parts for capping off the distributor if you’re switching to a more modern ignition setup. [Stephen] also reports that his replacement shifter bushing printed in PLA has lasted over a year in normal use.

This is an excellent example of what 3D printers do best – obscure, bespoke one-off parts with complex geometries are no trouble at all, and can be easily made at home. We’ve seen this done to great effect before, too – for example with this speedometer correction gear in an old truck.