Home Pool Added To Home Automation

Anyone who owns their own pool knows it’s not as simple as filling it up with water and jumping in whenever you want. There’s pool covers to deal with, regular cleaning with the pool vacuum and skimmers, and of course, all of the chemicals that have to be added to keep the water safe. While there are automatic vacuums, there aren’t a whole lot of options for automating the pool chemicals. [Clément] decided to tackle this problem, eliminating one more task from the maintenance of his home. (Google Translate from French.)

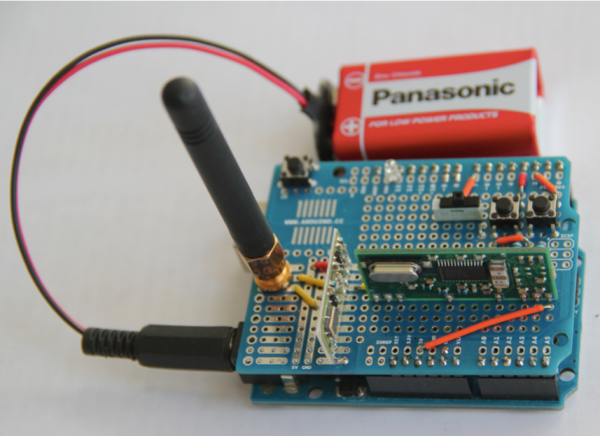
The problem isn’t as simple as adding a set amount of chemicals at a predetermined time. The amount of chemicals that a pool owner has to add are dependent on the properties of the water, and the amount of time that’s elapsed since the previous chemical treatment, and the number of people who have been using the water, and whether or not the pool cover is in use. To manage all of this, [Clément] used an ORP/Redox probe and a pH probe, and installed both in the filtration system. The two probes are wired to an Arduino with an ethernet shield. The Arduino controls electrically actuated chemical delivery systems that apply the required amount of chemicals to the pool, keeping it at a nice, healthy balance.
Continue reading “Home Pool Added To Home Automation”

Animated Progress Bar Shows LCD New Tricks

A small LCD screen can be extremely helpful with small microcontroller projects. Not everything needs to communicate to a fancy server using an ESP8266. However, if the simplicity of the character displays irks you, it’s possible to spice them up a little bit with custom characters and create animations, like [Fabien] did with his animated Arduino progress bar. (Google Translate from French)
The project started out simply enough: all [Fabien] needed was a progress bar. It’s easy enough to fill in the “characters” on the 2×16 character LCD screen one-by-one to indicate progress, and the first version of this did exactly that. The second version got a little bit fancier by adding a border around the progress bar and doubling its resolution, but the third version is where knowing the inner machinations of the microcontroller really paid off. Using a custom charset reuse optimization, [Fabien] was able to use 19 custom characters at a time when the display will normally only allow for eight. This was accomplished by placing the custom characters in memory in the correct order, to essentially trick the microcontroller into displaying them.
These types of microcontroller hacks get deep into the inner workings of the microcontroller and help expose some tricks that we can all use to understand their operation on a deeper level. Whether you’re using PWM to get a microcontroller to operate a TV, or creating the ATtiny-est MIDI synth, these tricks are crucial to getting exactly what you want out of a small, inexpensive microcontroller.

Arduino Replaces Bad AC Thermostat, Hacker Stays Cool

Most of North America has been locked in a record-setting heat wave for the last two weeks, and cheap window AC units are flying out of the local big-box stores. Not all of these discount units undergo rigorous QC before sailing across the Pacific, though, and a few wonky thermostats are sure to get through. But with a little sweat-equity you can fix it with this Arduino thermostat and temperature display.

We’ll stipulate that an Arduino may be overkill for this application and that microcontrollers don’t belong in every project. But if it’s what you’ve got on hand, and you’re sick of waking up in a pool of sweat, then it’s a perfectly acceptable solution. It looks like [Engineering Nonsense] got lucky and had a unit with a low-current power switch, allowing him to use a small relay to control the AC. The control algorithm is simple enough – accept a setpoint from an encoder, read the temperature sensor, and turn the AC on or off accordingly. Setpoint and current temperature are displayed on an OLED screen. One improvement we’d suggest is adding a three-minute delay between power cycles like the faceplate of the AC states.

This project bears some resemblance to this Arduino-controlled AC, but it seems more hackish to us. And that’s a good thing – hackers have to keep cool somehow.

Continue reading “Arduino Replaces Bad AC Thermostat, Hacker Stays Cool”

Keytar Made Out Of A Scanner To Make Even The 80s Jealous

Do any of you stay awake at night agonizing over how the keytar could get even cooler? The 80s are over, so we know none of us do. Yet here we are, [James Cochrane] has gone out and turned a HP ScanJet Keytar for no apparent reason other than he thought it’d be cool. Don’t bring the 80’s back [James], the world is still recovering from the last time.

Kidding aside (except for the part of not bringing the 80s back), the keytar build is simple, but pretty cool. [James] took an Arduino, a MIDI interface, and a stepper motor driver and integrated it into some of the scanner’s original features. The travel that used to run the optics back and forth now produce the sound; the case of the scanner provides the resonance. He uses a sensor to detect when he’s at the end of the scanner’s travel and it instantly reverses to avoid collision.

A off-the-shelf MIDI keyboard acts as the input for the instrument. As you can hear in the video after the break; it’s not the worst sounding instrument in this age of digital music. As a bonus, he has an additional tutorial on making any stepper motor a MIDI device at the end of the video.

If you don’t have an HP ScanJet lying around, but you are up to your ears in surplus Commodore 64s, we’ve got another build you should check out.

Hackaday Prize Entry: Smart USB Hub And IoT Power Meter

[Aleksejs Mirnijs] needed a tool to accurately measure the power consumption of his Raspberry Pi and Arduino projects, which is an important parameter for dimensioning adequate power supplies and battery packs. Since most SBC projects require a USB hub anyway, he designed a smart, WiFi-enabled 4-port USB hub that is also a power meter – his entry for this year’s Hackaday Prize.

[Aleksejs’s] design is based on the FE1.1s 4-port USB 2.0 hub controller, with two additional ports for charging. Each port features an LT6106 current sensor and a power MOSFET to individually switch devices on and off as required. An Atmega32L monitors the bus voltage and current draw, switches the ports and talks to an ESP8266 module for WiFi connectivity. The supercharged hub also features a display, which lets you read the measured current and power consumption at a glance.

Unlike most cheap hubs out there, [Aleksejs’s] hub has a properly designed power path. If an external power supply is present, an onboard buck converter actively regulates the bus voltage while a power path controller safely disconnects the host’s power line. Although the first prototype is are already up and running, this project is still under heavy development. We’re curious to see the announced updates, which include a 2.2″ touchscreen and a 3D-printable enclosure.

Arduino Absentmindedly Blows Bubbles

If you ever wanted to make an occasion festive with bubbles, [Sandeep_UNO] may have the project for you. As you can see in the video below (and, yes, it should have the phone rotated and it doesn’t), his Arduino uses a servo motor to dip a bubble wand into soap solution and then pulls it in front of a fan. The entire operation repeats over and over again.

There’s not a lot of detail and no code that we could find, but honestly, if you know how to drive a servo motor from an Arduino, the rest is pretty easy to figure out. Look closely at the motion of the robot. What is often accomplished with a spinning wheel of bubble wands and a constant fan becomes much more interesting when applied intermittently. The lazy cadence is what you expect to see from human operation and that adds something to the effect.

We’ve seen faster bubble blowers, but they were not so simple. We’ve even looked at other bubble-blowing robots. If you want to find out more about servo motors in general, our own [Richard Bauguley] has what you need to know.

Continue reading “Arduino Absentmindedly Blows Bubbles”

Beware Of Tall Grass: Pokemon Go On The Gameboy Pocket

[Pepijn de Vos] was excited to interact with the world’s most popular augmented reality pedometer, Pokemon Go, and was extremely disappointed to find that his Blackberry couldn’t run it. Still, as far as he could tell from behind his wall of obsolete technology, Pokemon Go is all about walking distractedly, being suspicious, and occasionally catching a Pokemon. That should be possible.

Not a stranger to hacking Pokemon on the Gameboy, [Pepijn] put together a plan. Using his TCPoke module, he took it a step further. Rather than just emulating the original gameboy trade signals over the internet, he hacked a Pokemon Red ROM with some custom Z80 assembly to add some features to the Cable Club in the game.

After some waiting for the delivery man to bring a flashable cartridge and along with some Arduino code, he could now translate the steps he took in the game to his steps in the real world. Well, mostly. He could pick the location where he would like to catch a Pokemon. The character stands there. Somewhere around 100m the game will trigger a random pokemon battle.

[Pepijn] is now no longer a social outcast, as you can see in the video after the break. On a simple trip to the grocery store he caught two Pokemon!

Continue reading “Beware Of Tall Grass: Pokemon Go On The Gameboy Pocket”