Following Pigs: Building An Injectable Livestock Tracking System

I’m often asked to design customer and employee tracking systems. There are quite a few ways to do it, and it’s an interesting intersection of engineering and ethics – what information is reasonable to collect in different contexts, anonymizing and securely storing it, and at a fundamental level whether the entire system should exist at all.

On one end of the spectrum, a system that simply counts the number of people that are in your restaurant at different times of day is pretty innocuous and allows you to offer better service. On the other end, when you don’t pay for a mobile app, generally that means your private data is the product being bought and sold. Personally, I find that the whole ‘move fast and break things’ attitude, along with a general disregard for the privacy of user data, has created a pretty toxic tech scene. So until a short while ago, I refused to build invasive tracking systems – then I got a request that I simply couldn’t put aside…

Continue reading “Following Pigs: Building An Injectable Livestock Tracking System”

The Danish Internet Of Hot Tubs

Every hacker camp has its own flavor, and BornHack 2019 in the Danish countryside gave us the opportunity to sample some hacker relaxation, Scandinavian style. Among the attractions was a wood-fired hot tub of gargantuan proportions, in which the tired attendee could rejuvenate themselves at 40 Celcius in the middle of the forest. A wood-fired hot tub is not the easiest of appliances to control, so to tame it [richard42graham] and a group of Danish hackerspace friends took it upon themselves to give it an internet-connected temperature sensor.

The starting point was a TMP112 temperature sensor and an ESP8266 module, which initially exposed the temperature reading via a web interface, but then collapsed under too much load. The solution was to make the raw data available via MQTT, and from that create a web interface for the event bar, Twitter and IRC bots. There was even an interface to display hot tub temperature on the ubiquitous OHMlights dotted around the camp.

It’s more normal to control a hot tub via an electric heater, but since the wood fire on this one has to be tended by a camp volunteer it made sense to use the IRC system as an alert. It will be back at BornHack 2020, so we’ll have to do our job here at Hackaday and spend a long time lounging in the hot tub in the name of journalistic research to see how well it works.

A Custom Milled Jig For Smart Bulb Programming

Who would have thought that some day we’d need programming jigs for our light bulbs? But progress marches on, and as there’s currently a number of affordable Internet-controlled bulbs powered by the ESP8266 on the market, we’re at the point where a tool to help update the firmware on the light over your kitchen sink might be something nice to have. Which is why [cperiod] created this programming jig for AiLight smart bulbs.

Flashing the AiLight bulbs is easy enough, there’s a series of test points right on the face of the PCB that you can hook up to. But if you’re updating more than one of them, you don’t want to have to solder your programmer up to each bulb individually. That’s where the jig comes in. [cperiod] says there are already some 3D printed designs out there, but they proved to be a bit finicky.

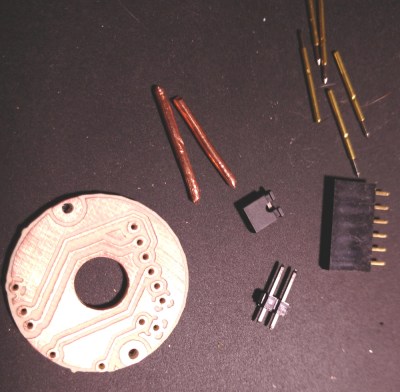
The design that [cperiod] came up with and eventually milled out on a 1610 CNC router is quite simple. It’s effectively just a holder to keep the five pogo pins where they need to be, and a jumper that lets you toggle the chip’s programming mode (useful for debugging).

The neat trick here are the “alignment pins”, which are actually two pieces of 14 gauge copper wire that have had their ends rounded off. It turns out these will slip perfectly into holes on the AliLight PCB, ensuring that the pogo pins end up on target. It works well enough that you can hold the bulb and jig in one hand while programming, it just needs a little downwards pressure to make good contact.

We’ve previously seen how easily you can replace the firmware on some of these ESP8266 bulbs. While there’s certainly a downside to these bulbs being so simple to modify, it’s hard to deny their hackability makes them very appealing for anyone looking to roll their own network-controlled lighting system.

This WiFi Spoofing Syringe Is For External Use Only

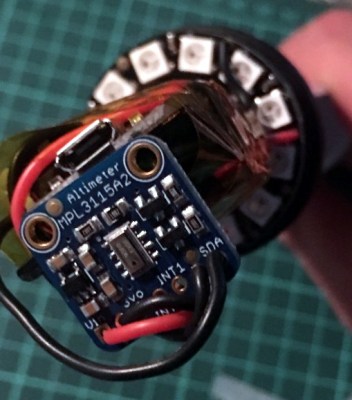
A browse through his collected works will tell you that [El Kentaro] loves to build electronics into interesting enclosures, so when he realized there’s enough room inside a 150 ml plastic syringe to mount an ESP8266, a battery, and a copious amount of RGB LEDs, the “Packet Injector” was the inescapable result.

Granted, the current incarnation of this device doesn’t literally inject packets. But [El Kentaro] wasn’t actually looking to do anything malicious, either. The Injector is intended to be a fun gag for him to bring along to the various hacker cons he finds himself at, like his DEAUTH “bling” necklace we saw at DEF CON 26, so having any practical function is really more icing on the cake than a strict requirement.

In the end, the code he came up with for the Adafruit Feather HUZZAH that uses the FakeBeaconESP8266 library to push out fictitious networks on demand. This is a trick we’ve seen used in the past, and makes for a relatively harmless prank as long as you’re not pumping out any particularly unpleasant SSIDs. In this case, [El Kentaro] punctuates his technicolor resplendency with beacons pronouncing “The WiFi Doctor is Here.”

But the real hack here is how [El Kentaro] controls the device. Everything is contained within the syringe chamber, and he uses a MPL3115A2 I2C barometric pressure sensor to detect when it’s being compressed. If the sensor reads a pressure high enough over the established baseline, the NeoPixel Ring fires up and the fake beacon frames start going out. Ease up on the plunger, and the code detects the drop in pressure and turns everything back off.

If this build has piqued your interest, [El Kentaro] gave a fascinating talk about his hardware design philosophy during the WOPR Summit that included how he designed and built some of his “greatest hits”; including a Raspberry Pi Zero enclosure that was, regrettably, not limited to external use.

Sniffed Transformer Puts Wired Doorbell Online

There’s certainly no shortage of “smart” gadgets out there that will provide you with a notification, or even a live audiovisual stream, whenever somebody is at your door. But as we’ve seen countless times before, not everyone is thrilled with the terms that most of these products operate under. Getting a notification on your phone when the pizza guy shows up shouldn’t require an email address, credit card number, or DNA sample.

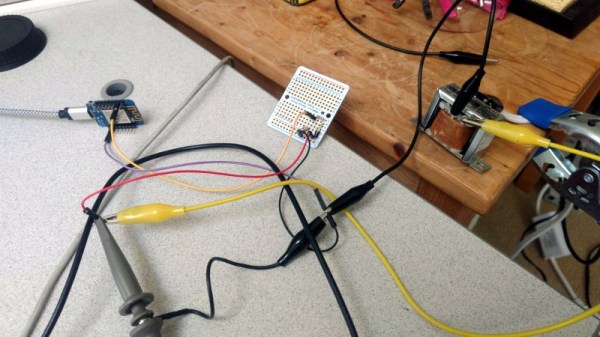
For [Nick Touran], half the work was already done. There was already a traditional wired doorbell in his home, he just had to come up with a minimally invasive way to link it with Home Assistant. He reasoned that he could tap into the low-voltage side of the doorbell transformer and watch for the telltale fluctuations that would indicate the bell was doing its thing. The ESP8266 has an ADC to measure voltage and WiFi to connect to Home Assistant, so it seemed like the perfect bridge between old and new.

Transformer voltage before and after

Of course, as with any worthwhile project, it ended up being a bit more complicated. Wired doorbells generally operate on 16-24 VAC, and [Nick] knew if he tried to put his Wemos D1 across the line he’d release the critical Magic Smoke. What he needed was a voltage divider circuit that would take low-voltage AC and drop it to an even lower DC voltage that the microcontroller could cope with.

The simple circuit [Nick] comes up with cuts the voltage way down and removes the negative component completely. So what was originally 18.75 VAC turned into a series of 60 Hz blips at 2.4 VDC; perfect for feeding into a microcontroller ADC. With a baseline to work from, he could then write some code that would watch for variations in this signal to determine when the bell was ringing.

Or at least, that was the idea. While the setup worked well enough on the bench, its performance in the real-world left something to be desired. If his house guest had a heavy hand, it worked great. But a quick tap of the doorbell button would tend to go undetected. After investigating the issue, [Nick] found that he needed to use some software trickery to ensure the ESP8266 was able to keep up with the speedy signal. Once he was able to reliably detect short and long button presses, the rest was just a simple matter of sending an MQTT message to his automation system.

Compared to the hoops we’ve seen other hackers have to jump through to smarten up their doorbells, we think [Nick] got off fairly easy. This project is also an excellent example of how learning about circuit design and passive components can still come in handy in the Arduino Era.

Continue reading “Sniffed Transformer Puts Wired Doorbell Online”

A Farewell To YouTube Sub Counters Set To Break With API Change

Of all the things you never would have guessed you’d need just ten years ago, a YouTube subscriber counter would probably rank highly. You would have guessed that the little hits of dopamine accompanying each tick upward of a number would be so addictive?

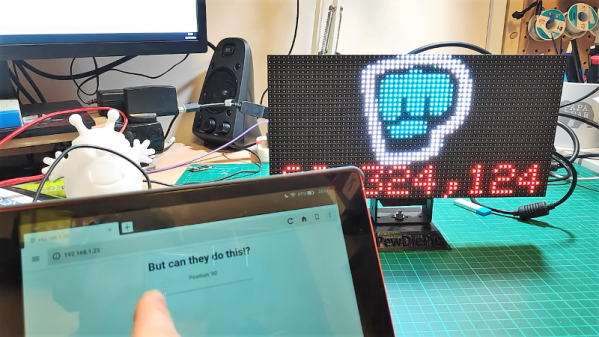
As it turns out, lots of people wanted to keep a running total of their online fans, and a bewilderingly varied ecosystem of subscriber counters has cropped up. All of them rely on the API that YouTube exposes for such purposes, which as [Brian Lough] points out is about to change and break every subscription counter ever made. In the YouTube sub counter space, [Brian] is both an enabler – he built an Arduino wrapper to fetch YT sub counts easily – and a serial builder of displays for other YouTubers. The video below shows a collection of his work, many based on RGB LED matrix display, like the one used in his Tetris-themed sub counter. They’re all well-built, nice to look at, and sadly, destined for obsolescence sometime in August when the API changes.

The details of the API changes were made public in April, and for the subs count it amounts to rounding the count and displaying large counts as, for instance, 510k as opposed to 510,023. We’re confident that [Brian] and other display builders will be able to salvage some of their counters with code changes, but others will probably require hardware changes. Thanks, YouTube.

Continue reading “A Farewell To YouTube Sub Counters Set To Break With API Change”

Four Years Of Learning ESP8266 Development Went Into This Guide

The ESP8266 is a great processor for a lot of projects needing a small microcontroller and Wi-Fi, all for a reasonable price and in some pretty small form factors. [Simon] used one to build a garage door opener. This project isn’t really about his garage door opener based on a cheap WiFi-enabled chip, though. It’s about the four year process he went through to learn how to develop on these chips, and luckily he wrote a guide that anyone can use so that we don’t make the same mistakes he did.

The guide starts by suggesting which specific products are the easiest to use, and then moves on to some “best practices” for using these devices (with which we can’t argue much), before going through some example code. The most valuable parts of this guide especially for anyone starting out with these chips are the section which details how to get the web server up and running, and the best practices for developing HTML code for the tiny device (hint: develop somewhere else).

[Simon] also makes extensive use of the Chrome developers tools when building the HTML for the ESP. This is a handy trick even outside of ESP8266 development which might be useful for other tasks as well. Even though most of the guide won’t be new to anyone with experience with these boards, there are a few gems within it like this one that might help in other unrelated projects. It’s a good read and goes into a lot of detail about more than just the ESP chips. If you just want to open your garage door, though, you have lots of options.