Over-Engineered Single Button Timer

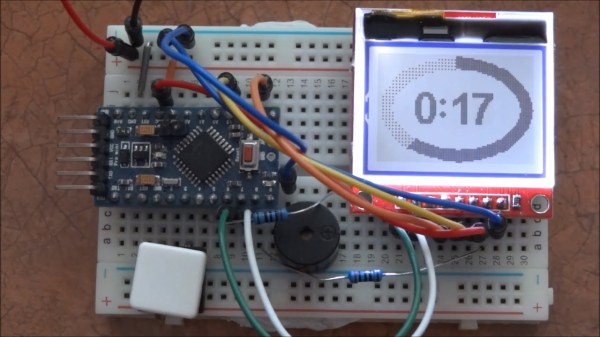
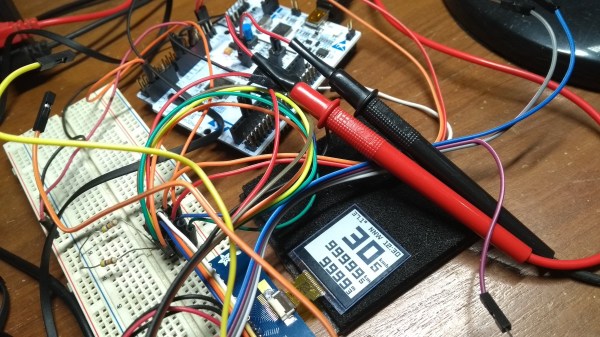
Feature creep is typically something to be avoided, since watching a relatively simple project balloon into a rat’s nest of complexity often leads to ineffective, or even abandoned, projects. On the other hand, if you can maintain a tight focus, it’s not always a bad thing. [cbm80Amiga] shows us how to drill down and add specific features in this single-button timer without losing focus on what the original project was all about.

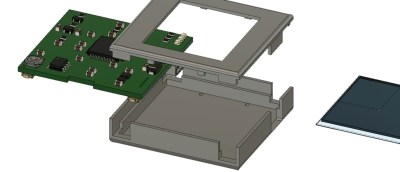
The timer is based on an Arduino Pro Mini and an HX1230 LCD with a simple piezo speaker for audible alerts. A single button controls operation of the timer, with short presses incrementing each digit and long presses moving on to the next digit. Controlling button presses this finely is a project in its own, but then [cbm80Amiga] moves on to other features such as backlight control, low power modes which allow it to operate for around two years on a single battery charge, preset times for various kitchen uses, and different appearance settings.

Honestly we aren’t sure how you could cram any more features on this timer without fundamentally altering the designed simplicity. It doesn’t fall into the abyss of feature creep while being packed with features, and it’s another example of how keeping things simple is often a recipe for success.

Thanks to [Hari] for the tip!

Continue reading “Over-Engineered Single Button Timer”

Bike Computer Powers On Long After Your Legs Give Out

A typical bicycle computer from the store rack will show your speed, trip distance, odometer, and maybe the time. We can derive all this data from a magnet sensor and a clock, but we live in a world with all kinds of sensors at our disposal. [Matias N.] has the drive to put some of them into a tidy yet competent bike computer that has a compass, temperature, and barometric pressure.

The brains are an STM32L476 low-power controller, and there is a Sharp Memory LCD display as it is a nice compromise between fast refresh rate and low power. E-paper would be a nice choice for outdoor readability (and obviously low power as well) but nothing worse than a laggy speedometer or compass.
In a show of self-restraint, he didn’t try to replace his mobile phone, so there is no GPS, WiFi, or streaming music. Unlike his trusty phone, you measure the battery life in weeks, plural. He implemented EEPROM memory for persistent data through power cycles, and the water-resistant board includes a battery charging circuit for easy topping off between rides.

When you toss the power of a mobile phone at a bike computer, someone will unveil the Android or you can measure a different kind of power from your pedals.

Continue reading “Bike Computer Powers On Long After Your Legs Give Out”

Cryptographic LCDs Use The Magic Of XOR

Digital security is always a moving target, with no one device or system every being truly secure. Whether its cryptographic systems being compromised, software being hacked, or baked-in hardware vulnerabilities, it seems there is always a hole to be found. [Max Justicz] has a taste for such topics, and decided to explore the possibility of creating a secure communications device using a pair of LCDs.

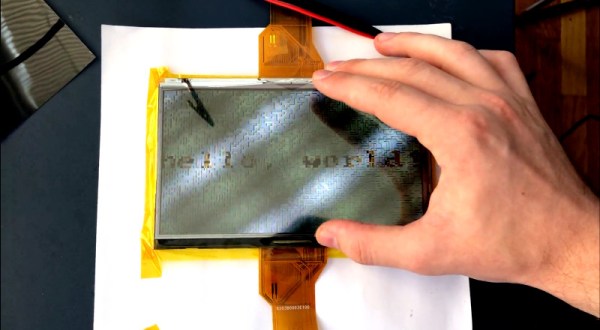
In a traditional communications system, when a message is decrypted and the plaintext is displayed on screen, there’s a possibility that any other software running could capture the screen or memory state, and thus capture the secret data. To get around this, [Max]’s device uses a concept called visual cryptography. Two separate, independent systems with their own LCD each display a particular pattern. It is only when the two displays are combined together with the right filters that the message can be viewed by the user, thanks to the visual XOR effect generated by the polarized nature of LCDs.

The device as shown, working with both transparent OLEDs and traditional LCDs, is merely a proof of concept. [Max] envisions a device wherein each display is independently sourced, such that even if one is compromised, it doesn’t have the full message, and thus can’t compromise the system. [Max] also muses about the problem of side-channel attacks, and other factors to consider when trying to build a truly secure system.

We love a good discussion of cryptography and security around here; [John McMaster]’s talk on crypto ignition keys was a particular hit at Supercon last year. Video after the break.

Continue reading “Cryptographic LCDs Use The Magic Of XOR”

A True 4K Projector From Scrap EBay Components

Cinemas all over the world have become no-go zones with COVID-19 around, but watching the latest blockbuster on the small screen at home is simply not the same. You could bring the big screen home, but buying a quality projector is going to set you back a small pile of cash. Fortunately [Matt] from [DIY Perks] has an alternative for us, demonstrating how to build your own true 4K projector with parts bought off eBay, for a fraction of the price.

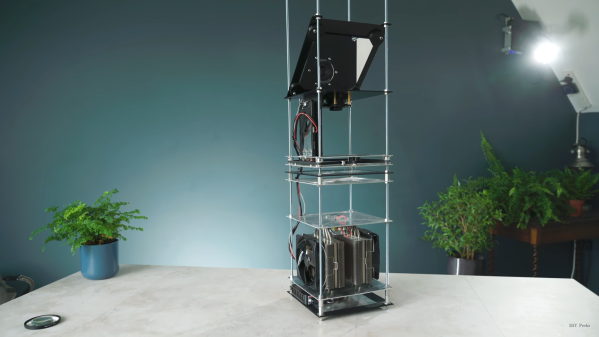
The core of the projector is a small 4K LCD panel, which is from a modified Sony smartphone. [Matt] disassembled the phone, removed the backlight from the LCD, which leaves it semi-transparent, and mounted it at a right angle to the rest of the phone body. The battery was also replaced with a voltage regulator to simulate a full battery. To create a practical projector, a much brighter backlight is needed. [Matt] used a 100W 10 mm diameter LED for this purpose. The LED needs some serious cooling to prevent it from burning itself out, and a large CPU cooler does the job perfectly. Two Fresnel lenses in series are used to turn the diverging light from the LED into a converging light source to pass through the LCD. An old 135 mm large format camera lens is placed at the focal point of light to act as a projection lens. The entire assembly is mounted on a vertical frame of threaded rods, nuts, and aluminium plates. [Matt] also used these threaded rods with GT2 pulleys to create a simple but effective moving platform for the projection lens that allows the focus of the projected image to be adjusted. The frame is topped off by a 45-degree mirror to project the image against a wall instead of the roof, and the frame is covered with aluminium panels.

The video after the break goes into incredible detail on how projector functions and how to build your own down. It definitely looks like a doable build for most hackers. [Matt] will also be releasing a complete PDF build guide in the next few weeks. Continue reading “A True 4K Projector From Scrap EBay Components”

Score Big Against Boredom With Tabletop Bowling

Bowling has been around since ancient Egypt and continues to entertain people of all ages, especially once they roll out the fog machine and hit the blacklights. But why pay all that money to don used shoes and drink watered-down beer? Just build a tabletop bowling alley in your spare time and you can bowl barefoot if you want.

Those glowing pins aren’t just for looks — the LEDs underneath them are part of the scoring system. Whenever a pin is knocked out of its countersunk hole, the LED underneath is exposed and shines its light on a corresponding light-dependent resistor positioned overhead. An Arduino Uno keeps track of of the frame, ball number, and score, and displays it on an LCD.

The lane is nearly six feet long, so this is more like medium-format bowling or maybe even skee-bowling. There are probably a number of things one could use for balls, but [lainealison] is using large ball bearings. Roll past the break to see it in action, but don’t go over the line!

Can’t keep your balls out of the gutter? Build a magic ball and make all wishful leaning more meaningful as you steer it down the lane with your body.

Continue reading “Score Big Against Boredom With Tabletop Bowling”

Matrix Of Resistors Forms The Hot Hands Behind This Thermochromic Analog Clock

If you’re going to ditch work, you might as well go big. A 1,024-pixel thermochromic analog clock is probably on the high side of what most people would try, but apparently [Daniel Valuch] really didn’t want to go to work that day.

The idea here is simple: heat up a resistor by putting some current through it, lay a bit of thermochromic film over it, and you’ve got one pixel. The next part was not so simple: expanding that single pixel to a 32 by 32 matrix.

To make each pixel square-ish, [Daniel] chose to pair up the 220-ohm SMD resistors for a whopping 2,048 components. Adding to the complexity was the choice to drive them with a 1,024-bit shift register made from discrete 74LVC1G175 flip flops. With the Arduino Nano and all the other support components, that’s over 3,000 devices with the potential to draw 50 amps, were someone to be foolish or unlucky enough to turn on every pixel at once. Luckily, [Daniel] chose to emulate an analog clock here; that led to additional problems, like dealing with cool-down lag in the thermochromic film when animating the hands, which had to be dealt with in software.

We’ve seen other thermochromic displays before, including recently with this temperature and humidity display. This one may not be the highest resolution display out there, but it’s big and bold and slightly dangerous, and that makes it a win in our book.

Reverse Engineering A Saab’s In-Dash Display

For [Leigh Oliver], there’s something undeniably appealing about the green on black instrumentation of the 2003 Saab 9-3 Gen2. Perhaps it’s because the Infotainment Control Module 2 (ICM2) screen brings a bit of that classic Matrix vibe to the daily commute. Whatever the reason, it seemed the display deserved better than to be stuck showing the nearly 20 year old stock user interface. Luckily, you can control it via I2C.

Though as you might expect, that fact wasn’t obvious at first. [Leigh] had to start by taking the ICM2 apart and reverse engineering the display board. With a multimeter and high resolution photographs of both sides of the PCB, all of the traces were mapped out and recreated in KiCAD. This might not have been strictly necessary, but it did serve as good practice for using KiCAD; a worthwhile tip for anyone else looking to build practical experience creating schematics.

With everything mapped out, [Leigh] was able to connect a BusPirate V3 up to the board and pretty quickly determine it was using I2C to control the display. As far as figuring out how to repurpose existing displays goes, this was perhaps the best possible scenario. It even allowed for creating a display library based on Adafruit_GFX which offers graphical capabilities far beyond what the ICM2 module itself is capable of.

Even with so much progress made, this project is really just getting started. [Leigh] has managed to put some impressive imagery on the black and green Saab display, but the hardware side of things is still being worked on. For example, there’s some hope that an I2C multiplexer would allow the display to easily and quickly be switched between “stock” mode and whatever enhanced version comes about thanks to the new libraries and an ESP8266 hiding behind the dashboard.

If you don’t have a sufficiently vintage Saab to take advantage of this project, don’t worry. Tapping into the OBD port with an OLED display can get you similar results on a wide range of vehicles.