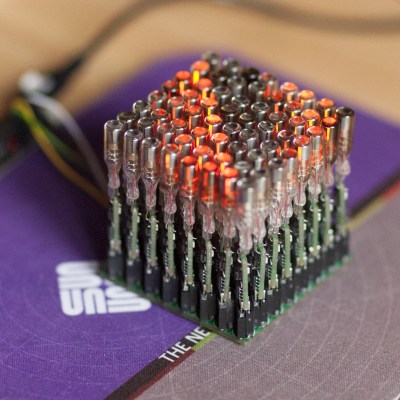
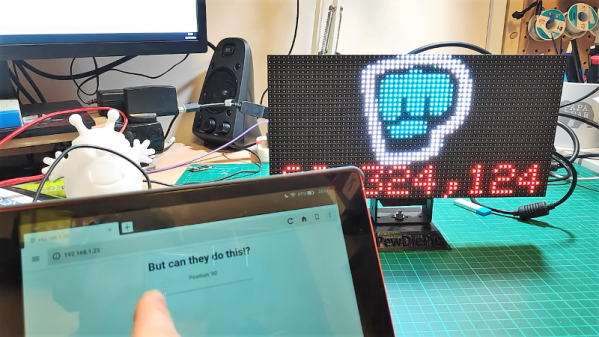
Ferrofluid Display Fuels The Fun, And The Procrastination

When deadlines loom and your future is on the line, do what top college students through the ages have always done: procrastinate! [Simen] and [Amund] did that in grand style by starting a YouTube channel, delightfully and aptly named “Applied Procrastination”, wherein they plan to avoid their responsibilities as long as possible in favor of making a large-scale ferrofluidic display panel. (Video, embedded below.)

We suppose we should encourage them to hit the books, but honestly they look like they’re having much more fun and learning more than they would in class. The idea isn’t new; we’ve seen ferrofluid clocks before, after all. [Amund] and [Simen] have grander plans for their display, but they’re wisely starting small with basic experiments. They had an early great idea to use a double-pane window as a tank for their display, but coatings on the inside of the glass and the aluminum frame conspired to cloud the display. They also did some tests to make sure they can control 252 electromagnets safely. They did manage to get a small test display working, but really the bulk of the video is just them playing with magnets and ferrofluid. And again, we’re OK with that.

It looks like this is going to be an interesting project, with hopefully regular updates to the channel now that summer break is upon us. Unless they find something else to do, of course.

Continue reading “Ferrofluid Display Fuels The Fun, And The Procrastination”

A Ping Pong Ball LED Video Wall

Constrained builds are often the most fun. Throw an artificial limit into the mix, like time limiting your effort or restricting yourself to what’s on hand, and there’s no telling what will happen.

[bitluni] actually chose both of those constraints for this ping pong ball LED video display, and the results are pretty cool, even if the journey was a little rough. It seems like using sheet steel for the support of his 15 x 20 Neopixel display was a mistake, at least in hindsight. A CNC router would probably have made the job of drilling 300 holes quite a bit easier, but when all you have is a hand drill and a time limit, you soldier on. Six strings of Neopixels fill the holes, a largish power supply provides the 18 or so amps needed, and an Arduino knock-off controls the display. The ping pong ball diffusers are a nice touch, even if punching holes in them cost [bitluni] a soldering iron tip or two. The display is shown in action in the video below, mostly with scrolling text. If we may make a modest suggestion, a game of Pong on a ping pong ball display might be fun.

[bitluni] says that the display is on its way to Maker Faire Berlin this weekend, so stop by and say hi. Maybe he’ll have some of his other cool builds too, like his Sony Watchman Game Boy mashup, or the electric scooter of questionable legality.

Continue reading “A Ping Pong Ball LED Video Wall”

The Clickiest Game Of Tetris You’ll Ever Play, On A Flip-Dot

Like many other classics it’s easy to come up with ways to ruin Tetris, but hard to think of anything that will make it better. Adding more clickiness is definitely one way to improve the game, and playing Tetris on a flip-dot display certainly manages to achieve that.

The surplus flip-dot display [sinowin] used for this version of Tetris is a bit of an odd bird that needed some reverse engineering to be put to work. The display is a 7 x 30 matrix with small dots, plus a tiny green LED for each dot. Those LEDs turned out to be quite useful for replicating the flashing effect used in the original game when a row of blocks was completed, and the sound of the dots being flipped provides audio feedback. The game runs on a Teensy through a custom driver board and uses a Playstation joystick for control. The video below, in perfectly acceptable vertical format, shows the game in action and really makes us want to build our own, perhaps with a larger and even clickier flip-dot display.

The best thing about Tetris is its simplicity: simple graphics, simple controls, and simple gameplay. It’s so simple it can be played anywhere, from a smartwatch to a business card and even on a transistor tester.

Continue reading “The Clickiest Game Of Tetris You’ll Ever Play, On A Flip-Dot”

LED Matrix And A Phototransistor Make A Reverse Camera

A digital camera has an array of sensors that captures light reflected or transmitted onto it. This build is something closer to a reverse camera – a single sensor that makes images on a matrix of LEDs. And we think it’s pretty neat.

We have to admit to being a little confused by [marciot]’s LED matrix scanner when we first stumbled upon it. From the video below we thought that the LEDs in the matrix were being used both to detect incident light and as a display. We’ve seen LEDs used as photodiodes before, so such a contraption could work, but that’s not what’s going on here. A phototransistor is wired to an Arduino Uno and positioned above a 32×32 RGB LED matrix. A scanning routine rasters over the LEDs in the matrix while the sensor watches, and then the program turns on the LEDs that the sensor saw during the scan. Positioned far above the matrix, a large disc of light results, making it look like the phototransistor is beaming light down onto the matrix. The effect is reinforced by placing something between the sensor and the matrix, which casts a virtual shadow. Used close to the LEDs the sensor acts more like a light pen.

It’s a cool effect and it looks like a fun project to throw together. Refresh time could perhaps be a bit snappier, though; maybe an ESP32 could help with that.

Continue reading “LED Matrix And A Phototransistor Make A Reverse Camera”

Flex PCBs Make Force-Mapping Pressure Sensor For Amputee

What prosthetic limbs can do these days is nothing short of miraculous, and can change the life of an amputee in so many ways. But no matter what advanced sensors and actuators are added to the prosthetic, it has to interface with the wearer’s body, and that can lead to problems.

Measuring and mapping the pressure on the residual limb is the business of this flexible force-sensing matrix. The idea for a two-dimensional force map came from one of [chris.coulson]’s classmates, an amputee who developed a single-channel pressure sensor to help him solve a painful fitting problem. [chris.coulson] was reminded of a piezoresistive yoga mat build from [Marco Reps], which we featured a while back, and figured a scaled-down version might be just the thing to map pressure points across the prosthetic interface. Rather than the expensive and tediously-applied web of copper tape [Marco] used, [chris] chose flexible PCBs to sandwich the Velostat piezoresistive material. An interface board multiplexes the 16 elements of the sensor array to a PIC which gathers and records testing data. [chris] even built a test stand with a solenoid to apply pressure to the sensor and test its frequency response to determine what sorts of measurements are possible.

We think the project is a great application for flex PCBs, and a perfect entry into our Flexible PCB Contest. You should enter too. Even though [chris] has a prototype, you don’t need one to enter: just an idea would do. Do something up on Fritzing, make a full EAGLE schematic, or just jot a block diagram down on a napkin. We want to see your ideas, and if it’s good enough you can win a flex PCB to get you started. What are you waiting for?

A Guide For Driving LED Matrices

Building an LED matrix is a fun project, but it can be a bit of a pain. Usually it starts with hand-soldering individual LEDs and resistors together, then hooking them up to rows and columns so they can be driven by a microcontroller of some sort. That’s a lot of tedious work, but you can order an LED matrix pre-built to save some time and headache. You’ll still need a driver though, and while building one yourself can be rewarding there are many pitfalls and trade-offs to consider when undertaking that project as well. Or, you can consider one of a number of drivers that [deshipu] has outlined in detail.

The hangups surrounding the driver board generally revolve around the issue of getting constant brightness from LEDs regardless of how many in the row or column are illuminated at one time. Since they are typically driven one row or column at a time, the more that are on the lower the brightness each LED will have. Driver boards take different approaches to solving this problem, which usually involve a combination of high-speed scanning of the matrix or using a constant-current source in order to eliminate the need for resistors. [deshipu] outlines four popular chips that achieve these purposes, and he highlights their pros and cons to help anyone looking to build something like this.

Most of these boards will get you to an 8×8 LED matrix with no problem, with a few going a few pixels higher in either direction. That might be enough for most of our needs, but for something larger you’ll need other solutions like the one found in this 64×32 LED matrix clock. There are also even more complicated drivers if you go into extra dimensions.

Photo credit: Komatta [Public domain], from Wikimedia Commons

Clock Plays A Game Of Pong With Itself To Pass The Time

Would you play a game of Pong where each set lasts exactly one minute and the right player is guaranteed to win 60 times more than the left player? Of course not, but if you were designing a clock that displays the time using a Pong motif, then perhaps it would make sense.

There are some neat design tips in [oliverb]’s Pong Clock that are worth taking a look at. Foremost is the case, which is a retasked jewelry box with a glass lid, procured on the cheap from eBay. It’s a good size for a clock meant to be seen from across the room, and already finished to fit into modern decor. The case holds all the goodies, from the 24×16 green LED matrix display to the Uno that runs the show, as well as an RTC module, a sound chip, a temperature sensor, and a PIR module to turn the display off when the room is unoccupied. To prevent disrupting the sleek lines of the case, all the controls are mounted in a remote panel, itself a clean and modern-looking device thanks to the chrome-plated duplex outlet cover used to house it. The clock has several display modes, from normal time and temperature to a word clock, as well as the Pong mode, where the machine plays itself and the score shows the time. It’s fascinating to watch, and we like everything about it, although we think the tick-tock would drive us nuts pretty quickly.

We recently covered the life and times of [Ted Dabney], one of Pong’s fathers and co-founder of Atari. We tend to think he’d like the design of this clock, both as a nod to his game and for its simple but functional design.

Continue reading “Clock Plays A Game Of Pong With Itself To Pass The Time”