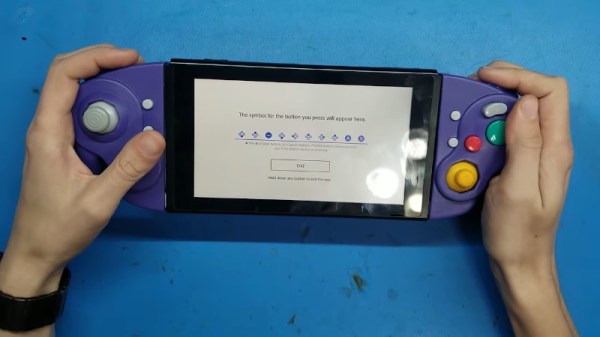
3D Printed Goggles Let R.O.B. See Into The Bluetooth World

We admit that a hack enabling a 34-year-old video game peripheral to be controlled by a mobile app wasn’t something we were expecting to see today, but if controlling something with something else isn’t the definition of a classic hack, we don’t know what is. The folks at [Croxel Inc.] worked out a way to control R.O.B. using a phone app to demo out their expertise in building hardware and software prototypes, a service they offer at their website.

R.O.B. was a little robot with movable clamp arms bundled with the 1985 release of the NES, an effort by Nintendo of America to drive sales of the console after the gaming crash of 1983 by making it look less like a video game and more like a toy. The robot receives inputs from light sensors in its head, which would be pointed towards the TV playing one of the only two games released with support for it. [Croxel] used this to their advantage, and in order to control the robot without needing a whole NES, they fabricated a board using a BGM111 Bluetooth Low-Energy module which can receive outside inputs and translate them to the light commands the robot recognizes.

To avoid having to modify the rare toy itself and having to filter out any external light, the hack consists of a 3D printed “goggles” enclosure that fits over R.O.B.’s eyes, covering them entirely. The board is fitted inside it to shine the control light into its eyes, while also flashing “eye” indicators on the outside to give it an additional charming 80s look. The inputs, which are promptly obeyed, are then given by a phone paired to the module using a custom app skinned to look like a classic NES controller.

We’ve seen more intrusive hacks to this little robot here on Hackaday, such as this one which replaces the old sluggish motors entirely with modern servos and even plans to reconstruct it from scratch given the scarcity of the originals. It’s interesting to see the ways in which people are still hacking hardware from 35 years ago, and we’re excited to see what they’ll come up with around the 40 or 50 year marks!

[via Gizmodo, thanks Itay for the tip!]

That Game Cartridge Isn’t As Straightforward As You’d Think

Classic games consoles played their games from cartridges, plastic bricks that held a PCB with the game code on it ready to be run by the console hardware. You might therefore expect them to be an easy prospect for emulation, given that the code can be extracted from whatever ROM they contain. But as anyone with an interest in the subject will tell you, some cartridges included extra hardware to boost the capabilities of their games, and this makes the job of an emulator significantly more complex.

[Byuu] has penned an article exploring this topic across a variety of consoles, with in-depth analyses of special-case cartridges. We see the obvious examples such as the DSP coprocessors famously used on some SNES games, as well as Nintendo’s Super Game Boy that contained an entire Game Boy on a chip.

But perhaps more interesting are the edge-case cartridges which didn’t contain special hardware. Capcom’s Rockman X had a copy protection feature that sabotaged the game if it detected RAM at a frequently used save game address emulated by copiers. Unfortunately this could also be triggered accidentally, so every one of the first generation Rockman X cartridges had a manually attached bodge wire that a faithful emulator must replicate. There is also the case of the Sega Genesis F22 Interceptor, which contained an 8-bit ROM where most cartridges for this 68000-powered platform had a 16-bit part. Simple attempts to copy this cartridge result in the upper 8 bits having random values due to the floating data lines, which yet again an emulator must handle correctly.

It’s a subject with a variety as huge as the number of console developers and their games, and a field in which new quirks are constantly being unearthed. While most of us don’t spend our time peering into dusty cartridges, we’re grateful for this insight into that world.

We’ve visited the world of emulators a few times before, such as when we looked at combatting in-game lag.

10-Way Game Console Lets Everyone Play

[Bitluni]’s motto seems to be, “When you’re busy, get busier.” At least that would explain adding even more work to his plate in the run-up to the Hanover Maker Faire and coming up with a ten-player game console from scratch.

As for this being extra work, recall that [bitluni] had already committed to building a giant ping pong ball LED wall for the gathering. That consisted of prototyping a quarter-scale panel, building custom tooling to get him past the literal pain point of punching 1200 holes, and wiring, programming and testing the whole display. Building a game console that supports ten players at once seems almost tame by comparison. The console is built around an ESP32 module, either WROOM or WROVER thanks to a clever multifunctional pad layout on the slick-looking white PCBs. [bitluni] went with a composite video output using the fast R-2R ladder network DAC that he used for his ESP32 VGA project. The console supports ten Nintendo gamepads for a simple but engaging game something like the Tron light cycles. Unsurprisingly, players found it more fun to just crash into each other on purpose.

Sure, it could have been biting off more than he could chew, but [bitluni] delivered and we appreciate the results. There’s something to be said for adding a little pressure to the creative process.

Continue reading “10-Way Game Console Lets Everyone Play”

RuneScape GBA Controller Is A Nostalgic Mash-Up

For gamers, the early 2000s certainly stand out as a memorable era. The dawn of the 21st century ushered in the sixth generation of home video game consoles, with Sony, Nintendo, and Microsoft all releasing their systems within a few years of each other. Nintendo also released their Game Boy Advance at around the same time, representing a minor revolution for mobile gaming. On the PC front, a free-to-play MMORPG called RuneScape was redefining people’s expectations of browser-based software.

Now, thanks to modern technology and the expert guidance of [TiKevin83], these varied bits of video game history can be used in conjunction for maximum rose-tinting effect. Using homebrew software on the GameCube and a healthy collection of wires and adapters, the GBA can be used as a controller for your adventures through the realm of Gielinor. After nearly two decades, the dreams of gamers everywhere have come true.

Well, that might be a stretch. In fact, we’d wager that nobody in human history has ever looked at the GBA and thought it would be a particularly good controller for an MMORPG. Watching the video after the break, it’s not hard to see why. Using the handheld system’s digital pad to control the mouse in RuneScape looks to be precisely as clunky as you’d imagine. But of course, that’s hardly the point.

So how is it accomplished? A homebrew tool for the GameCube’s “Game Boy Player” accessory allows the GBA, when connected to the console via the appropriate adapter cable, to mimic a standard controller. Once the GBA is running in this mode, it can then be connected to the computer using a Wii U to USB adapter. Finally, the program JoyToKey is used to map the GBA’s buttons to mouse and keyboard input for “Old School” RuneScape.

If you’d like to do something similar but aren’t quite committed enough to collect up all the Nintendo-branded ephemera this method requires, you may be interested in this DIY adapter that allows the venerable GBA to be used as a standard Bluetooth controller.

Continue reading “RuneScape GBA Controller Is A Nostalgic Mash-Up”

How To Play Doom – And More – On An NES

Doom was a breakthrough game for its time, and became so popular that now it’s essentially the “Banana For Scale” of hardware hacking. Doom has been ported to countless devices, most of which have enough processing ability to run the game natively. Recently, this lineup of Doom-compatible devices expanded to include the NES even though the system definitely doesn’t have enough capability to run it without special help. And if you want your own Doom NES cartridge, this video will show you how to build it.

We featured the original build from [TheRasteri] a while back which goes into details about how it’s possible to run such a resource-intensive game on a comparatively weak system. You just have to enter the cheat code “RASPI”. After all the heavy lifting is done, it’s time to put it into a realistic-looking cartridge.

To get everything to fit in the donor cartridge, first the ICs in the cartridge were removed (except the lockout IC) and replaced with custom ROM chips. Some modifications to the original board have to be soldered together as well, since the new chips’ pinouts don’t match perfectly. Then, most of the pin headers on the Raspberry Pi and the supporting hardware have to be removed and soldered together. Then, [TheRasteri] checks to make sure that all this extra hardware doesn’t draw too much power from the NES and overheat it.

The original project was impressive on its own, but with the Doom cartridge completed this really makes it the perfect NES hack, and also opens up the door for a lot of other custom games, including things like Mario64.

Continue reading “How To Play Doom – And More – On An NES”

NES Gets A Slick Acrylic Casemod

Those alive during the 1990s will remember the clear or “crystal” versions of various home consoles. Made with the usual injection molding processes, they usually came out somewhere closer to a smoky translucency and didn’t reveal much of the insides. [BitHead1000] likes to do things right though, and has busted out an awesome acrylic case mod for his NES.

The build starts with the disassembly of the original console, naturally, and the RF shielding is discarded in order to provide an unobstructed view of the internals. The acrylic case is then built up piece by piece, using the original case as a template. Flame polishing is used to treat the edges, and everything is stuck together using what appears to be acrylic cement. For a nice finishing touch, the cartridge door gets a frosted Nintendo logo, thanks to some careful work in the sandblasting booth.

The final product looks stunning, and the transparent case lends itself excellently to edge-lighting thanks to a few LEDs. We’ve seen [BitHead1000’s] work before, with the stunning flamethrowing N64 build. Video after the break.

The Not Quite USB-C Of Nintendo Switch Accessories

Historically gaming consoles are sold at little-to-no profit in order to entice customers with a low up-front price. The real profits roll in afterwards from sales of games and accessories. Seeking a slice of the latter, aftermarket accessory makers jump in with reverse-engineered compatible products at varying levels of “compatible”.

When the Nintendo Switch was released with a standard USB-C port for accessories, we had hoped those days of hit-or-miss reverse engineering were over, but reality fell short. Redditor [VECTORDRIVER] summarized a few parts of this story where Nintendo deviated from spec, and accessory makers still got things wrong.

Officially, Nintendo declared the Switch USB-C compliant. But as we’ve recently covered, USB-C is a big and complicated beast. Determined to find the root of their issues, confused consumers banded together on the internet to gather anecdotal evidence and speculate. One theory is that Nintendo’s official dock deviated from official USB-C dimensions in pursuit of a specific tactile feel; namely reducing tolerance on proper USB-C pin alignment and compensating with an internal mechanism. With Nintendo playing fast and loose with the specs, it makes developing properly functioning aftermarket accessories all the more difficult.

But that’s not the only way a company can slip up with their aftermarket dock. A teardown revealed Nyko didn’t use a dedicated chip to manage USB power delivery, choosing instead to implement it in software running on ATmega8. We can speculate on why (parts cost? time to market?) but more importantly we can read the actual voltage on its output pins which are too high. Every use becomes a risky game of “will this Switch tolerate above-spec voltage today?” We expect that as USB-C becomes more common, it would soon be cheapest and easiest to use a dedicated chip, eliminating the work of an independent implementation and risk of doing it wrong.

These are fairly typical early teething problems for a new complex technology on their road to ubiquity. Early USB keyboard and mice didn’t always work, and certain combination of early PCI-Express cards and motherboards caused damage. Hopefully USB-C problems — and memories of them — will fade in time as well.

[via Ars Technica]

[Main image source: iFixit Nintendo Switch Teardown]