Improved Controller For E-Skateboards

[Timo] recently purchased himself a Acton Blink Qu4tro electric skateboard. Performance-wise, the board was great, but the controller left a lot to be desired. There were issues with pairing, battery displays, and just general rideability. Like any good hacker, he decided some reverse engineering was in order, and got to work.

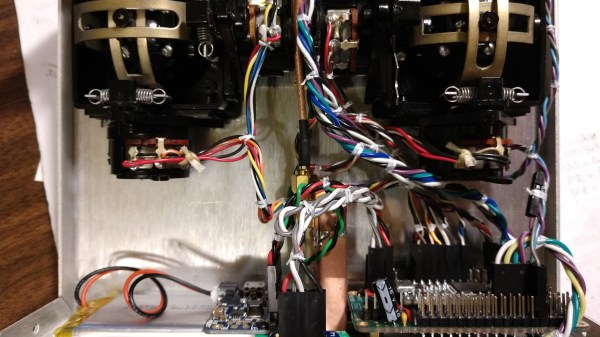
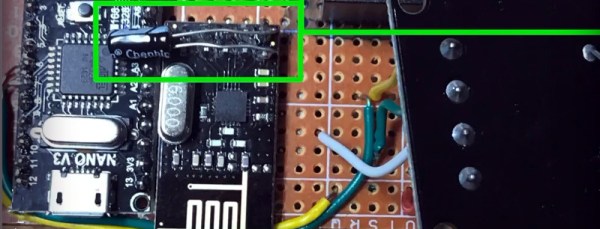
Initial results were disheartening – the skateboard relies on various chips of Chinese origin for which documentation proved impossible to come by. However, as it turned out, the board and controller communicated using the common NRF24L01+ transceiver.

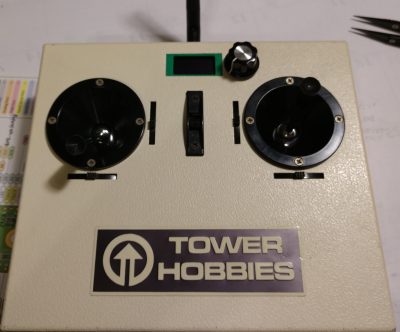
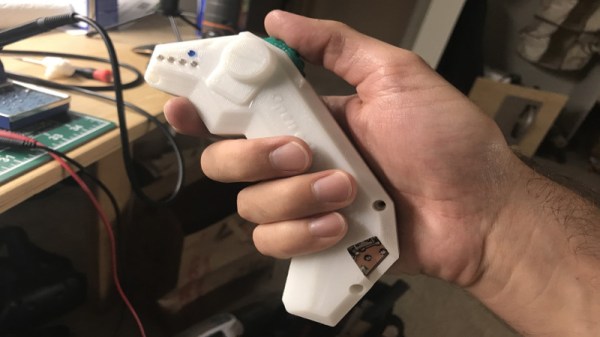
Initial work focused on understanding the pairing process and message protocol. With that done, [Timo] decided the best course of action was to redevelop a controller from scratch, using an Arduino Nano and NRF24L01+ to do the job. [Timo]’s Open esk8 controller improves driveability by removing delays in message transfer, as well as improving on the feel of the controller with a 3D printed chassis redesign.

[Timo] now has a much more usable skateboard, and has racked up over 200 miles in testing since the build. However, if you fancy converting your existing board to electric, check out this project.

Hacked RC Transmitters Control All The Things

If you have lots of RC creations about, each with their own receiver, you’ll know that the cost of a new one for each project can quickly mount up – despite RC receivers being pretty cheap these days. What if you could use a NRF24L01+ module costing less than $3?

That’s just what [Rudolph] has done for his Hackaday Prize entry, rudRemoteThough many people already spin their own RC link with the NRF24 modules, this sets itself apart by being a complete, well thought out solution, easily scalable to a large number of receivers.

The transmitter can be made of anything to hand; stick an NRF24 module and Teensy inside, some gimbals if needed, and you have a rudRemote transmitter. Gaming controllers, sandwich boxes and piles of laser cut parts are all encouraged options. [Rudolph] used some 40-year-old transmitters for his build – on the outside they remain unchanged, apart from a small OLED and rotary encoder for the function menu. The gimbal connections are simply re-routed to the Teensy I/O.

The protocol used is CRTP (Crazy RealTime Protocol); this is partly because one of the things [Rudolph] wanted to control is a CrazyFlie quadcopter. It’s a protocol that can easily be used to control anything you like, providing it fits into the 29-byte payload space. The CrazyFlie only uses 14 bytes of that, so there’s plenty of headroom for auxiliary functions.

We’d be interested to see the latency of this system – we’ve some surprising results when it comes to measuring cheap RC transmitter latency.

Glorious Body Of Tracked ‘Mad Mech’ Started As Cardboard

[Dickel] always liked tracked vehicles. Taking inspiration from the ‘Peacemaker’ tracked vehicle in Mad Max: Fury Road, he replicated it as the Mad Mech. The vehicle is remote-controlled and the tank treads are partly from a VEX robotics tank tread kit. Control is via a DIY wireless controller using an Arduino and NRF24L01 modules. The vehicle itself uses an Arduino UNO with an L298N motor driver. Power is from three Li-Po cells.

The real artistic work is in the body. [Dickel] used a papercraft tool called Pepakura (non-free software, but this Blender plugin is an alternative free approach) for the design to make the body out of thin cardboard. The cardboard design was then modified to make it match the body of the Peacemaker as much as possible. It was coated in fiberglass for strength, then the rest of the work was done with body filler and sanding for a smooth finish. After a few more details and a good paint job, it was ready to roll.

There’s a lot of great effort that went into this build, and [Dickel] shows his work and process on his project page and in the videos embedded below. The first video shows the finished Mad Mech being taken for some test drives. The second is a montage showing key parts of the build process.

Continue reading “Glorious Body Of Tracked ‘Mad Mech’ Started As Cardboard”

Wireless Protocol Reverse Engineered To Create Wrist Wearable Mouse

We’ve seen a few near-future sci-fi films recently where computers respond not just to touchscreen gestures but also to broad commands, like swiping a phone to throw its display onto a large flat panel display. It’s a nice metaphor, and if we’re going to see something like it soon, perhaps this wrist-mounted pointing device will be one way to get there.

The video below shows the finished product in action, with the cursor controlled by arm movements. Finger gestures that are very much like handling a real mouse’s buttons are interpreted as clicks. The wearable has a Nano, an MPU6050 IMU, and a nRF24L01 transceiver, all powered by some coin cells and tucked nicely into a 3D-printed case. To be honest, as cool as [Ronan Gaillard]’s wrist mouse is, the real story here is the reverse engineering he and his classmate did to pull this one off.

The road to the finished product was very interesting and more detail is shared in their final presentation (in French and heavy with memes). Our French is sufficient only to decipher “Le dongle Logitech,” but there are enough packet diagrams supporting into get the gist. They sniffed the packets going between a wireless keyboard and its dongle and figured out how to imitate mouse movements using an NRF24 module. Translating wrist and finger movements to cursor position via the 6-axis IMU involved some fairly fancy math, but it all seems to have worked in the end, and it makes for a very impressive project.

Is sniffing wireless packets in your future? Perhaps this guide to Wireshark and the nRF24L01 will prove useful.

Continue reading “Wireless Protocol Reverse Engineered To Create Wrist Wearable Mouse”

High-Effort Streaming Remote For Low-Effort Bingeing

There’s no limit to the amount of work some people will put into avoiding work. For instance, why bother to get up from your YouTube-induced vegetative state to adjust the volume when you can design and build a remote to do it for you?

Loath to interrupt his PC streaming binge sessions, [miroslavus] decided to take matters into his own hands. When a commercially available wireless keyboard proved simultaneously overkill for the job and comically non-ergonomic, he decided to build a custom streaming remote. His recent microswitch encoder is prominently featured and provides scrolling control for volume and menu functions, and dedicated buttons are provided for play controls. The device reconfigures at the click of a switch to support Netflix, which like YouTube is controlled by sending keystrokes to the PC through a matching receiver. It’s a really thoughtful design, and we’re sure the effort [miroslavus] put into this will be well worth the dozens of calories it’ll save in the coming years.

A 3D-printed DIY remote is neat, but don’t forget that printing can also save a dog-chewed remote and win the Repairs You Can Print contest.

Continue reading “High-Effort Streaming Remote For Low-Effort Bingeing”

Over The Air Updates For Your Arduino

An Arduino and a data radio can make a great remote sensor node. Often in such situations, the hardware ends up installed somewhere hard to get to – be it in a light fitting, behind a wall, or secreted somewhere outdoors. Not places that you’d want to squeeze a cable repeatedly into while debugging.

[2BitOrNot2Bit] decided this simply wouldn’t do, and decided to program the Arduinos over the air instead.

Using the NRF24L01 chip with the Arduino is a popular choice to add wireless communications to a small project. By installing one of these radios on both the remote hardware and a local Arduino connected to the programming computer, it’s possible to remotely flash the Arduino without any physical contact whatsoever using Optiboot.

The writeup is comprehensive and covers both the required hardware setup for both ends of the operation as well as how to install the relevant bootloaders. If you’re already using the NRF24L01 in your projects, this could be the ideal solution to your programming woes. Perhaps you’re using a different platform though – like an Arduino on WiFi? Don’t worry – you can do OTA updates that way, too.

Sub-$20 Arduino-Based Telemetry System

[William Osman] set out to prove that unlike expensive commercial data logging rigs, he could get the same results for under twenty bucks. He wanted to build a wireless three-axis accelerometer for a race car project, allowing engineers to make modifications to the suspension based on the data collected.

The hardware consists of an Arduino Pro Mini connected to a three-axis accelerometer, and an nRF24L01 wireless module. Power is supplied by the race car’s 12 V, changed to 5 V by a linear regulator with the Pro Mini in turn supplying 3.3 V. The base station consists of an Arduino and another nRF24L01 module plugged into a laptop.

The telemetry system is based on COSMOS, an open-source, realtime datalogging platform put out by Bell Aerospace. COSMOS consists of fifteen separate applications depending on how you want to view and manage your telemetry. You can download [William]’s COSMOS config files and Arduino sketch on Google Docs.

We’ve published a bunch of pieces on telemetry, like this ESP8266 telemetry project, a rocket telemetry rig, and open sourcing satellite telemetry.

[Thanks, Dennis Nestor!]