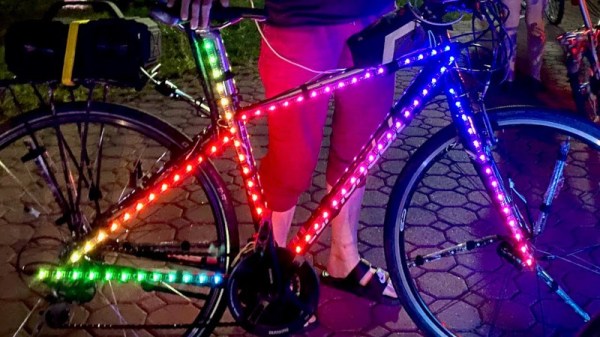
Get Creative With This ESP8266 Photography Light

In today’s fast-paced world of social media, if you want your photos to grab attention, you’ve got to have an edge. Whether it’s a deft touch in Photoshop or an amazing lens, it’s important to stand apart. Another great way is to experiment with lighting and color. To do just that, [Andrei] built a pocket RGB photo light for the home studio.

[Andrei]’s cat models for the camera.
This is a project that any experienced maker should be able to whip up in a weekend. Not that there’s anything wrong with that, of course. The basic enclosure is 3D printed and readily reproducible on any FDM printer. Lighting is provided via the venerable WS2812B LED, 68 of them, to be exact. Finally there’s an ESP8266 running WLED, a webserver for the platform that’s dedicated to controlling LED strips. This makes it easy to tweak the LEDs with your smartphone.

Thanks to the WS2812Bs LEDs, a full range of RGB colors are available for [Andrei] to experiment with. He’s done a great job showing off the light with a few choice cat pics that serve to show its capabilities. While we wouldn’t expect to use such a device for clean white lighting in a serious photographic sense, it’s a perfect tool for art photography.

We’ve covered other studio light builds before, too. Video after the break.

Continue reading “Get Creative With This ESP8266 Photography Light”

Hex Matrix Clock Is Spellbinding

Just when we think we’ve seen all possible combinations of 3D printing, microcontrollers, and pretty blinkenlights coming together to form DIY clocks, [Mukesh_Sankhla] goes and builds this geometric beauty. It’s kaleidoscopic, it’s mosaic, and it sorta resembles stained glass, but is way cheaper and easier.

The crucial part of the print does two jobs — it combines a plate full of holes for a string of addressable RGB LEDs with the light-dividing walls that turn the LEDs into triangular pixels. [Mukesh] designed digits for a clock that each use ten triangles. You’d need an ESP8266 to run the clock code, or if you’d rather sit and admire the rainbow light show unabated by the passing of time, just use an Arduino Uno or something similar.

Most of the aesthetic magic here is in the printed pieces and the FastLED library. It has a bunch of really cool animations baked in that look great with this design. Check out the demo video after the break. The audio is really quiet until the very end of the video, so be warned. In our opinion, the audio isn’t necessary to follow along with the build.

The humble clock takes many lovely forms around here, including pop art.

Continue reading “Hex Matrix Clock Is Spellbinding”

Laser Cutting Your Way To An RGB LED Table

You’ve got the RGB keyboard, maybe even the RGB mouse. But can you really call yourself master of the technicolor LED if you don’t have an RGB table to game on? We think you already know the answer. Luckily, as [ItKindaWorks] shows in his latest project, it’s easy to build your own. Assuming you’ve got a big enough laser cutter anyway…

The construction of the table is quite straightforward. Using an 80 watt laser cutter, he puts a channel into a sheet of MDF to accept RGB LED strips, a pocket to hold a Qi wireless charger, and a hole to run all the wires out through. This is then backed with a second, solid, sheet of MDF.

Next, a piece of thin wood veneer goes into the laser cutter. In the video after the break you can see its natural tendency to roll up gave [ItKindaWorks] a little bit of trouble, but when strategically weighted down, it eventually lays out flat. He then uses the laser to blast an array of tiny holes in the veneer, through which the light from the LEDs will shine when it’s been glued over the MDF. A few strips of plastic laid over the strips serve both to diffuse the light and support the top surface.

The end result is truly gorgeous and has a very futuristic feel. Assuming you’ve got the equipment, it’s also a relatively simple concept to experiment with. It’s yet another example of the unique construction techniques possible when you add a high-powered laser to your arsenal.

Continue reading “Laser Cutting Your Way To An RGB LED Table”

RGB Minecraft Sign Isn’t Just For Looks

This laser cut and LED illuminated version of the Minecraft logo created by [Geeksmithing] looks good enough to occupy a place of honor on any gamer’s shelf. But it’s not just decoration: it can also notify you about your Minecraft’s server status and tell you when players are online by way of its addressable LEDs.

In the first half of the video after the break, [Geeksmithing] shows how the logo itself was built by cutting out pieces of white and black acrylic on his laser cutter. When stacked up together, it creates an impressive 3D effect but also isolates each letter. With carefully aligned rows of RGB LEDs behind the stack, each individual letter can be lit in its own color (or not at all) without the light bleeding into either side.

Once he had a way of lighting up each letter individually, it was just a matter of writing some code for the Raspberry Pi that can do something useful with them. Notifying him when the server goes down is easy enough, just blink them all red. But the code [Geeksmithing] came up with also associates each letter with one of the friends he plays with, and lights them up when they go online. So at a glance he can not only tell how many friends are already in the game, but which ones they are. Naturally this means the display can only show the status of nine friends…but hey, that’s more than we have anyway.

We’ve been seeing people connect the real world to Minecraft in weird and wonderful ways for years now, and it doesn’t seem like there’s any sign of things slowing down. While we recognize the game isn’t for everyone, but you’ve got to respect the incredible creativity it’s inspired in young and old players alike.

Continue reading “RGB Minecraft Sign Isn’t Just For Looks”

Elegant Shoji Lamps From Your 3D Printer

The gorgeous Shoji-style lamps you’re seeing here aren’t made of wood or paper. Beyond the LEDs illuminating them from within, the lamps are completely 3D printed. There aren’t any fasteners or glue holding them together either, as creator [Dheera Venkatraman] used authentic Japanese wood joinery techniques to make their components fit together like a puzzle.

While we’re usually more taken with the electronic components of the projects that get sent our way, we have to admit that in this case, the enclosure is really the star of the show. [Dheera] has included a versatile mounting point where you could put anything from a cheap LED candle to a few WS2812B modules, but otherwise leaves the integration of electronic components as an exercise for the reader.

All of the components were designed in OpenSCAD, which means it should be relatively easy to add your own designs to the list of included panel types. Despite the colorful details, you won’t need a multi-material printer to run them off either. Everything you see here was printed on a Prusa i3 MK3S in PETG. Filament swaps and careful design were used to achieve the multiple colors visible on some of the more intricate panels.

If the timeless style of these Japanese lanterns has caught your eye, you’ll love this beautiful sunrise clock we covered last year.

An RGB Backlight For The Nokia 5110 LCD

Hardware hackers love the Nokia 5110 LCD. Or at least, they love the clones of it. You can pick up one of these panels for a couple bucks wherever electronic bits and bobs are sold, and integrating it into your project is a snap thanks to all the code and documentation floating around out there. But while it might be cheap and reliable, it’s not a terribly exciting component.

Which is perhaps why [Miguel Reis] thought he’d spruce it up a bit with an RGB backlight. While we’ll admit that this hack is mostly about looking cool, it’s not entirely without practical application. If your gadget experiences some kind of fault, having it flash the LCD bright red is sure to get somebody’s attention from across the room.

The board itself is very straightforward, with four MHPA1010RGBDT RGB LEDs and a couple of passives to keep them happy. The Nokia 5110 LCD module just pops right on, and beyond the extra pins added for the three LED colors, gets wired up the same as before. The backlight LEDs just need a few spare GPIO pins on your microcontroller to drive them, and away you go.

[Miguel] is currently selling his RGB version of this iconic LCD on Tindie for only a couple dollars more than the standard version, so it looks like a pretty cheap way to add a little bling to your next project. (Tindie is owned by Supplyframe, which also owns Hackaday. But they didn’t put us up to adding this link.)

Tic Tac Arduintoe Moves The Game To 4×4

We know you’re out there spending a lot more time with your loved ones, and appreciate that you may be running out of ways to keep everyone entertained. [Mukesh] dropped us a tip because he has the antidote to boredom — a new twist on that old chestnut, Tic Tac Toe.

Instead of the usual 3×3 configuration, [Mukesh] made the grid 4×4 so the game would be more engaging. Game play is otherwise the same — this Tic Tac Toe still results in a lot of draws, but they take longer and you can’t see them coming a mile away. What’s even more engaging is that you get to push clicky buttons that light up, and don’t have to draw a grid before every game.

Under the hood is an Arduino Uno that controls 16 push buttons and their corresponding RGB LEDs. Whoever goes first is blue, and player two gets pink. If you win, your color floods the board for a brief victory animation. If the game is a tie, the board turns red. We really like the printed two-piece buttons that house the LEDs and actuate the push buttons while keeping the two separate. Toe your way past the break to check out the build video.

Intrigued by the 4×4 version, but need a build that takes more time? Try building your TTT in TTL.

Continue reading “Tic Tac Arduintoe Moves The Game To 4×4”