How To Get Into Cars: Forced Induction

For those addicted to automotive thrills, there’s always an underlying lust for more power. For those chasing a bigger number, forced induction is one of the most effective ways to achieve it. In addition to more grunt, you get a whole bunch of fun new noises, too.  For those with a naturally aspirated car, here’s how you go about converting to forced induction.

Superchargers and Turbos

When we talk about forced induction, we’re talking about forcing more air into the engine under pressure. With more air available, it’s possible to fully combust more fuel, creating more power. The two most common ways of doing this are supercharging and turbocharging. We’ll be using the common automotive vernacular here, so those eager to bicker about terminology from the early 20th century aircraft industry best do it in the comments. Continue reading “How To Get Into Cars: Forced Induction”

Software Shortcut Keyboard Registers Many Macros

[FabroLabs Technologies] is an industrial designer who uses several creative-type software programs in a given day. Unfortunately, they all have slightly different shortcut schemes, and trying to remember all the different modifiers is a waste of time better spent elsewhere.

This lovely little macro keyboard is every bit as useful as it is cool looking. Spinning the rotary encoder cycles through a menu of programs on the 16×2 LCD, and the key map just updates automatically for the chosen program. At the heart of this build is an Arduino Pro Micro and 20 of the loudest key switches ever made — Cherry MX blues. We like that it manages to look like toy cash register and a serious peripheral all at once — it probably has something to do with those way-cool circular keycaps that were made on a resin printer.

We’re glad that [FabroLabs] laid down such a comprehensive and open build guide during the process of making this macro keyboard. The average hacker can learn a lot from industrial designers who show their work. Remember the time [Eric Strebel] showed us all how to improve our foam board design game?

Google And Apple Reveal Their Coronavirus Contact Tracing Plans: We Kick The Tires

Google and Apple have joined forces to issue a common API that will run on their mobile phone operating systems, enabling applications to track people who you come “into contact” with in order to slow the spread of the COVID-19 pandemic. It’s an extremely tall order to do so in a way that is voluntary, respects personal privacy as much as possible, doesn’t rely on potentially vulnerable centralized services, and doesn’t produce so many false positives that the results are either ignored or create a mass panic. And perhaps much more importantly, it’s got to work.

Slowing the Spread

As I write this, the COVID-19 pandemic seems to be just turning the corner from uncontrolled exponential growth to something that’s potentially more manageable, but it’s not clear that we yet see an end in sight. So far, this has required hundreds of millions of people to go into essentially voluntary quarantine. But that’s a blunt tool. In an ideal world, you could stop the disease globally in a couple weeks if you could somehow test everyone and isolate those who have been exposed to the virus. In the real world, truly comprehensive testing is impossible, and figuring out whom to isolate is extraordinarily difficult due to two factors: COVID-19 has a long incubation period during which it is nonetheless transmissible, and some or even most people don’t know they have it. How can you stop what you can’t see, and even when you can detect it, it’s a week too late?

One promising approach is to isolate those people who’ve been in contact with known cases during the stealth contagion period. To do this is essentially to keep a diary of everyone you’ve been in contact with for the last week or two, and then if you eventually test positive for COVID-19, alert them all so that they can keep from infecting others even before they test positive: track and trace. Doctors can do this by interviewing patients who test positive (this is the “contact tracing” we’ve been hearing so much about), but memory is imperfect. Enter a technological solution. Continue reading “Google And Apple Reveal Their Coronavirus Contact Tracing Plans: We Kick The Tires”

Reverse Engineering A Saab’s In-Dash Display

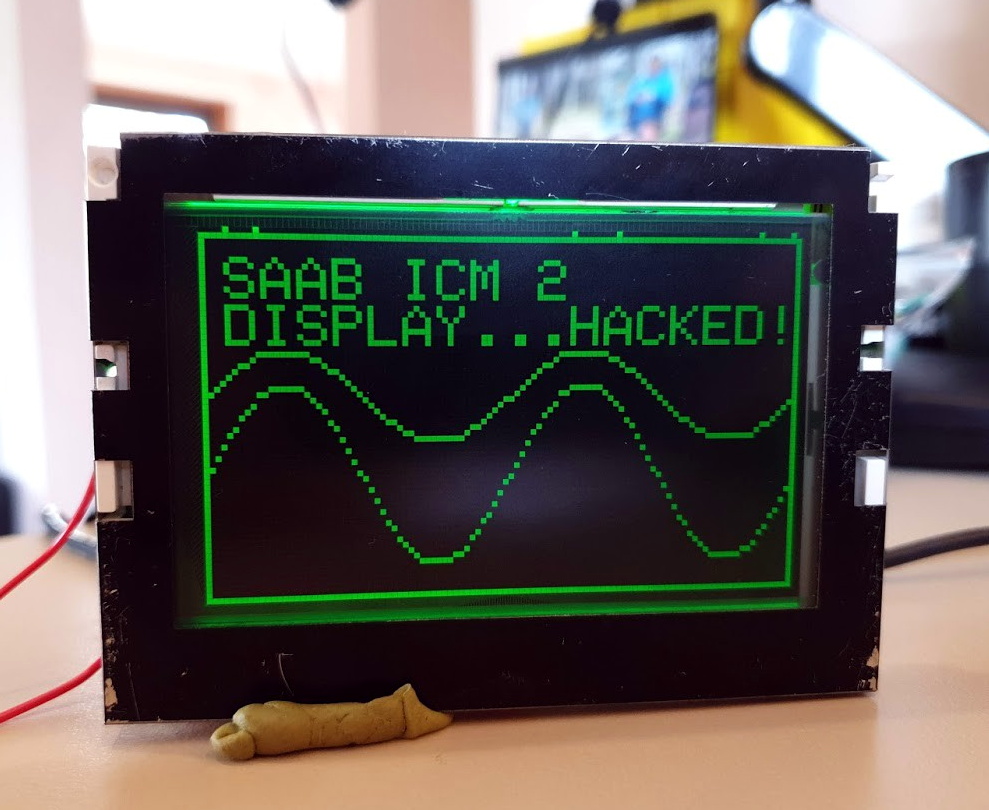
For [Leigh Oliver], there’s something undeniably appealing about the green on black instrumentation of the 2003 Saab 9-3 Gen2. Perhaps it’s because the Infotainment Control Module 2 (ICM2) screen brings a bit of that classic Matrix vibe to the daily commute. Whatever the reason, it seemed the display deserved better than to be stuck showing the nearly 20 year old stock user interface. Luckily, you can control it via I2C.

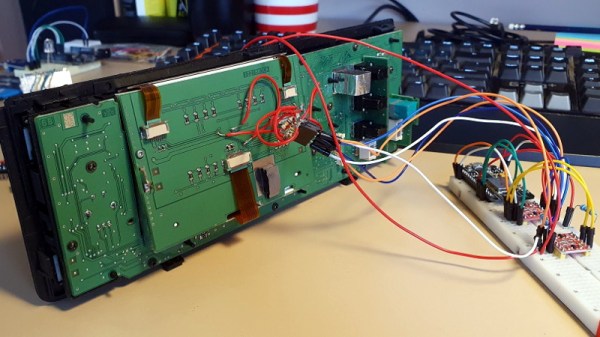
Though as you might expect, that fact wasn’t obvious at first. [Leigh] had to start by taking the ICM2 apart and reverse engineering the display board. With a multimeter and high resolution photographs of both sides of the PCB, all of the traces were mapped out and recreated in KiCAD. This might not have been strictly necessary, but it did serve as good practice for using KiCAD; a worthwhile tip for anyone else looking to build practical experience creating schematics.

With everything mapped out, [Leigh] was able to connect a BusPirate V3 up to the board and pretty quickly determine it was using I2C to control the display. As far as figuring out how to repurpose existing displays goes, this was perhaps the best possible scenario. It even allowed for creating a display library based on Adafruit_GFX which offers graphical capabilities far beyond what the ICM2 module itself is capable of.

Even with so much progress made, this project is really just getting started. [Leigh] has managed to put some impressive imagery on the black and green Saab display, but the hardware side of things is still being worked on. For example, there’s some hope that an I2C multiplexer would allow the display to easily and quickly be switched between “stock” mode and whatever enhanced version comes about thanks to the new libraries and an ESP8266 hiding behind the dashboard.

If you don’t have a sufficiently vintage Saab to take advantage of this project, don’t worry. Tapping into the OBD port with an OLED display can get you similar results on a wide range of vehicles.

A Dangerous Demonstration Of The Power Of Radio

Terrestrial radio may be a dying medium, but there are still plenty of listeners out there. What would a commute to or from work be without a check of “Traffic on the Eights” to see if you need to alter your route, or an update of the scores from yesterday’s games? Getting that signal out to as many listeners as possible takes a lot of power, and this dangerous yet fascinating demo shows just how much power there is on some radio towers.

Coming to us by way of a reddit post, the short video clips show a crew working on a 15,000-Watt AM radio tower. They appear to be preparing to do tower maintenance, which means de-energizing the antenna. As the engineer explains, antennas for AM radio stations in the medium-wave band are generally the entire tower structure, as opposed to the towers for FM and TV stations, which generally just loft the antenna as high as possible above the landscape. The fun starts when the crew disconnects a jumper and an arc forms across the clamp and the antenna feed. The resulting ball of plasma acts like a speaker, letting us clearly hear the programming on the station. It’s like one of the plasma speakers we’ve seen before, albeit exceptionally more dangerous.

It’s an impressive display of the power coursing through broadcast towers, and a vivid reminder to not mess with them. Such warnings often go unheeded, sadly, with the young and foolish paying the price. There’s a reason they put fences up around radio towers, after all.

Continue reading “A Dangerous Demonstration Of The Power Of Radio”

LED Clock Strips Time Down To Pulses Of Light

Nietzsche said (essentially) that time is a flat circle — we are doomed to repeat history whether we remember it or not. This is a stark and sobering thought for sure, but it’s bound to dissipate the longer you look at [andrei.erdei]’s literal realization of time as a flat circle.

A clock that uses nothing but RGB LEDs to give the time sounds confusing and potentially cluttered, but the result here is quite pleasing and serene. We figure it must be the combination of brighter LEDs to represent 12, 3, 6, and 9, and dimmer LEDs for the rest of the numbers, plus the diffusion scheme. The front plate is smoky acrylic topped with two layers of frosted black window foil.

Inside the printed plastic ring are two adhesive RGB LED strips running on an ESP8266 that ultimately connects to an NTP time server. The strips are two halves of an adhesive 60 LED/meter run that have been stuck together back to back so that the lights are staggered for seamless coverage. This sets up the coolest thing about this clock — the second hand, which is represented by a single pink LED zig-zagging back and forth around the ring. Confused? Watch the short demo after the break and you’ll figure it out in no time.

Now that times are strange, you might be more interested in a straightforward approach to finding out what day it is. The wait is over.

Continue reading “LED Clock Strips Time Down To Pulses Of Light”

This Camera Captures Piezo Inkjet Micro-Drops For DIY Microfluidics

In microfluidics, there are “drop on demand” instruments to precisely deposit extremely small volumes (pico- or nano-liters) of fluid. These devices are prohibitively expensive, so [Kyle] set out to design a system using hobbyist-level parts for under $1000. As part of this, he has a fascinating use case for a specialized camera: capturing the formation and shape of a micro-drop as it is made.

There are so many different parts to this effort that it’s all worth a read, but the two big design elements come down to:

  1. Making the microdrop using a piezo element
  2. Ensuring the drop is made correctly, and visually troubleshooting
Working prototype. The piezo tube is inside the blue piece at the top. The camera is to the right, and the LED strobe is on the left.

It’s one thing to make an inkjet element in a printer work, but it’s quite another to make a piezoelectric element dispense arbitrary liquids in a controlled, repeatable, and predictable way. Because piezoelectric elements force liquid out with a mechanical motion, different liquids require different drive signals and that kind of experimentation requires a way to see what is going on, hence the need for a drop observation camera.

[Kyle] ended up taking the lens assembly from a cheap USB microscope and mating it to his Korukesu C1 USB Camera with a 3D printed assembly. Another 3D printed enclosure doubles as a lightbox, holding the piezo tube in the center with the LED strobe and camera on opposite sides. The whole assembly had a few false starts, but in the end [Kyle] seems pretty happy with his results. The device is briefly described at a high level here. There are some rough edges, but it’s a working system.

Inkjet technology has been around for a long time (you can see a thirty-plus year old inkjet printer in action here) but it’s worth mentioning that not all inkjet heads are alike. Most inkjet printer heads operate thermally, which means a flash of heat vaporizes some ink to expel a micro-drop. These heads aren’t very suitable for microfluidics because not only do they rely on vaporizing the liquid, but they also don’t work well with anything other than the ink they’re designed for. Piezoelectric print heads are less common, but are more suited to the kind of work [Kyle] is doing.