3D Print Your Very Own Mechanical Computer

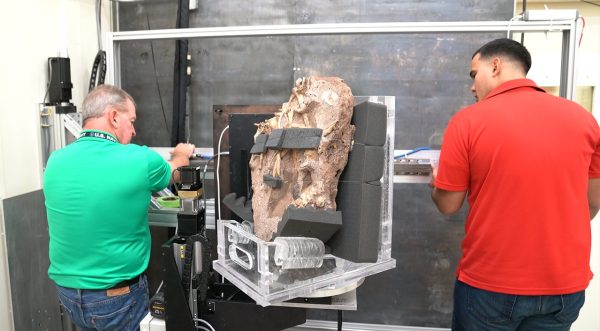
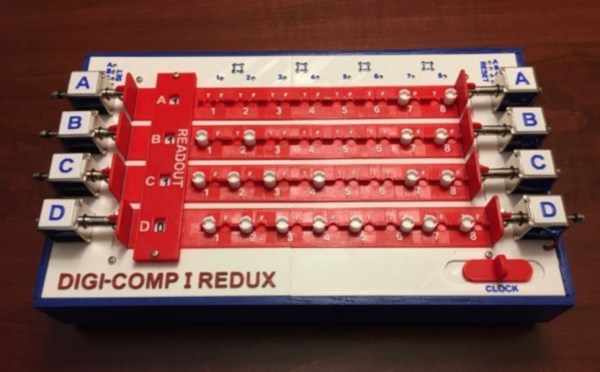
Most Hackaday readers are familiar with computers from the 70s and 80s, but what about ones even older than that? The Digi Comp 1 was a commercially available computer from the 1960s that actually cost less than a modern-day microcontroller. The catch? It was mechanical rather than electrical. Thanks to retro-wizard [Mike Gardi], now anyone can build a replica of one.

Admittedly the Digi Comp 1 was more of a toy than a tool, but it was still a working computer. It contained three flip-flops (memory) and had a lever that acted as a clock, allowing the user to perform boolean operations and some addition and subtraction. Certainly not advanced, but interesting nonetheless. [Mike]’s version of the Digi Comp 1 has an extra bit when compared to the original and includes some other upgrades, but largely remains faithful to the original design.

If you want to print one of these on your own, [Mike] has made all of the files available on Thingiverse. He has also experimented with other mechanical computers as well, including the sequel Digi Comp 2. We’ve seen some recent interest in that mechanical computer lately as well.

Continue reading “3D Print Your Very Own Mechanical Computer”

Weather Station Gets Much-Needed Upgrades

Weather stations are a popular project, partly because it’s helpful (and interesting) to know about the weather at your exact location rather than a forecast that might be vaguely in your zip code. They’re also popular because they’re a good way to get experience with microcontrollers, sensors, I/O, and communications protocols. Your own build may also be easily upgradeable as the years go by, and [Tysonpower] shows us some of the upgrades he’s made to the popular Sparkfun weather station from a few years ago.

The Sparkfun station is a good basis for a build though, it just needs some updates. The first was that the sensor package isn’t readily available though, but some hunting on Aliexpress netted a similar set of sensors from China. A Wemos D1 Mini was used as a replacement controller, and with it all buttoned up and programmed it turns out to be slightly cheaper (and more up-to-date) than the original Sparkfun station.

All of the parts and code for this new station are available on [Tysonpower]’s Github page, and if you want to take a look at a similar station that we’ve featured here before, there’s one from three years ago that’s also solar-powered.

Continue reading “Weather Station Gets Much-Needed Upgrades”

Hiring From A Makerspace Pays Off

A makerspace is a great place to use specialty tools that may be too expensive or large to own by oneself, but there are other perks that come with participation in that particular community. For example, all of the skills you’ve gained by using all that fancy equipment may make you employable in some very niche situations. [lukeiamyourfather] from the Dallas Makerspace recently found himself in just that situation, and was asked to image a two-million-year-old fossil.

The fossil was being placed into a CT machine for imaging, but was too thick to properly view. These things tend to be fragile, so he spent some time laser cutting an acrylic stand in order to image the fossil vertically instead of horizontally. Everything that wasn’t fossil had to be non-conductive for the CT machine, so lots of fishing line and foam was used as well. After the imaging was done, he was also asked to 3D print a model for a display in the museum.

This is all going on at the Perot Museum of Nature and Science if you happen to be in the Dallas area. It’s interesting to see these skills put to use out in the wild as well, especially for something as rare and fragile as studying an old fossil. Also, if you’d like to see if your local makerspace measures up to the Dallas makerspace, we featured a tour of it back in 2014, although they have probably made some updates since then.

Linux’s Marketing Problem

The cult classic movie Office Space is a scathing critique of life for software engineers in a cubicle farm, and it did get a lot of things right even if it didn’t always mean to. One of those is the character of Tom Smykowski whose job is to “deal with the customers so the engineers don’t have to”. The movie treats Tom and his job as a punchline in a way, but his role is actually very important for most real businesses that rely on engineers or programmers for their core products.

Engineers can have difficulty relating to customers, and often don’t have the time (or even willingness) to handle the logistics of interacting with them in the first place. Customers may get frustrated understanding engineers or communicating their ideas clearly to them. A person like Tom Smykowski is often necessary to bridge the gap and smooth out the rough edges on both sides, but in the Linux world there are very few Toms to rely on. The customers, or users, have to deal directly with the engineers in many situations, and it’s not working out very well for either group. Linux has a marketing problem, and it needs a marketing solution if it ever wants to increase its market share in the PC realm. Continue reading “Linux’s Marketing Problem”

Solenoid Engine Adds Three “Pistons”

The earliest piston engines typically had only one cylinder, and at best, produced horsepower measured in single digits. But once you have a working engine, it’s a relatively short step to adding cylinders and increasing the power output. [Emiel] made a similar upgrade to one of his engines recently, upgrading it from one cylinder to four. But this isn’t an internal combustion engine, it gets its power from electric solenoids.

We featured his single-cylinder build about a month ago, and since then he’s been busy with this impressive upgrade. The new engine features four cylinders arranged in a V4 pattern. Of course, this greatly increases the mechanical complexity. To start, he had to machine a crankshaft to connect all four “pistons” to a shared output shaft. He also had to build a set of cams in order to time the firing of the cylinders properly, so they don’t work against one another.

The build is just as polished and impressive as the last, which is saying a lot. [Emiel] has a quality machine shop and built the entire motor from scratch, including winding the solenoids, machining the connecting rods and shafts, and building a very picturesque wooden base for the entire contraption to sit on. It’s definitely worth checking out.

Continue reading “Solenoid Engine Adds Three “Pistons””

Proprietary Fan Blows, Gets PWM Upgrade

Proprietary components are the bane of anyone who dares to try and repair their own hardware. Nonstandard sizes, lack of labeling or documentation, and unavailable spare parts are all par for the course. [Jason] was unlucky enough to have an older Dell computer with a broken, and proprietary, cooling fan on it and had to make some interesting modifications to replace it.

The original fan had three wires and was controlled thermostatically, meaning that a small thermistor would speed up the the fan as the temperature increased. Of course, the standard way of controlling CPU fans these days is with PWM, so he built a circuit which essentially converts the PWM signal from the motherboard into a phantom thermistor. It’s even more impressive that it was able to be done with little more than a MOSFET and a Zener diode.

Unfortunately, there was a catch. The circuit only works one way, meaning the fan speed doesn’t get reported to the motherboard and the operating system thinks the fan has failed. But [Jason] simply disabled the warning and washed his hands of that problem. If you don’t want to use a CPU fan at all, you can always just dunk your entire computer in mineral oil.

Hand-Made Drum Carder Gets Wool Ready For Spinning

Making a natural fiber like wool into something useful like a sweater involves a lot of steps. We might be familiar with shearing the sheep, spinning the wool into yarn, or knitting and weaving, but between shearing and spinning there’s another unfamiliar process you’ll have to go through. Known as carding, it helps align the fibers so they are able to be spun, and of course it requires either an expensive tool, or one you build on your own.

This drum carder is exactly what it sounds like. It uses two drums covered in a metal mesh, spinning at different speeds, which pull the fibers into an orderly shape. Small drum carders like this can run around $600 but with some quality wood and a lathe you can easily make one for a fraction. Making the series of drums is fairly straightforward with a lathe, and from there you need to make sure they are connected with a quality belt or chain and then covered in the appropriate metal mesh.

[kris] notes in the reddit comments section that he’d like for a second version to spin a little faster and be a little more durable, but this is a great working carder nonetheless. From there you’ll want to move on to spinning the wool into yarn, which you can do with either a wheel or an electric motor.

Continue reading “Hand-Made Drum Carder Gets Wool Ready For Spinning”