Everyone’s Favorite Energy Meter Hack, Now Wireless

[Kalle] is at it again with more hacks on electricity use meters. This time, the meter has been hacked to stream their data over the aether wirelessly. Now, data can be grabbed from multiple devices simultaneously, making the possibilities for home energy monitoring limitless

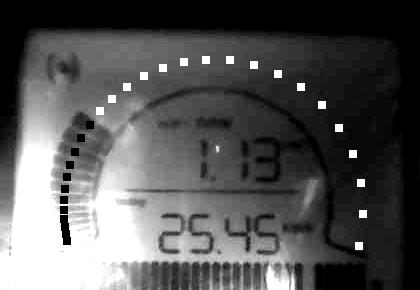
The first project [Kalle] did involved finding a meter from China with capabilities similar to (and cheaper than) the Kill-a-Watt meters. Unlike the Kill-a-Watt which spits out analog values, the Chinese meter sent digital information out on a ribbon cable with the bus lines labeled. Since the meter was so hackable, [Kalle] took it even further in this hack.

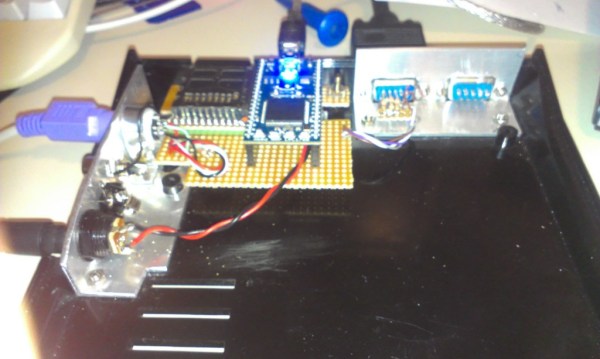
With those pesky wires out of the way, the device now uses an Arduino Pro Mini to sniff the energy meter’s data stream. Then it transmits the data wirelessly with a nRF34L01+ transceiver. As a perk, all of these chips fit inside the case of the energy meter, making this a very tidy hack indeed. The project code an incredible amount of detail is available on the project site, so be sure to check this one out for all of your energy monitoring needs!

Redundant Automated Water Filler For Your Coffee

We’ve always wondered why we have indoor plumbing if it isn’t hooked up to our coffee pots. We probably drink as much coffee as water anyway, so why not just hook up a water line to refill the pot? [Loose Cannon] aka [LC] has been working on just that problem, with a whole lot of extra features, creating a very robust automatically-filled, gravity-fed, vacuum-sealed water tank for whatever appliance you have that could use it, including your coffee pot.

[LC] tapped into the 1/4″ water line from the ice maker, which has the added bonus of being a common size for solenoid valves. He’s using an eTape sensor to measure the water level in the reservoir, but he ALSO is using a flow meter in the line itself to double-check that the reservoir won’t overflow. The flow meter allows a hard limit to be set for the maximum amount of water allowed into the tank. He’s used an Arduino Micro to tie the project together, which also handles a real-time clock so the tank can be filled on a schedule.

The tank that [LC] was trying to fill was vacuum-sealed as well, which made things a little trickier. Without a vacuum on the tank, the water would just run out of the overflow valve. This is an interesting project that goes way beyond the usual automatic water supplies for coffee pots we’ve seen before.

Automated Bed Warmer Control For Chilly Nights

For most of the Northern Hemisphere, winter is in full swing right now. That means long, chilly nights. We assume [LC] is in one of these climes because it seems like his bed warmer wasn’t doing quite a good enough job of getting his bed up to a reasonable temperature before he climbed in. To alleviate some of his discomfort, he hacked into the control unit and added some automation.

The original controller uses a mechanical potentiometer to set the heat level. [LC] added a digital potentiometer which he can switch to in order to allow the automation (using a real-time clock to handle scheduling) to take over control of the bed warmer. This also preserves the original functionality of the controller. There is also an Arduino involved which handles the override from mechanical to digital potentiometer when a capacitive touch sensor is activated. This means that when someone attempts to take manual control of the device, the Arduino can switch the override circuit off.

There is quite a bit of detail on the project site about this hack, including the source code for the controller. [LC] also mentions that this could be interfaced to the web to allow remote control of the bed warmer. This is a great hack, and also fits into the idea of heating the person, not the room.

Game Boy With Lithium Batteries And USB

[Alan] procured a few Game Boys from a Yahoo auction with the intent of using them for some other projects, but one of the Game Boys was shipped with a very corroded battery which had eaten up one of the terminals. When [Alan] had repaired it, he was left with a Game Boy with no battery terminal at all, so he decided to splice in some lithium-ion batteries.

Not only does the Game Boy now have a new battery pack, but [Alan] was able to source a USB charger to handle the batteries’ charging needs. However, he realized that his battery pack was 3.7 volts, while the Game Boy only needed 3 volts. To lower the voltage of the battery pack to the required voltage, [Alan] grabbed a 1N4148 diode and put it in series with the battery pack, which also helps prevent any accidental reverse polarity.

This isn’t the most technically advanced Game Boy hack we’ve ever seen but it’s great to see new life breathed into these classic video game systems. Not to mention that [Alan] saved some lithium batteries from the landfill!

Small, Detailed Nixie Clock Build

Nixie tubes, while built during the vacuum tube era of the mid-20th century, still exist in a niche among hackers. It’s quite the task to get them up and running due to a number of quirks, so getting an entire clock to work with Nixie tubes is a badge of honor for those who attempt the project. For anyone thinking about trying, [Tomasz] has written an extremely detailed write-up of his Nixie clock which should be able to help.

There is a lot of in-depth theory behind Nixie tubes on [Tomasz]’s page that he covers in the course of describing his clock. As far as the actual project is concerned, this is a simplified design which uses one board for the entire clock, including circuits for the lamps, drivers, microcontroller, power supply, and DC/DC conversion. This accomplishes his goal of making this project as small as possible. The Nixies he chose were IN-12 which are popular in his Eastern European home, but could be sourced from eBay and shipped anywhere in the world.

There is a lot of documentation on the project site, including schematics, microcontroller code, PCB design, and even screenshots of the oscilloscope for various points in the circuit. While this might not be the simplest Nixie clock ever, it is certainly close, more easily readable, and the most detailed build we’ve seen in a while!

Reading Power Use Data With A Webcam And Python

As any hacker will attest to, whenever an important tool is missing, you might as well just build a new one! That’s the position that [Matt] found himself in when he was attempting to measure the power consumption at his parents’ house. He left the transmitter for the power meter at home, and so the logical thing to do was to set up a webcam and a python script to monitor his dad’s power meter instead of going back to get his.

The power meter that he had handy was a GEO Minim Electricity Monitor. He found it very difficult to extract the data directly from this particular meter, so instead of digging into any of the communications protocols int he meter, he set up a webcam in a box with an LED and monitored it with a specially-written Python script. The script is able to see the particulars of the meter, and then reports back to the computer with all of the relevant data. [Matt] has put this code up on his project site for anyone to use.

This is a great workaround that doesn’t involve delving too deep into the inner workings of the meter in question. You could always build your own power monitoring system though, if that’s more of your style!

ZX81 Emulated On An Mbed

This is a wonderful example of the phenomenon of “feature creep”. [Gert] was working on getting a VGA output running on an mbed platform without using (hardly) any discrete components. Using only a few resistors, the mbed was connected to a VGA display running at 640×480. But what could he do with something with VGA out? He decided to emulate an entire Sinclair ZX81 computer, of course.

With more than 1.5 million units sold, the Sinclair ZX81 was a fairly popular computer in the early ’80s. It was [Gert]’s first computer, so it was a natural choice for him to try to emulate. Another reason for the choice was that his mbed-VGA device could only output monochrome color, which was another characteristic of the ZX81.

[Gert] started by modifying a very lean Z80 emulator to make the compiled code run as efficiently as possible on the mbed. Then he went about getting a picture to display on the screen, then he interfaced an SD card and a keyboard to his new machine. To be true to the original, he built everything into an original ZX81 case.

This isn’t the first time we’ve seen a ZX81, but it is one of the better implementations of an emulated version of this system we’ve seen.

Thanks to [Jeroen] for the tip!