Seymour Cray, Father Of The Supercomputer

Somewhere in the recesses of my memory there lives a small photograph, from one of the many magazines that fed my young interests in science and electronics – it was probably Popular Science. In my mind I see a man standing before a large machine. The man looks awkward; he clearly didn’t want to pose for the magazine photographer. The machine behind him was an amazing computer, its insides a riot of wires all of the same color; the accompanying text told me each piece was cut to a precise length so that signals could be synchronized to arrive at their destinations at exactly the right time.

My young mind was agog that a machine could be so precisely timed that a few centimeters could make a difference to a signal propagating at the speed of light. As a result, I never forgot the name of the man in the photo – Seymour Cray, the creator of the supercomputer. The machine was his iconic Cray-1, the fastest scientific computer in the world for years, which would go on to design nuclear weapons, model crashes to make cars safer, and help predict the weather.

Very few people get to have their name attached so firmly to a product, let alone have it become a registered trademark. The name Cray became synonymous with performance computing, but Seymour Cray contributed so much more to the computing industry than just the company that bears his name that it’s worth taking a look at his life, and how his machines created the future.

Continue reading “Seymour Cray, Father Of The Supercomputer”

CNC Turns A Single PCB Into Origami Hemisphere

Trying to make a hemispherical surface out of a PCB is no easy feat. Trying to do that and make the result a working circuit is even harder. Doing it with one solid piece of FR4 seems impossible, right?

Not so much. [brainsmoke] came up with a clever way to make foldable, working PCBs that can be formed into hemispheres. The inspiration for this came from a larger project that resulted in a 32-cm diameter LED-studded sphere, which a friend thought would make a swell necklace if it was scaled down. That larger sphere was made somewhat like a PCB soccer ball, with individual panels soldered together. [brainsmoke] didn’t relish juggling dozens of tiny PCBs to make a necklace-sized version, so the unfolded pattern for half a deltoidal hexecontahedron was laid out as one piece on single-sided FR4. The etched boards were then cut out on a CNC mill, with the joints between the panels cut as V-grooves from the rear of the board. By leaving just enough material to act as a live hinge, [brainsmoke] was able to fold the pattern up into a hemisphere while leaving the traces intact. The process was fussy and resulted in a lot of broken FR4 and traces, but with practice and the use of thicker board material and heavier copper, the hemisphere came together. The video below shows the final product

This objet d’art is [brainsmoke]’s entry in the Circuit Sculpture Contest, which is just wrapping up wrapped up last week. We can’t wait to share some of the cool things people came up with in this contest, which really seemed to get the creative juices flowing.

Continue reading “CNC Turns A Single PCB Into Origami Hemisphere”

Vintage Audio Gear Gets A Display Upgrade

The lengths the retrocomputing devotee must go to in order to breathe new life into old gear can border on the heroic. Tracing down long-discontinued parts, buying multiple copies of the same unit to act as organ donors for the one good machine, and when all else fails, improvising with current productions parts to get that vintage look and feel.

This LCD display backlighting fix for a vintage audio sampler falls into that last category, which was pulled off by [Inkoo Vintage Computer]. The unit in question is an Akai S1100 sampler, a classic from the late 1980s that had already been modified to replace the original floppy drive with a USB reader when the backlight on the LCD began to give out. Replacements for the original electroluminescent backlight are available, but [Inkoo] opted for a cheaper way out. An iPhone 6s 6 Plus backlight was an inexpensive option, if it could be made to fit. Luckily, [Inkoo] was able to trim the diffuser without causing any electrical issues. A boost converter was needed to run the backlight from the sampler’s 5 V DC rail, and interfacing the backlight’s flexible circuitry to the 80s-era copper wiring was a bit fussy, but the results were great. The sampler’s LCD is legible again, and looks just like it might have in the studio back when [Depeche Mode] and [Duran Duran] were using it to crank out hits.

As much as we like this repair, it doesn’t imply that EL is a dead technology. Far from it – [Ben Krasnow] is using it to create unique displays, and EL wire makes for some dazzling wearables. It doesn’t last forever, but while it does, it’s pretty neat stuff.

See The Radioactive World With This Peltier Cloud Chamber

Remember when a homemade cloud chamber was a science fair staple? We haven’t participated for decades, but it seemed like every year someone would put a hunk of dry ice in a fish tank, add a little alcohol, and with the lighting just right – which it never was in the gymnasium – you might be lucky enough to see a few contrails in the supersaturated vapor as the occasional stray bit of background radiation whizzed through the apparatus.

Done right, the classic cloud chamber is a great demonstration, but stocking enough dry ice to keep the fun going is a bit of a drag. That’s where this Peltier-cooled cloud chamber comes into its own. [mosivers] spares no expense at making a more permanent, turn-key cloud chamber, which is perched atop a laser-cut acrylic case. Inside that is an ATX power supply which runs a Peltier thermoelectric cooling module. Coupled with a CPU cooler, the TEC is able to drive the chamber temperature down to a chilly -42°C, with a strip of white LEDs providing the required side-lighting. The video below gives a tour of the machine and shows a few traces from a chunk of pitchblende; it’s all pretty tame until [mosivers] turns on his special modification – a high-voltage grid powered by a scrapped electronic fly swatter. That really kicks up the action, and even lets thoriated TIG welding electrodes be used as a decent source of alpha particles.

It’s been a while since we’ve seen a Peltier cloud chamber build around here, which is too bad because they’re great tools for engaging young minds as well as for discovery. And if you use one right, it just might make you as famous as your mother.

Continue reading “See The Radioactive World With This Peltier Cloud Chamber”

Addressable 7-Segment Displays May Make Multiplexing A Thing Of The Past

[Sean Hodgins] has a knack for coming up with simple solutions that can make a big difference, but this is one of those “Why didn’t I think of that?” things: addressable seven-segment LED displays.

[Sean]’s design is basically a merging of everyone’s favorite Neopixel RGB LED driver with the ubiquitous seven-segment display. The WS2811 addressable RGB driver chip doesn’t necessarily have to drive three different color LEDs – it can drive three segments of the same display. With three of the chips on a single board, all seven segments plus the decimal point of a display can be controlled over a single data line. No more shift registers, no more multiplexing. And as a nice touch, individual displays can be ganged together with connectors on the back of each module. [Sean] has some code to support the display but is looking for someone to build a standalone library for it, so you might want to pitch in. Yes, he plans to sell the boards in his shop, but as with all his projects, this one is open source and everything you need to build your own is up on GitHub. The brief video below shows a few daisy-chained displays in action.

Like many of [Sean]’s designs, including this Arduino rapid design board, this is a simple way to get a tedious job done, and it wrings a lot of functionality from a single IO pin.

Continue reading “Addressable 7-Segment Displays May Make Multiplexing A Thing Of The Past”

Smartphone App Uses AR To Visualize The RF Spectrum

Have you ever wished you could see in the RF part of the radio spectrum? While such a skill would probably make it hard to get a good night’s rest, it would at least allow you to instantly see dead spots in your WiFi coverage. Not a bad tradeoff.

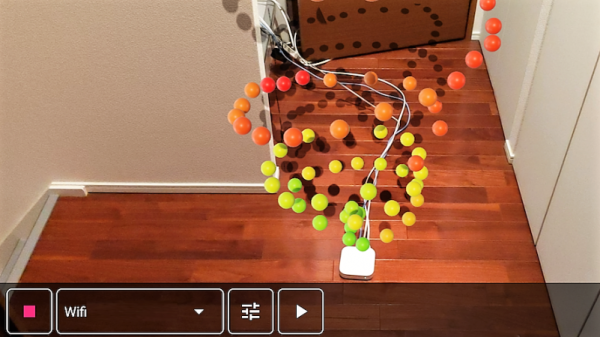
Unwilling to go full [Geordi La Forge] to be able to visualize RF, [Ken Kawamoto] built the next best thing – an augmented-reality RF signal strength app for his smartphone. Built to aid in the repositioning of his router in the post-holiday cleanup, the app uses the Android ARCore framework to figure out where in the house the phone is and overlays a color-coded sphere representing sensor data onto the current camera image. The spheres persist in 3D space, leaving a trail of virtual breadcrumbs that map out the sensor data as you warwalk the house. The app also lets you map Bluetooth and LTE coverage, but RF isn’t its only input: if your phone is properly equipped, magnetic fields and barometric pressure can also be AR mapped. We found the Bluetooth demo in the video below particularly interesting; it’s amazing how much the signal is attenuated by a double layer of aluminum foil. [Ken] even came up with an Arduino with a gas sensor that talks to the phone and maps the atmosphere around the kitchen stove.

The app is called AR Sensor and is available on the Play Store, but you’ll need at least Android 8.0 to play. If your phone is behind the times like ours, you might have to settle for mapping your RF world the hard way.

Continue reading “Smartphone App Uses AR To Visualize The RF Spectrum”

New Game, Old Ways: Cramming An NES Game Into 40 KB

Why would anyone bother to create new content for a console system that’s staring down its 40th birthday? Perhaps just for the challenge of fitting a game into 40 kilobytes of storage.

That at least seems to be the motivation behind [Morphcat Games] pending release of Micro Mages, a new game for the Nintendo Entertainment System console that takes its inspiration from Super Mario Bros. The interesting bit here is how they managed to stuff so much content into so little space. The video below goes into great detail on that, and it’s a fascinating lesson in optimization. The game logic itself is coded in assembler, which of course is far more efficient than higher level languages. Even so, that took 32 kB of ROM, leaving a mere 8 kB for background elements and foreground sprites.

Through a combination of limited sprite size, tiling of smaller sprites to make larger characters, and reusing tiles by flipping them horizontally or vertically, an impressively complete palette of animated characters was developed. Background elements were similarly deconstructed and reused, resulting in a palette of tiles used to generate all the maps for the game that takes up just 60 bytes. Turning those into playable levels involves more mirroring and some horizontal shifting of tiles, and it looks like quite an engaging playfield.

Yes, there’s a Kickstarter for the game, but we’re mainly intrigued by what it takes to cram a playable game into so little space. Don’t get us wrong – we love the Retro Pie builds too, but seeing the tricks that early game developers relied upon to make things work really gets the creative juices flowing.

Continue reading “New Game, Old Ways: Cramming An NES Game Into 40 KB”