An Open Source Sip-and-Puff Mouse For Affordable Accessibility

At the core of any assistive technology is finding a way to do something with whatever abilities the user has available. This can be especially difficult in the case of quadriplegia sufferers, the loss of control of upper and lower limbs caused by spinal cord damage in the cervical region. Quadriplegics can gain some control of their world with a “Sip-and-puff” device, which give the user control via blowing or sucking on a mouthpiece.

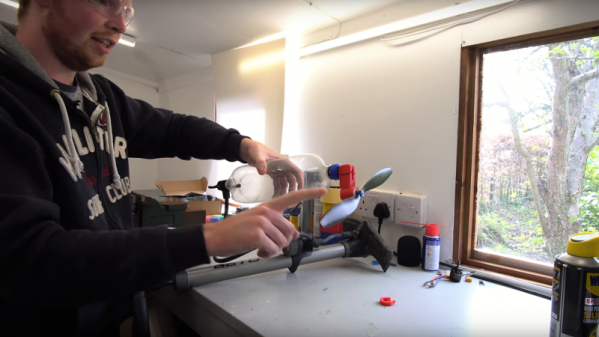
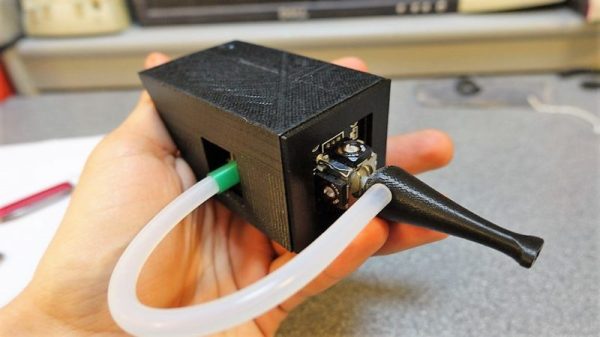
A sip-and-puff can make a world of difference to a quadriplegic, but they’re not exactly cheap. So to help out a friend, [Jfieldcap] designed and built an open source sip-and-puff mouse on the cheap. As is best for such devices, the design is simple and robust. The hollow 3D-printed mouthpiece acts as handle for a joystick module , and a length of tubing connects the mouthpiece to a pressure sensor. An Arduino lets the user move his head to position the cursor; hard sips and puffs are interpreted as left and right clicks, while soft mouth pressure is used for scrolling. In conjunction with some of the accessibility tools in modern OSes and personal assistant software like Siri or Cortana, the sip-and-puff opens up the online world, and for all of $50 in material.

We’re impressed by the effort and the results, but we worry that the standard PLA used for the mouthpiece won’t stand up to the cleaning it’ll need. Of course, printing extra mouthpieces is easy, but since it’s going to be in contact with the mouth, perhaps a review of food-safe 3D-printing is in order.

Cams And Pushrods Improve 3D-Printed Compressed Air Engine

Some folks just can’t leave well enough alone, and that often ends up being a good thing. Such is the case with this 3D-printed compressed air engine, which just keeps getting better.

The design has changed a lot since we first covered [Tom Stanton]’s attempts at reviving the powerplant from the glory days of the Air Hogs line of toys, which he subsequently built a plane around. The engine was simple, with a ball valve that admitted air into the cylinder when a spring mounted to the top of the piston popped it out of the way. That spring has always bothered [Tom], though, compelling him to go back to the drawing board. He wanted to replace the ball valve with one actuated by a cam and pushrod. This would increase the complexity of the engine quite a bit, but with the benefit of eliminating the fail point of the spring. With a few iterations in the design, he was able to relocate the ball valve, add a cam to the crankshaft, and use a pushrod to open the valve. The new design works much better than the previous version, sounding more like a lawnmower than a 3D-printed engine should. Check out the design process and some tests in the video below.

And speaking of lawnmowers that run on compressed air

Continue reading “Cams And Pushrods Improve 3D-Printed Compressed Air Engine”

Thermoelectric Fan Harvests Wood Stove Heat Junkyard Style

Anyone who heats with a wood stove knows that the experience is completely different from typical central heating. It’s not for everyone, though, and it’s certainly not without its trade-offs. One of the chief complaints is getting heat away from the stove and into other areas of the house, and many owners turn on an electric fan to circulate the heated air.

That’s hardly in the green nature of wood heating, though, and fans can be noisy. So something like this heat-powered stove-top fan can come in handy. Such fans, which use Peltier devices to power a small electric motor, are readily available commercially. [bongodrummer] thought that sounded like no fun, though, and created his own mostly from junk. The Peltier module was salvaged from an old travel fridge and mounted to a heat sink from a computer to harvest heat from the stove. The other side of the Peltier needs to have a heat sink to keep it cooler than the hot side, and [bongodrummer] chose an unconventional bit of salvage for the job — the cylinder of a chainsaw engine. The spark plug hole sprouts the mount for the fan motor, and the cooling fins help keep the Peltier cool. And to prevent overheating of the device, he added a surprise — a car cooling system thermostat to physically lift the device off the stove when it gets too hot. Genius!

The video below shows the build, which was not trivial. But we think the end results are worth it, and it reminds us a little of the woodstove generator we featured a while back.

Continue reading “Thermoelectric Fan Harvests Wood Stove Heat Junkyard Style”

A Low Cost, Dead Tree Touch Screen

Remember the “paperless office”? Neither do we, because despite the hype of end-to-end digital documents, it never really happened. The workplace is still a death-trap for trees, and with good reason: paper is cheap, literally growing on trees, and it’s the quickest and easiest medium for universal communication and collaboration. Trouble is, once you’re done scribbling your notes on a legal pad or designing the Next Big Thing on a napkin, what do you do with it?

If you’re anything like us, the answer to that question is misplacing or destroying the paper before getting a chance to procrastinate transcribing it into some useful digital form. Wouldn’t paper that automatically digitizes what you draw or write on it be so much better? That’s where this low-cost touch-sensitive paper (PDF link) is headed, and it looks like it has a lot of promise. Carnegie-Mellon researchers [Chris Harrison] and [Yang Zhang] have come up with cheap and easy methods of applying conductive elements to sheets of ordinary paper, and importantly, the methods can scale well to the paper mill to take advantage of economies of scale at the point of production. Based on silk-screened conductive paints, the digitizer uses electrical field tomography to locate touches and quantify their pressure through a connected microcontroller. The video below shows a prototype in action.

Current cost is 30 cents a sheet, and if it can be made even cheaper, the potential applications range from interactive educational worksheets to IoT newspapers. And maybe if it gets really cheap, you can make a touch-sensitive paper airplane when you’re done with it.

Continue reading “A Low Cost, Dead Tree Touch Screen”

Turn Failed Prints Into Office Fun With A Paper Airplane Maker

If you’re anything like us, you feel slightly guilty when you send a job to a printer only to find that twenty pages have printed wrong. Maybe it’s a typo, maybe it’s the dreaded landscape versus portrait issue. Whatever it is, trees died for your mistake, and there’s nothing you can do about it except to recycle the waste. But first, wipe that guilt away by using this one-stroke paper airplane maker to equip the whole office for an epic air battle.

We have to admit, automated paper handling has always fascinated us. The idea that a printer can reliably (sometimes) feed individual sheets of a stack is a testament to good design, and don’t even get us started about automatic paper folding. [Jerry de Vos]’ paper airplane maker doesn’t drive the sheets through the folder — that’s up to the user. But the laser-cut plywood jig does all the dirty work of creating a paper airplane. The sheet is clipped to an arm that pulls the paper through a series of ramps and slots that force the paper gently into the five folds needed for the classic paper dart. It’s fascinating to watch, and even though everyone seems to be using it very gingerly lest the paper tear, we can see how adding some rollers and motors from a scrapped printer could entirely automate the process. Think of the fun a ream of paper could provide around the office then.

Oh, wait…

Continue reading “Turn Failed Prints Into Office Fun With A Paper Airplane Maker”

Roll Up Your Sleeve, Watch A Video With This Smart Watch Forearm Projector

We’re all slowly getting used to the idea of wearable technology, fabulous flops like the creepy Google Glass notwithstanding. But the big problem with tiny tech is in finding the real estate for user interfaces. Sure, we can make it tiny, but human fingers aren’t getting any smaller, and eyeballs can only resolve so much fine detail.

So how do we make wearables more usable? According to Carnegie-Mellon researcher [Chris Harrison], one way is to turn the wearer into the display and the input device (PDF link). More specifically, his LumiWatch projects a touch-responsive display onto the forearm of the wearer. The video below is pretty slick with some obvious CGI “artist’s rendition” displays up front. But even the somewhat limited displays shown later in the video are pretty impressive. The watch can claim up to 40-cm² of the user’s forearm for display, even at the shallow projection angle offered by a watch bezel only slightly above the arm — quite a feat given the irregular surface of the skin. It accomplishes this with a “pico-projector” consisting of red, blue, and green lasers and a pair of MEMS mirrors. The projector can adjust the linearity and brightness of the display to provide a consistent image across the uneven surface. An array of 10 time-of-flight sensors takes care of watching the display area for touch input gestures. It’s a fascinating project with a lot of potential, but we wonder how the variability of the human body might confound the display. Not to mention the need for short sleeves year round.

Need some basics on the micro-electrical mechanic systems (MEMS) behind the pico-projector in this watch? We’ve got a great primer on these microscopic machines.

Continue reading “Roll Up Your Sleeve, Watch A Video With This Smart Watch Forearm Projector”

Reflow Rig Makes SMD Soldering A Wok In The Park

For a DIY reflow setup, most people seem to rely on the trusty thrift store toaster oven as a platform to hack. But there’s something to be said for heating the PCB directly rather than heating the surrounding air, and for that one can cruise the yard sales looking for a hot plate to convert. But an electric wok as a reflow hotplate? Sure, why not?

At the end of the day [ThomasVDD]’s reflow wok is the same as any other reflow build. It has a heat source that can be controlled easily, temperature sensors, and a microcontroller that can run the proportional-integral-derivative (PID) control algorithm needed for precise temperature control. That the heating element he used came from an electric wok was just a happy accident. A laser-cut MDF case complete with kerf-bent joints holds the heating element, the solid-state relay, and the Arduino Nano that runs the show. A MAX6675 thermocouple amp senses the temperature and allows the Nano to cycle the temperature through different profiles for different solders. It’s compact, simple, and [ThomasVDD] now has a spare wok to use on the stove top. What’s not to like?

Reflow doesn’t just mean oven or hotplate, of course. Why not give reflow headlights, a reflow blowtorch, or even a reflow work light a try?