Smile For The Raspberry Pi Powered Photo Booth

[Roo] was tasked with finding a better way to take corporate employee photos. The standard method was for a human resources employee to use a point and shoot camera to take a photo of the new recruits. The problem with this method is many people feel awkward trying to force a smile in front of other people. Plus, if the photo turns out poorly many people won’t ask to have it retaken so as not to feel vain or inconvenience the photographer. [Roo’s] Raspberry Pi powered photo booth solves this problem in a novel way.

The new system has the employee use their own mobile phone to connect to a website running on the Pi. When the employee tells the Pi to snap a photo, the system uses the Raspberry Pi camera module to capture an image. [Roo] actually 3D printed a custom adapter allowing him to replace the standard camera lens if desired. The photo can be displayed on an LCD screen so the user can re-take the photo if they wish.

The system is built into a custom case made from both 3D printed and laser cut parts. The front plate is a frosted white color. [Roo] placed bright white lights behind the front panel in order to act as a flash. The frosted plastic diffuses the light just enough to provide a soft white light for each photo taken. Once the photo is selected, it can then be uploaded to the company database for use with emails, badges, or whatever else.

[Roo] also mentions that the system can easily be changed to send photos via Twitter or other web applications. With that in mind, this system could be a great addition to any hackerspace or event. The code for an older version of the project can be found on the project’s github page.

Continue reading “Smile For The Raspberry Pi Powered Photo Booth”

Flat Pack Lamp

Flat Pack Elastic Band Lamp Is A Thing Of Beauty

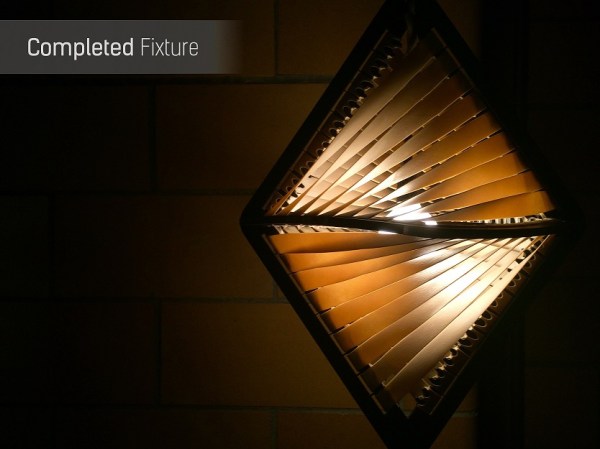
[Matt] was looking for a project for his senior industrial design studio at Wentworth Institute of Technology. He ended up designing a clever lamp that can be flat packed. [Matt] started by drawing out designs on paper. He really liked the idea of combining curves with straight lines, but he wanted to translate his two-dimensional drawings into a three-dimensional shape.

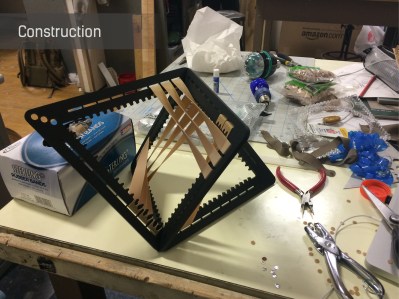
zOz0ys6 - ImgurHaving access to a laser cutter made the job much easier than it could have been and allowed [Matt] to go through many designs for the lamp frame. The two main pieces were cut from acrylic and include mounting pegs for the elastic bands. The two plastic pieces are designed to slot together, forming a sort of diamond shape.
The final version of the lamp required that the elastic bands had holes punched in them for mounting. The holes were placed over the small pegs to keep the bands in place. [Matt] used 3/4″ industrial elastic bands for this project. He then used a 120V 15W candelabra light bulb to illuminate the lamp. The final design is not only beautiful, but it can be flat packed and manufactured inexpensively.

If you want more inspiration for artistically designed lamps check out this one that uses the corrugation in cardboards as a shade pattern.

[via reddit]

Drawer Blade

Smarter-than-wood Saw Blade Makes Perfect Foldable Joints

[Andrew Klein] knows the pain of building drawers from plywood. It can be a pain to get all of the pieces measured and cut just right. Then you have to line them up, glue them together, and clamp them perfectly. It’s time-consuming and frustrating. Then one day it hit him that he might be able to make the whole process much easier using a custom saw blade.

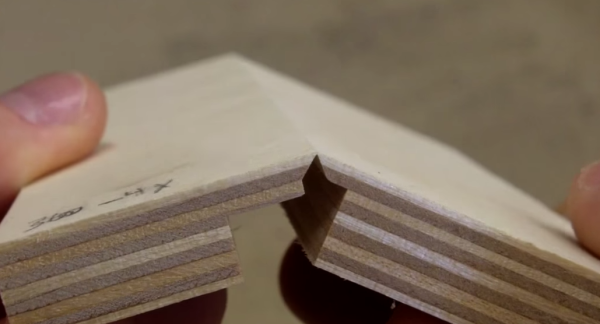
The the video below, [Andrew] does a great job explaining how the concept works using a piece of paper. The trick is that the plywood must be cut in a very specific shape. This shape results in the plywood just barely being held together, almost as if it’s hinged. The resulting groove can then be filled with wood glue, and the plywood is folded over on itself. This folding process leaves no gaps in the wood and results in a strong joint. Luckily this special shape can be cut with a specialized saw blade.

This new process removes the requirement of having five separate pieces for a drawer. Instead, only four cuts are needed on a single piece of square plywood. The corners are then removed with a razor blade and all four sides are folded up and into place. [Andrew] shows that his prototype blade needs a little bit of work, but he’s so hopeful that this new invention will be useful to others. Continue reading “Smarter-than-wood Saw Blade Makes Perfect Foldable Joints”

Pen Gun

Pneumatic Pen Gun Is Fit For James Bond

The James Bond franchise is well-known for many things, but perhaps most important to us hackers are the gadgets. Bond always had an awesome gadget that somehow was exactly the thing he needed to get out of a jam. [hw97karbine’s] latest project would fit right into an old Bond flick. He’s managed to build a single-shot pellet gun that looks like a pen.

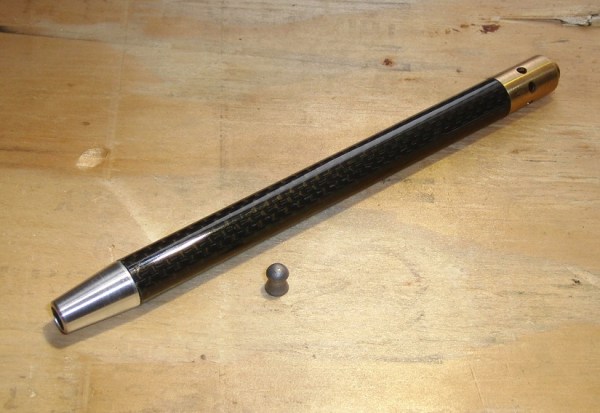
[hw97karbine] started out by cutting the body from a tube of carbon fiber. He used a hacksaw to do the cutting, and then cleaned up the edges on a lathe. A barrel was cut from a piece of brass tubing with a smaller diameter. These two tubes will eventually sit one inside of the other. A custom front end cap was machined from brass. One end is ribbed and glued into the carbon fiber tube. The barrel is also glued to this end of the front cap, though it’s glued to the inside of the cap. The other end of the cap has 1/8″ BSP threads cut into it in order to allow for attachments.

A rear end cap is machined from Delrin. This piece also has a Delrin piston placed inside. The piston has a small piece of rubber used as a gasket. This piston valve is what allows the gun to operate. The rear cap gets glued into place and attached to a Schrader valve, removed from an automotive tire valve stem.

To pressurize the system, a bicycle pump is attached to the Schrader valve. This pushes the piston up against the barrel, preventing any of the air from escaping. The piston doesn’t make a perfect seal, so air leaks around it and pressurizes the carbon fiber tube. The Schrader valve prevents the air from leaking out of the pen body. A special machined button was threaded onto the Schrader valve. When the button is pressed, the air escapes; the sudden pressure imbalance causes the piston to shoot backwards, opening up a path for the air to escape through the barrel. This escaping air launches the projectile. The whole process is explained better with an animation.

Now, the question left in our mind: is this the same pressure imbalance concept that was used in that vacuum pressure bazooka we saw a couple years back?

Continue reading “Pneumatic Pen Gun Is Fit For James Bond”

Light Stage

Incredibly Simple Stage For Product Photos

If you’ve ever tried to take nice photos of small objects in your home, you might have found that it can be more difficult than it seems. One way to really boost the quality of your photos is to get proper lighting with a good background. The problem is setting up a stage for photos can be expensive and time-consuming. [Spafouxx] shows that you don’t need to sink a lot of money or energy into a setup to get some high quality photos.

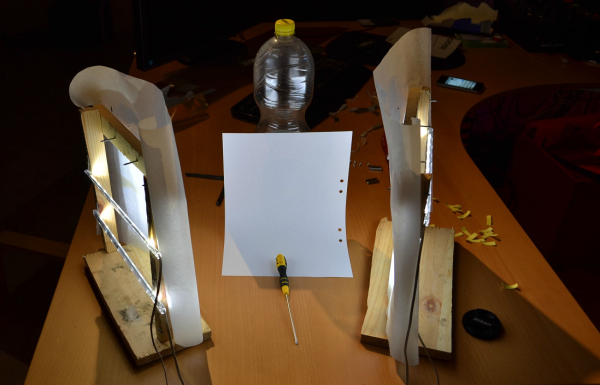
His lighting setup is very simple. Two wooden frames are built from scraps of wood. The frames stand upright and have two LED strips mounted horizontally. The LEDs face inwards toward the object of the photos. The light is diffused using ordinary parchment paper that you might use when baking.

The frames are angled to face the backdrop. In this case, the backdrop is made of a piece of A4 printer paper propped up against a plastic drink bottle. The paper is curved in such a way to prevent shadows. For being so simple, the example photo shows how clean the images look in the end.

Bike Cinema

A Pedal Powered Cinema

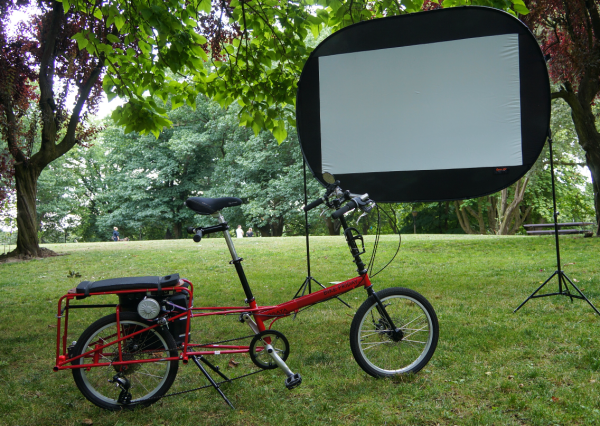
When the apocalypse hits and your power goes out, how are you going to keep yourself entertained? If you are lucky enough to be friends with [stopsendingmejunk], you can just hop on his pedal powered cinema and watch whatever movies you have stored on digital media.

This unit is built around an ordinary bicycle. A friction drive is used to generate the electricity via pedal power. In order to accomplish this, a custom steel stand was fabricated together in order to lift the rear wheel off the ground. A 24V 200W motor is used as the generator. [stopsendingmejunk] manufactured a custom spindle for the motor shaft. The spindle is made from a skateboard wheel. The motor is mounted in such a way that it can be lowered to rub the skateboard wheel against the bicycle wheel. This way when the rear bicycle wheel spins, it also rotates the motor. The motor can be lifted out of the way when cruising around if desired.

The power generated from the motor first runs through a regulator. This takes the variable voltage from the generator and smooths it out to a nice even power signal. This regulated power then charges two Goal Zero Sherpa 100 lithium batteries. The batteries allow for a buffer to allow the movie to continue playing while changing riders. The batteries then power the Optomo 750 projector as well as a set of speakers.

Notification Cube

LED Notification Cube Is A Good First Project

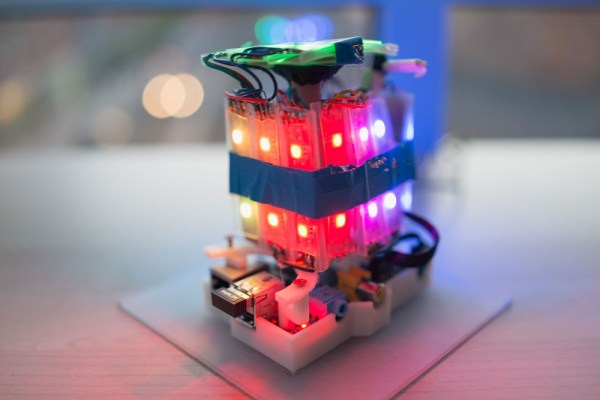
Two years ago, [Matt] made a move away from his software hacks and into the physical world. He was part of a pilot program to provide mentorship to children as part of the Maker Education Initiative. This program gave him access to 3D printers, CNC machines, and laser cutters within the New York Hall of Science makerspace. [Matt] chose to build an illuminated notification cube for his first physical project. The idea being that smart phones have so many alerts, many of which are unimportant. His project would help him to visualize and categorize each alert to better understand its importance.

The brain of the system is a Raspberry Pi. [Matt] found a Python library that allowed him to directly control an RGB LED strip based on the LPD8806 chip. He wired the data pins directly to the Pi and used an old 5V cell phone charger to power the LEDs. The strip was cut into smaller strands. Each face of the cube would end up with three strands of two LEDs each, or six LEDs per side. [Matt] found a mount for the Pi on Thingiverse and used a 3D printer to bring it into existence. The sides were made of frosted laser cut acrylic. The frosted look helps to diffuse the light from the LEDs.

Over time [Matt] found that the cube wasn’t as useful as he originally thought it would be. He just didn’t have enough alerts to justify the need. He ended up reprogramming the Pi to pull weather information instead, making use of the exact same hardware for another, more useful purpose.