Get Apple To Track Your Bluetooth Devices For You

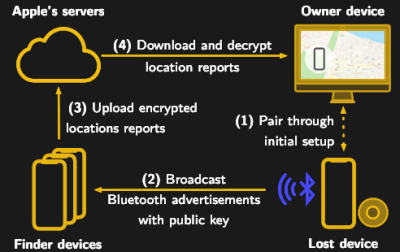
Apple’s “Find My” service allows users to track their missing devices by leveraging a worldwide network of location-aware iGadgets. With millions of iPhones and Macs out in the wild listening for the missing device’s Bluetooth advertisements and relaying their findings to the Cupertino Mothership, it’s a highly effective way of tracking hardware so long as it stays in relatively urban areas. Unfortunately, the system is completely proprietary and non-Apple devices aren’t invited to play.

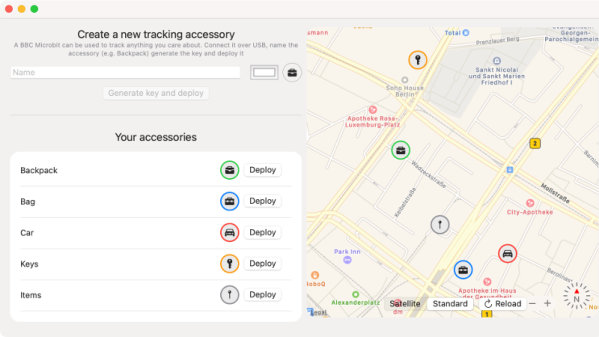
Or at least, that used to be the case. A project recently released by the [Secure Mobile Networking Lab] called OpenHaystack demonstrates how generic devices can utilize Apple’s Find My network by mimicking the appropriate Bluetooth Low Energy (BLE) broadcasts. Currently they have a firmware image for the BBC micro:bit, as well as a Python script for Linux, that will allow you to spin up an impromptu Find My target. But the team has also published all the information required to implement similar functionality on other BLE-capable devices and microcontrollers, so expect the list of supported hardware to grow shortly.

Diagram showing how the Apple Find My system worksSomewhat ironically, while OpenHaystack allows you to track non-Apple devices on the Find Me tracking network, you will need a Mac computer to actually see where your device is. The team’s software requires a computer running macOS 11 (Big Sur) to run, and judging by the fact it integrates with Apple Mail to pull the tracking data through a private API, we’re going to assume this isn’t something that can easily be recreated in a platform-agnostic way. Beyond the occasional Hackintosh that might sneak in there, it looks like Tim Cook might have the last laugh after all.

It’s not immediately clear how difficult it will be for Apple to close this loophole, but the talk of utilizing a private API makes us think there might be a built-in time limit on how long this project will be viable. After all, Big Tech doesn’t generally approve of us peons poking around inside their machinations for long. Though even if Apple finds a way to block OpenHaystack, it’s expected the company will be releasing “AirTags” sometime this year which will allow users to track whatever objects they like through the system.

RetroArch Open Hardware Aims For Plug-and-Play

At its core, the RetroArch project exists to make it easier to play classic games on more modern hardware. The streamlined front-end with its tailored collection of emulators helps take the confusion out of getting your favorite game from decades past running on whatever gadget you please, from your smartphone to the venerable Raspberry Pi. But there’s always room for improvement.

In a recent blog post, the folks behind RetroArch took the wraps off of an exciting hardware project that’s been in the works for about a year now. Referred to simply as “RetroArch Open Hardware”, the goal is to develop a fully open source cartridge adapter that will integrate seamlessly with the RetroArch software. Just plug in your original cartridge, and the game fires right up like back in the good old days.

Now to be clear, this isn’t exactly a new idea. But the team at RetroArch explain that previous devices that blurred the line between hardware and emulation have been expensive, hard to find, and worst of all, proprietary. By creating an open hardware project, they hope to truly unleash this capability on the community. Instead of having to deal with one vendor, multiple companies will be free to spin up their own clones and potentially even improve the core design. Should none of the ones on the market fit your particular needs, you’d even be free to build your own version,

What’s more, the gadget will also make it easier to create your own ROMs from cartridges you own. By appearing to the operating system as a USB Mass Storage device, users can literally drag and drop a game ROM to their computer’s desktop. No arcane software fired off from the command line; as much as we might enjoy such things, it’s not exactly intuitive for the gaming community at large. The same technique will also allow users to backup their saved progress before it’s inevitably lost to the ravages of time. The device demonstrated by the team currently only works on Nintendo 64 games, but presumably compatibility with be expanded to other cartridges in the future.

Over the years, we’ve seen a number of hombrew devices designed to read and copy game cartridges. We’ve even seen some rather polished examples that were released as open hardware. But those devices never had the public backing of such a well known group in the emulation scene, and we’re excited to see what kind of development and adoption can be spurred on by this level of legitimacy.

[Thanks to Nick for the tip.]

Inspire Dev Kit Drops Price Of MSLA Printer To Just $30

Over the last couple of years, we’ve seen massive price reductions on consumer 3D printers based on masked stereolithography (MSLA) technology. As the name implies, these machines use a standard LCD panel to selectively mask off the ultraviolet light coming from an array of LEDs. Add in a motorized Z stage, and you’ve got a simple and cheap way of coaxing UV resin into three dimensional shapes. These days, $200 USD can get you a turn-key MSLA printer with resolution far beyond the capabilities of filament-based FDM machines.

But [JD] still thinks we can do better. His project aims to produce a fully-functional MSLA printer for $30, and perhaps as low as $15 if manufactured in sufficient quality. He believes that by making high-resolution 3D printing more accessible, it will allow users all over the globe to bring their ideas to life. It’s no wonder he’s calling his machine the Inspire 3D Printer.

A test fixture for the LCD module.

This isn’t just some pie in the sky concept rolling around in [JD]’s head, either. You can order the Inspire Development Kit right now for just $30, though he makes it clear what you’ll receive isn’t quite a functional MSLA printer. By leveraging a common LCD module, the ESP32, and several 3D printed parts, he’s proven his price point for the kit is achievable; but there’s still plenty of work that needs to be done before the machine is ready for the general public.

For one thing, he’s still working the kinks out of the Z movement. The current design is 3D printed, but [JD] says he’s not quite happy with the amount of slop in the movement and is considering replacing the entire thing with the linear actuator from an optical drive. We’ve already seen these parts reused for accurately positioning lasers, so there’s certainly precedent for it. The firmware for the ESP32 is also in its infancy, and currently only allows the user to print from a selection of simple hard-coded shapes as a proof of concept.

We’ve seen DIY attempts at resin printers in the past, but they’ve often been based on more complex techniques involving projectors or UV lasers. Masked stereolithography is much more approachable for the home gamer, and projects like the Inspire 3D Printer show just how little it really takes to pull solid objects out of a puddle of goo.

Arduboy FX Mod-Chip: Now You’re Playing With Power

Traditionally, a forum full of technical users trying integrate their own hardware into a game system for the purposes of gaining unfettered access to its entire software library was the kind of thing that would keep engineers at Sony and Nintendo up at night. The development and proliferation of so called “mod chips” were an existential threat to companies that made their money selling video games, and as such, sniffing out these console hackers and keeping their findings from going public for as long as possible was a top priority.

But the Arduboy is no traditional game system. Its games are distributed for free, so a chip that allows users to cram hundreds of them onto the handheld at once isn’t some shady attempt to pull a fast one on the developers, it’s a substantial usability improvement over the stock hardware. So when Arduboy creator Kevin Bates found out about the grassroots effort to expand the system’s internal storage on the official forums, he didn’t try to put a stop to it. Instead, he asked how he could help make it a reality for as many Arduboy owners as possible.

Now, a little less than three years after forum member Mr.Blinky posted his initial concept for hanging an external SPI flash chip on the system’s test pads, the official Arduboy FX Mod-Chip has arrived. Whether you go the DIY route and build your own version or buy the ready-to-go module, one thing is for sure: it’s a must-have upgrade for the Arduboy that will completely change how you use the diminutive handheld.

Continue reading “Arduboy FX Mod-Chip: Now You’re Playing With Power”

2:3 Scale VT100 Is A Perfect Pairing For PDP-8/I Replica

When he went shopping for a vintage serial terminal to go along with his reproduction PDP-8/I computer, [Michael Gardi] came down with a bad case of sticker shock. But rather than be discouraged, he reasoned that if his “retro” computer could stand to have modern components at its heart, so could the terminal he used to talk to it. Leaning on his considerable experience in designing 3D printed replica hardware, he’s built an absolutely gorgeous scaled down DEC VT100 terminal that any classic computer aficionado would be happy to have on their desk.

Now to be clear, [Michael] hasn’t created a true serial terminal. Since the faux PDP-8/I is running on a Raspberry Pi, all he needed to do was come up with something that could connect to its HDMI and USB ports. Put simply, he’s essentially just made a 3D printed enclosure for the Pi’s monitor and keyboard. Oh, but what a gorgeous enclosure it is.

Recreating the VT100 in CAD was made more difficult by the fact that [Michael] couldn’t get his hands on the authentic hardware. But of course, that’s never stopped him before. It turns out DEC provided some very detailed dimensions for the terminal in their original documentation, and while comparing them to photographs of the actual terminal did uncover a few key differences, the overall look is spot on. Once the design was done, he reports it took two rolls of filament and more than 200 hours to print out all the parts for the enclosure.

To help sell the authentic look [Michael] tracked down a 4:3 LCD of the appropriate size, and the use of an off-the-shelf portable mechanical keyboard should make text entry a pleasure. For a little fun, he even came up with a themed arcade controller for the VT100 that can be used with RetroPie. The printed logo plate is an especially nice touch, and we’re more than willing to forgive the fact that he had to print it at a larger scale than the rest of the terminal to get all the detail in with his printer’s 0.4 mm nozzle.

On a technical level, this is perhaps the most straightforward replica we’ve ever seen from [Michael]. But even on a relatively simple project like this, his signature attention to detail and craftsmanship is on full display. It’s always a good day when he’s got a new build to show off with, and we’re eager to see what he comes up with next.

Generator Runs On Natural Gas With Field Expedient Tip

Many small gasoline engines can be safely modified to run on natural gas or propane with a kit that replaces the carburetor and adds a regulator, providing a reliable alternative fuel source in the event that gasoline is difficult to obtain in an emergency situation. This seat of the pants hack by [HowToLou] is definitively not the safe way to run your generator on natural gas, but if you ever find yourself in a situation where getting the power back on might be a literal matter of life or death, it’s a tip worth keeping in mind.

The basic idea here is that you feed natural gas (though propane should also work) directly into the engine’s intake by way of a hose attached to the air filter box. While cranking the engine, a valve on the gas line is used to manually adjust the air–fuel mixture until it fires up. It’s an extremely simple hack that, in a pinch, you can pull off with the parts on hand. But as you might expect, that simplicity comes at a cost.

There are a few big problems with this approach, but certainly the major one is that there’s nothing to cut off the flow of gas when the engine stops running. So if the generator stalls or you just forget to close the valve after you shut it down, there’s the potential for a very dangerous situation. Additionally, the manual gas valve will be at odds with a generator that automatically throttles up and down based on load. Though to be fair, there are certainly generators out there that simply run the engine flat-out the whole time.

Much like his DIY generator interlock plate that we covered last month, we imagine this project may rub some folks in the wrong way. Admittedly, this isn’t a modification that you should take lightly and certainly not something you’d want to rely on for long-term use. But as the recent situation in Texas has reminded us, drastic times can occasionally call for drastic measures.

Continue reading “Generator Runs On Natural Gas With Field Expedient Tip”

Attack Of The Flying 18650s

When somebody builds a quadcopter with the express purpose of flying it as fast and aggressively as possible, it’s not exactly a surprise when they eventually run it into an immovable object hard enough to break something. In fact, it’s more like a rite of passage. Which is why many serious fliers will have a 3D printer at home to rapidly run off replacement parts.

Avid first person view (FPV) flier [David Cledon] has taken this concept to its ultimate extreme by designing a 3D printable quadcopter that’s little more than an 18650 cell with some motors attached. Since the two-piece frame can be produced on a standard desktop 3D printer in a little over two hours with less than $1 USD of filament, crashes promise to be far less stressful. Spend a few hours during the week printing out frames, and you’ll have plenty to destroy for the weekend.

While [David] says the overall performance of this diminutive quadcopter isn’t exactly stellar, we think the 10 minutes of flight time he’s reporting on a single 18650 battery is more than respectable. While there’s still considerable expense in the radio and video gear, this design looks like it could be an exceptionally affordable way to get into FPV flying.

Of course, the argument could be made that such a wispy quadcopter is more likely to be obliterated on impact than something larger and commercially produced. There’s also a decent amount of close-quarters soldering involved given the cramped nature of the frame. So while the total cost of building one of these birds might be appealing to the newbie, it’s probably a project best left to those who’ve clocked a few hours in on the sticks.

We’ve seen quite a few 3D printed quadcopter frames over the years, but certainly none as elegant as what [David] has created here. It’s an experiment in minimalism that really embraces the possibilities afforded by low-cost desktop 3D printing, and we wouldn’t be surprised to see it become the standard by which future designs are measured.