Motor Controller Reverse Engineering Releases Smoke

It may have been designed for a sewing machine, but [Haris Andrianakis] found his imported DC brushed motor was more than up to the challenge of powering his mini lathe. Of course there’s always room for improvement, so he set out to reverse engineer the motor’s controller to implement a few tweaks he had in mind. Unfortunately, things took an unexpected turn when plugging his AVR programmer into the board’s ISP socket not only released the dreaded Magic Smoke, but actually tripped the breaker and plunged his bench into darkness.

Studying how the Hall-effect sensors in the motor are wired.

Upon closer inspection, it turned out the board has no isolation between the high voltage side and its digital logic. When [Haris] connected his computer to it via the programmer, the 330 VDC coming from the controller’s rectifier shorted through the USB bus and tripped the Earth-leakage circuit breaker (ELCB). The good news is that his computer survived the ordeal, and even the board itself seemed intact. But the shock must have been too much for the microcontroller he was attempting to interface with, as the controller no longer functioned.

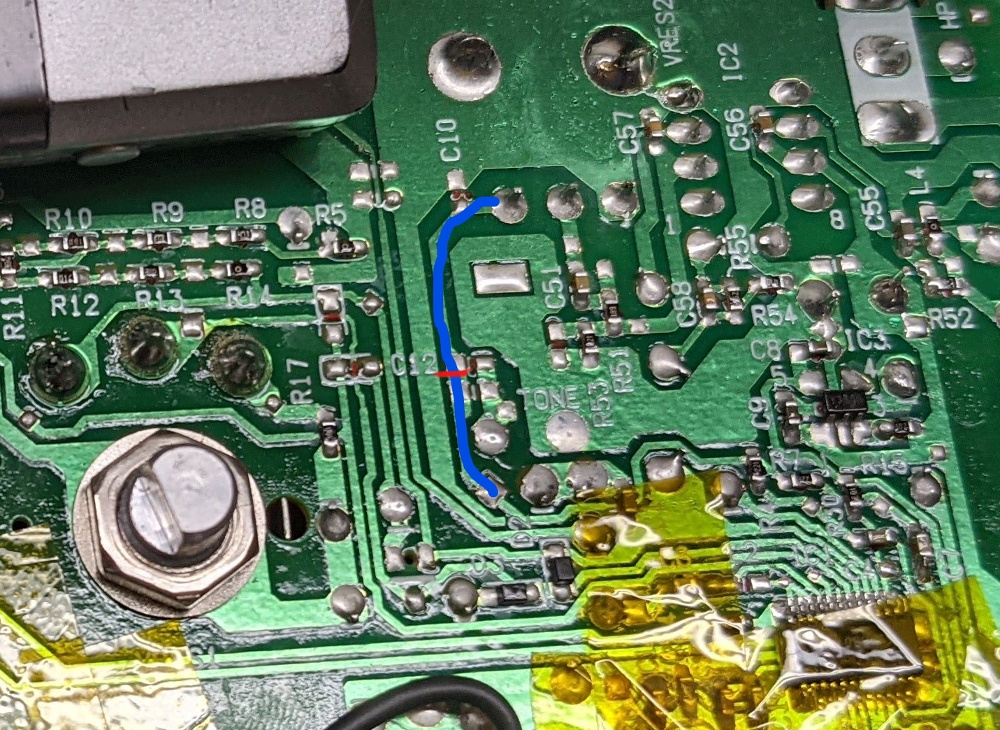
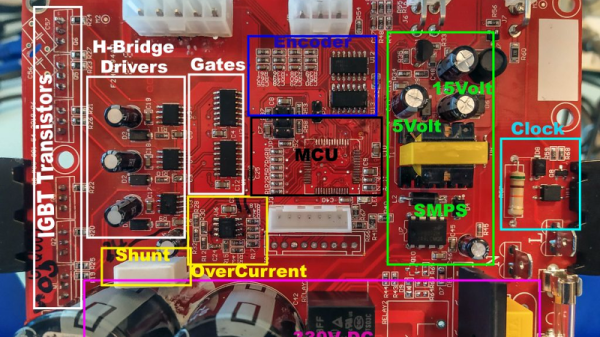
Now fully committed, [Haris] started mapping out the rest of the controller section by section. In the write-up on his blog, he visually masks off the various areas of the PCB so readers have an easier time following along and understanding how the schematics relate to the physical board. It’s a nice touch, and a trick worth keeping in mind during your own reverse engineering adventures.

In the end, [Haris] seems to have a good handle on what the majority of the components are up to on the board. Which is good, since getting it working again now means replacing the MCU and writing new firmware from scratch. Or perhaps he’ll just take the lessons learned from this controller and spin up his own custom hardware. In either event, we’ll be keeping an eye out for his next post on the subject.

Twisted Tea Launcher Refreshes At 104 MPH

A few weeks ago, a video went viral on social media that depicted a rather unsavory individual receiving what could be described as a “percussive reminder” of social norms courtesy of a bystander armed with a can of Twisted Tea. The video served as inspiration for many a meme, but perhaps none more technically intricate than this air cannon that launches 24 ounces of hard iced tea at better than 100 miles per hour built by [Greg Bejtlich].

It’s all fun and games until somebody brings out the weaponized bead seater.

Technically we’re looking at two different hacks here. The first is the pneumatic launcher put together using a low-cost eBay tire bead seater. These tools are designed to unleash a large volume of air into a tire so it can be properly seated onto the rim, but it doesn’t take much more than a few pieces of PVC pipe from the hardware store to turn it into an impromptu mortar. It’s even got a convenient trigger and a handle to help control the recoil. Though as you can see in the video after the break, it still ends up being a bit too energetic for [Greg] to keep a grip on.

For the projectiles, [Greg] has 3D printed a nose cone and tail fin that snap onto the 24 oz cans in hopes of making them more aerodynamically stable. The slow motion video seems to indicate they aren’t terribly effective, but they certainly look impressive. Spring-loaded control surfaces that deploy after the can leaves the muzzle could be the answer, though at some point you have to ask yourself how far you’re willing to go for an Internet meme.

It probably goes without saying that you definitely shouldn’t try firing cans of alcoholic iced tea off in your backyard. But the launcher itself might be useful for lofting antennas or hurling the occasional potato.

Continue reading “Twisted Tea Launcher Refreshes At 104 MPH”

Orphaned Gimbal Gets Second Chance To Fly

A reality of flying RC aircraft is that at some point, one of your birds is going to fall in the line of duty. It could get lost in the clouds never to be seen again, or perhaps it will become suddenly reacquainted with terra firma. Whatever the reason, your overall enjoyment of the hobby depends greatly on how well you can adapt to the occasional loss.

Based on what we’ve seen so far, we’d say [Rural Flyer] has the right temperament for the job. After losing one of his quadcopters in an unfortunate FPV incident, he decided to repurpose the proprietary gimbal it left behind. If he still had the drone he could have slipped a logic analyzer in between its connection with the motorized camera to sniff out the communication protocol, but since that was no longer an option, he had to get a little creative.

Figuring out the power side of things was easy enough thanks to the silkscreen on the camera’s board, and a common 5 V battery eliminator circuit (BEC) connected to the drone’s 7.4 V battery pack got it online. A cobbled together adapter allowed him to mount it to one of his other quads, but unfortunately the angle wasn’t quite right.

[Rural Flyer] wanted the camera tilted down about 15 degrees, but since he didn’t know how to talk to it, he employed a clever brute force solution. After identifying the accelerometer board responsible for determining the camera’s position, he use a glob of hot glue to push the sensor off of the horizontal. Providing this physical offset to the sensor data caused the camera to automatically move itself to exactly where he wanted it.

Continue reading “Orphaned Gimbal Gets Second Chance To Fly”

Youngster’s ESP32 Jukebox Uses RFID To Queue Tunes

Though kids today have an incredible knack for figuring out modern phones and tablets, there’s still something to be said for offering a simple physical user interface for little hands. To that end, [Martin Hierholzer] has put together a whimsical jukebox that his two year old daughter can use to listen to her favorite songs. With just a few simple buttons, no display to read, and the ability to stop and start songs using RFID tags embedded into 3D printed figures, it’s a perfect interface for tiny humans just getting the hang of interacting with technology.

While the Raspberry Pi might have been the more obvious choice to base this project around, [Martin] decided to go the ESP32 route for improved energy efficiency. The popular microcontroller is more than powerful enough to play MP3s, and its integrated WiFi connectivity allows the player to download new tracks from the network occasionally. He added a micro SD slot to provide some mass storage, a PCM5102 I2S DAC with a PAM8403 amplifier to handle the audio side of things, and a MFRC522 RFID receiver that can pick up tags placed on the top of the player. Power is provided by parts salvaged from a USB battery bank, and everything is housed on a custom PCB.

The relatively low power requirements of the ESP32 means the jukebox can keep the party going for many hours (perhaps even days) when in active use. When the RFID token is removed and there are no songs to play, some clever coding kicks the chip into low-power mode to greatly extend the player’s standby time. [Martin] says it can sleep for months without having to be recharged, and considering some of the impressive feats of battery-sipping we’ve previously seen from the ESP32, we don’t doubt it.

Even if you don’t have any young music lovers at home, the documentation [Martin] has put together for this project is absolutely worth a look. Whether its how he configures the server side to push songs and firmware updates to the player, how he wrangled the ESP32’s Ultra-Low Power coprocessor (ULP), or the woodworking tips used to produce the charming enclosure, you’re sure to pick up a trick or two.

The children of hackers and makers always seem to get the coolest stuff, and we’re looking forward to seeing what [Martin] comes up with next. After all, kids grow up fast and pretty soon his daughter is going to need something new to entertain her.

AM/FM Radio Gets Bluetooth Upgrade

For many commercial broadcast radio has lost its luster, leaving an unknowable number of perfectly serviceable AM/FM radios to lie dormant. But they don’t have to. As [Dan Gebhardt] shows in his recent hack, integrating a Bluetooth audio receiver into portable radio may be easier than you think.

For this project, [Dan] wanted to make sure no original functionality was lost. The radio still functions on the AM/FM bands, but now with the flip of a switch, he can listen to the audio coming his way courtesy of a Apt-X low-latency Bluetooth receiver. It sounds like the link is quick enough that he can even use this as a wireless speaker for watching TV, which isn’t always possible with cheaper chipsets that introduce a noticeable lag.

Isolating the audio trace.

The trick was to track down the receiver IC, a Silicon Labs chip similar to ones we’ve seen used in a few DIY radio projects previously. A peek at the datasheet told him which pins were carrying the audio signal, and after following them around the board, he found a convenient spot to cut the trace before it went into the volume control. From there is was just a matter of wiring in a SPDT slide switch that allowed him to select which device was passed through to the radio’s audio hardware.

While he had everything apart, [Dan] exorcised the Apt-X’s original 300 mAh LiPo pouch and replaced it with a DC-DC converter connected to the radio’s battery compartment. This allows him to run all of the hardware off of the same set of rechargeable NiMH cells, and also provides considerably improved runtime for the Bluetooth receiver.

Now as for physically integrating the Apt-X into the case of the radio…well, what can we say? [Dan] admits it’s a bit rough, but then the point was never to enter the thing into beauty pageants. It works well enough for his purposes, and in the end that’s all that matters.

Handy Tool Drains 18650 Cells So You Don’t Have To

Draining a battery is easy. Just put a load across the terminals, maybe an incandescent bulb or a beefy power resistor, and wait. What’s quite a bit trickier is doing so safely. Put too large a load on, or leave it connected for longer than necessary, and you can end up doing damage to the cell. Not convinced he’d always remember to pull the battery out of his jury-rigged discharger at the opportune moment, [Jasper Sikken] decided to come up with a simple tool that could automatically handle the process with the cold and calculating precision of silicon.

V4 used the protection module from a pouch battery.

At a glance we can see the major components you’d expect in a discharger: a fairly simple PCB, four ceramic power resistors, a holder for a single 18650 cell, and a rocker switch to connect it all together. But wait, what’s that a TP4056 charging module doing in there?

While its presence technically makes this device a battery charger, [Jasper] is actually using it for the onboard protection IC. With the charging module between the cell and the power resistors, it will cut the connection when the voltage drops to 2.4 V. Oh yeah, and it can charge the battery back up if you connect up a USB cable.

[Jasper] says his little tool works great, with the resistor array putting just enough load on the battery to pull it down quickly without getting so hot that they’re dangerous to have exposed. He estimates the BOM for this gadget runs around $2 USD, and is considering offering it as a kit on Tindie in the near future.

If you’re looking for something a bit more advanced, [Jasper] built a programmable load a few years back that can discharge batteries and test power supplies all while logging the data to your computer for later analysis.

Continue reading “Handy Tool Drains 18650 Cells So You Don’t Have To”

Sirius XM Satellite Failure A Reminder That Space Is Risky (And That Satellite Insurance Is A Thing)

It’s easy to imagine that once a spacecraft leaves Earth’s atmosphere and is in a stable orbit, the most dangerous phase of the mission is over. After all, that’s when we collectively close the live stream and turn our attentions back to terrestrial matters. Once the fire and fury of the launch is over with, all the excitement is done. From that point on, it’s just years of silently sailing through the vacuum of space. What’s the worst that could happen?

Unfortunately, satellite radio provider Sirius XM just received a harsh reminder that there’s still plenty that can go wrong after you’ve slipped Earth’s surly bonds. Despite a flawless launch in early December 2020 on a SpaceX Falcon 9 and a reportedly uneventful trip to its designated position in geostationary orbit approximately 35,786 km (22,236 mi) above the planet, their brand new SXM-7 broadcasting satellite appears to be in serious trouble.

Maxar Technologies, prime contractor for the SXM-7, says they’re currently trying to determine what’s gone wrong with the 7,000 kilogram satellite. In a statement, the Colorado-based aerospace company claimed they were focused on “safely completing the commissioning of the satellite and optimizing its performance.” But the language used by Sirius XM in their January 27th filing with the U.S. Securities and Exchange Commission was notably more pessimistic. No mention is made of bringing SXM-7 online, and instead, the company makes it clear that their existing fleet of satellites will be able to maintain service to their customers until a replacement can be launched.

So what happened, and more importantly, is there any hope for SXM-7? Neither company has released any concrete details, and given the amount of money on the line, there’s a good chance the public won’t get the full story for some time. But we can theorize a bit based on what we do know, and make some predictions about where things go from here.

Continue reading “Sirius XM Satellite Failure A Reminder That Space Is Risky (And That Satellite Insurance Is A Thing)”