A Bolt-On I2C Navigation Key For Your Next Project

We often talk about the advantages of modular hardware here at Hackaday; the ability to just order a few parts online, hook them up with some jumper wires, and move onto the software side of things is a monumental time saver when it comes to prototyping. So anytime we see a new module that’s going to save us time and aggravation down the road, we get a bit excited.

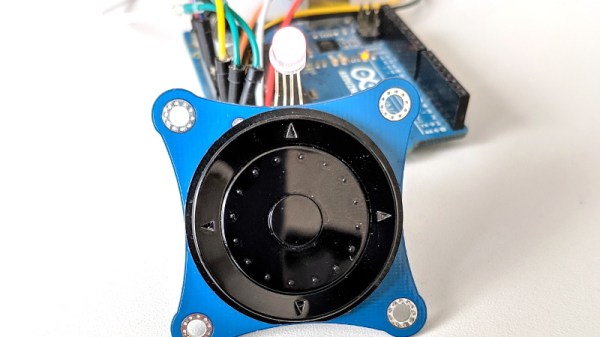
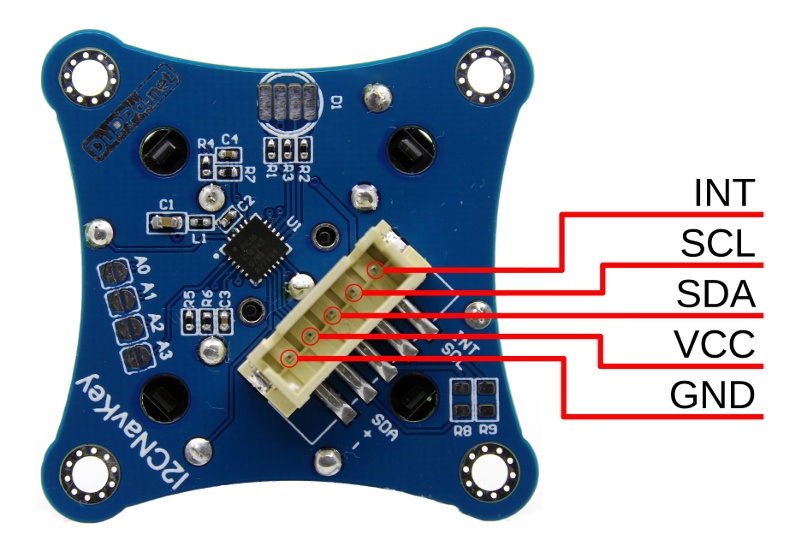
Today we present the very slick I2CNavKey developed by [Saimon], a turn-key interface solution for your builds that can’t quite get away with a couple toggle switches. It not only gives you a four-way directional pad with center button, but a rotary “wheel” like on the old iPods. All of which you can access easily and with a minimum of wiring thanks to the wonders of I2C.

But even that might be selling the module short. This isn’t just a couple of buttons on a breakout board, the I2CNavKey is powered by its own PIC16F18345 microcontroller and features three configurable GPIOs with PWM support (perfect for an RGB LED) plus 256 bytes of onboard EEPROM storage.

[Saimon] has released the entire project as open source hardware for your hacking pleasure, but you can also get them as ready-to-use modules on Tindie for $18 USD [Editor’s Note: Because of a typo we originally we left the 1 out of the price]. Whether you’re a paying customer or not, you get access to the project’s absolutely phenomenal documentation, including a nearly 30 page manual that contains everything you’d ever want to know about the I2CNavKey and how to integrate it into your project. If all hardware was documented with this level of dedication, the world would be a much nicer place for folks like us.

If you recognize the name, or perhaps the affinity for neat I2C-connected input devices, it’s probably because you’ve seen his very similar I2C rotary encoder on these pages previously, which was a finalist in our Open Hardware Design Challenge during the 2018 Hackaday Prize.

Windows 3.1 In My BIOS? It’s More Likely Than You Think

It might be difficult for modern audiences to believe, but at one point Microsoft Windows fit on floppy disks. This was a simpler time, with smaller hard drives, lower resolution displays, and no hacker blogs for you to leave pessimistic comments on. A nearly unrecognizable era, to be sure. But if you’re one of the people who looks back on these days fondly, you might wonder why we don’t see this tiny graphical operating system smashed into modern hardware. After all, SkiFree sure ain’t gonna play itself.

Well, wonder no more. A hacker by the name of [redsPL] thought that Microsoft’s latest and greatest circa 1992 might do well crammed into the free space remaining on a ThinkPad X200’s firmware EEPROM. It would take a little fiddling, plus the small matter of convincing the BIOS to see the EEPROM as a virtual floppy drive, but clearly those are all minor inconveniences for anyone mad enough to boot their hardware into a nearly 30 year old copy of Visual Basic for a laugh.

The adventure starts when [redsPL] helped a friend install libreboot and coreboot on a stack of old ThinkPads by using the Raspberry Pi as an SPI flasher, a pastime we’re no strangers to ourselves. Once the somewhat finicky software and hardware environment was up and running, it seemed a waste not to utilize it further. Especially given the fact most firmware replacements only fill a fraction of the X200’s 8 MB chip.

Of course, Windows 3.1 was not designed for modern hardware and no proper drivers exist for much of it. Just getting the display resolution up to 1024×768 (and still with only 256 colors) required patching the original video drivers with ones designed for VMWare. [redsPL] wasn’t able to get the sound hardware working, but at least the PC speaker makes the occasional buzz. The last piece of the puzzle was messing around the zip and xz commands until the disk image was small enough to sneak onto the chip.

Believe it or not, this isn’t the first time we’ve seen Windows from this era running on a (relatively) modern ThinkPad. For whatever reason, these two legends of the computing world seem destined to keep running into each other.

[Thanks to Renard for the tip.]

Making A Birthday Party Magical With Smart Wands

Visitors to the Wizarding World of Harry Potter at Universal Studios are able to cast “spells” by waving special interactive wands in the air. Hackers like us understand that there must be some unknown machinations happening behind the scenes to detect how the wands are moving, but for the kids wielding them, it might as well be real magic. So when his son asked to have a Harry Potter themed birthday party, [Adam Thole] decided to try recreating the system used at Universal Studios in his own home.

Components used in the IR streaming camera

The basic idea is that each wand has a reflector in the tip, which coupled with strong IR illumination makes them glow on camera. This allows for easy gesture recognition using computer vision techniques, all without any active components in the wand itself.

[Adam] notes that you can actually buy the official interactive wands from the Universal Studios online store, and they’d even work with his system, but at $50 USD each they were too expensive to distribute to the guests at the birthday party. His solution was to simply 3D print the wands and put a bit of white prismatic reflective tape on the ends.

With the wands out of the way, he turned his attention to the IR imaging side of the system. His final design is a very impressive 3D printed unit which includes four IR illuminators, a Raspberry Pi Zero with the NoIR camera module. [Adam] notes that his software setup specifically locks the camera at 41 FPS, as that triggers it to use a reduced field of view by essentially “zooming in” on the image. If you don’t request a FPS higher than 40, the camera will deliver a wider image which didn’t have any advantage in this particular project.

The last part of the project was taking the video stream from his IR camera and processing it to detect the bright glow of a wand’s tip. For each frame of the video the background is first removed and then any remaining pixel that doesn’t exceed a set brightness level if ignored. The end result is an isolated point of light representing the tip of the wand, which can be fed into Open CV’s optical flow function to show [Adam] what shape the user was trying to make. From there, his software just needs to match the shape with one of the stock “spells”, and execute the appropriate function (such as changing the color of the lights in the room) with Home Assistant.

Overall, it’s an exceptionally well designed system considering the goal was simply to entertain a group of children for a few hours. We almost feel bad for the other parents in the neighborhood; it’s going to take more than a piñata to impress these kids after [Adam] had them conjuring the Dark Arts at his son’s party.

It turns out there’s considerable overlap between hacker types and those who would like to have magic powers (go figure). [Jennifer Wang] presented her IMU-based magic wand research at the 2018 Hackaday Superconference, and in the past we’ve even seen other wand controlled light systems. If you go all the way back to 2009, we even saw some Disney-funded research into interactive wand attractions for their parks, which seems particularly prescient today.

Continue reading “Making A Birthday Party Magical With Smart Wands”

Humanity Creates A Cloud Of Space Garbage, Again

With the destruction of the Microsat-R reconnaissance satellite on March 27th, India became the fourth country in history to successfully hit an orbiting satellite with a surface-launched weapon. While Microsat-R was indeed a military satellite, there was no hostile intent; the spacecraft was one of India’s own, launched earlier in the year. This follows the examples of previous anti-satellite (ASAT) weapons tests performed by the United States, Russia, and China, all of which targeted domestic spacecraft.

Yet despite the long history of ASAT weapon development among space-fairing nations, India’s recent test has come under considerable scrutiny. Historically, the peak of such testing was during the 1970’s as part of the Cold War rivalry between the United States and then Soviet Union. Humanity’s utilization of space in that era was limited, and the clouds of debris created by the destruction of the target spacecraft were of limited consequence. But today, with a permanently manned outpost in low Earth orbit and rapid commercial launches, space is simply too congested to risk similar experiments. The international community has strongly condemned the recent test as irresponsible.

For their part, India believes they have the right to develop their own defensive capabilities as other nations have before them, especially in light of their increasingly active space program. Prime Minister Narendra Modi released a statement reiterating that the test was not meant to be a provocative act:

Today’s anti-satellite missile will give a new strength to the country in terms of India’s security and a vision of developed journey. I want to assure the world today that it was not directed against anybody.

India has always been against arms race in space and there has been no change in this policy. This test of today does not violate any kind of international law or treaty agreements. We want to use modern technology for the protection and welfare of 130 million [1.3 Billion] citizens of the country.

Further, the Indian Space Research Organisation (ISRO) rejects claims that the test caused any serious danger to other spacecraft. They maintain that the test was carefully orchestrated so that any debris created would renter the Earth’s atmosphere within a matter of months; an assertion that’s been met with criticism by NASA.

So was the Indian ASAT test, known as Mission Shakti, really a danger to international space interests? How does it differ from the earlier tests carried out by other countries? Perhaps most importantly, why do we seem so fascinated with blowing stuff up in space?

Continue reading “Humanity Creates A Cloud Of Space Garbage, Again”

Arduino Drives Seventeen Stepper Motors, Carefully

It’s fair to say that building electronic gadgets is easier now than it ever has been in the past. With low-cost modular components, there’s often just a couple dozen lines of code and a few jumper wires standing between your idea and a functioning prototype. Driving stepper motors is a perfect example: you can grab a cheap controller board, hook it up to a microcontroller, and the rest is essentially just software. But recently [mechatronicsguy] wondered if even that was more hardware than was technically necessary to get the job done.

It’s not that he was intentionally looking to make things more complicated for himself, of course. His rationale was entirely economic; if you’re looking to drive a dozen or more stepper motors, even the “cheap” controllers can add up. So he started to wonder if he could skip the controller entirely and connect the stepper motor directly to the digital pins of an Arduino. Generally speaking this is a bad idea, but if you’re careful and are willing to take the risk, [mechatronicsguy] is living proof it’s possible

So what’s the trick to running a whopping seventeen individual stepper motors directly from the digital pins of an Arduino Mega? Well, to start with you’re not going to be running the beefy NEMA 17 motors like you might find in a 3D printer. [mechatronicsguy] is using the diminutive (and dirt cheap) 28BYJ-48, a light duty stepper used in many consumer products. Even with this relatively tiny motor, you need to crack open the case and cut a trace on the PCB to switch it from unipolar to bipolar.

Beyond that, you need to be careful. [mechatronicsguy] reports he’s had success running as many as ten of them at once, but realistically the fewer operating simultaneously the better. This is actually made easier due to the relatively poor specs of the 28BYJ-48 motor; its huge eleven degree step size means its not really susceptible to the same kind of slippage you’d get on a NEMA 17 when powered down. This means you can cut power to all but the actively moving motor and be fairly sure they’ll all stay where you left them.

With as popular as the 28BYJ-48 stepper is, there are several projects this “quick and dirty” method of interfacing could potentially work with. This small “barn door” star tracker is an obvious example, but we’ve also seen some very nice robotic arms built with these low-cost motors which could benefit from the technique.

Duck And Cover With This WiFi “Geiger Counter”

There’s perhaps no sound more recognizable than the frantic clicking of a Geiger counter. Not because this is some post-apocalyptic world in which everyone is personally acquainted with the operation of said devices, but because it’s such a common effect used in many movies, TV shows, and video games. If somebody hears that noise, even if it doesn’t really make sense in context, they know things are about to get serious.

Capitalizing on this phenomena, [Anton Haidai] has put together a quick hack which turns the ESP8266 into a “Geiger counter” for WiFi. Rather than detecting radiation, the gadget picks up on the strongest nearby WiFi signal and will start clicking in response to signal strength. As the signal gets stronger, so does the clicking. While primarily a novelty, it’s an interesting idea that could potentially be useful for things like fox hunting.

The hardware is really about as simple as it gets, just a basic buzzer attached to one of the digital pins on a NodeMCU development board. This project is more of a proof of concept, but if it were to be developed further it would be interesting to see the electronics placed into a 3D printed replica of one of the old Civil Defense Geiger counters. Perhaps even integrating an analog gauge that can bounce around in response to signal strength.

Software-wise there is the option of locking onto one single network SSID or allowing the device to find the strongest network in the area. Even if you’re not in the market for a chirping WiFi detector, the code is a good example of how you can detect signal RSSI and act on it accordingly; a neat trick which might come in handy in a future project.

If you’re more interested in the real thing, we’ve got plenty of DIY Geiger counters in the archive for you to check out. From diminutive builds that can be mounted to the top of a 9V battery to high-tech solid state versions with touch screen interfaces, you should have plenty of inspiration if you’re looking to kit yourself out before your next drive through the Chernobyl Exclusion Zone.

Continue reading “Duck And Cover With This WiFi “Geiger Counter””

Vintage Print Processor Fixed With 3D Printing

If you don’t know what a print processor is, don’t feel bad. There’s precious few people out there still running home darkrooms, and the equipment used for DIY film development is about as niche as it gets today. For those looking to put together their own darkroom in 2019, buying second hand hardware and figuring out how to fix it on your own is the name of the game, as [Austin Robert Hermann] found out when he recently purchased a Durst Printo Print Processor on eBay.

The auction said the hardware was in working order, but despite the fact that nobody would ever lie on the Internet, it ended up being in quite poor condition. Many of the gears in the machine were broken, and some were simply missing. The company no longer supports these 1990’s era machines, and the replacement parts available online were predictably expensive. [Austin] determined his best course of action was to try his hand at modeling the necessary gears and having them 3D printed; two things he had no previous experience with.

Luckily for [Austin], many of the gears in the Printo appeared to be identical. That meant he had several intact examples to base his 3D models on, and with some educated guesses, was able to determine what the missing gears would have looked like. Coming from an animation background, he ended up using Cinema 4D to model his replacement parts; which certainly wouldn’t have been our first choice, but there’s something to be said for using what you’re comfortable with. Software selection not withstanding, he was able to produce some valid STLs which he had printed locally in PLA using an online service.

Interestingly, this is a story we’ve seen play out several times already. Gears break and wear down, and for vintage hardware, that can be a serious problem. But if you’ve got a couple intact gears to go by, producing replacements even on an entry level desktop 3D printer is now a viable option to keep these classic machines running.