Dice Roller Keeps Germs Out Of Your Snake Eyes

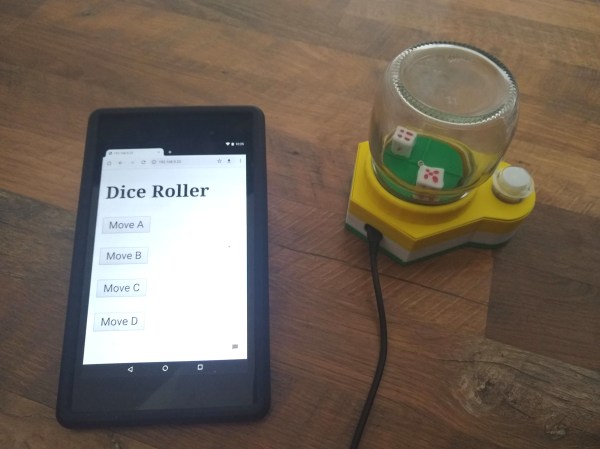
Do you need a to find a more sanitary way to roll the dice at your next socially-distanced board game gathering? [CJA3D]’s pop-o-matic mason jar dice roller can roll the bones two different ways — either by hitting that big, inviting arcade button, or though a web app that everyone can access on their own phones.

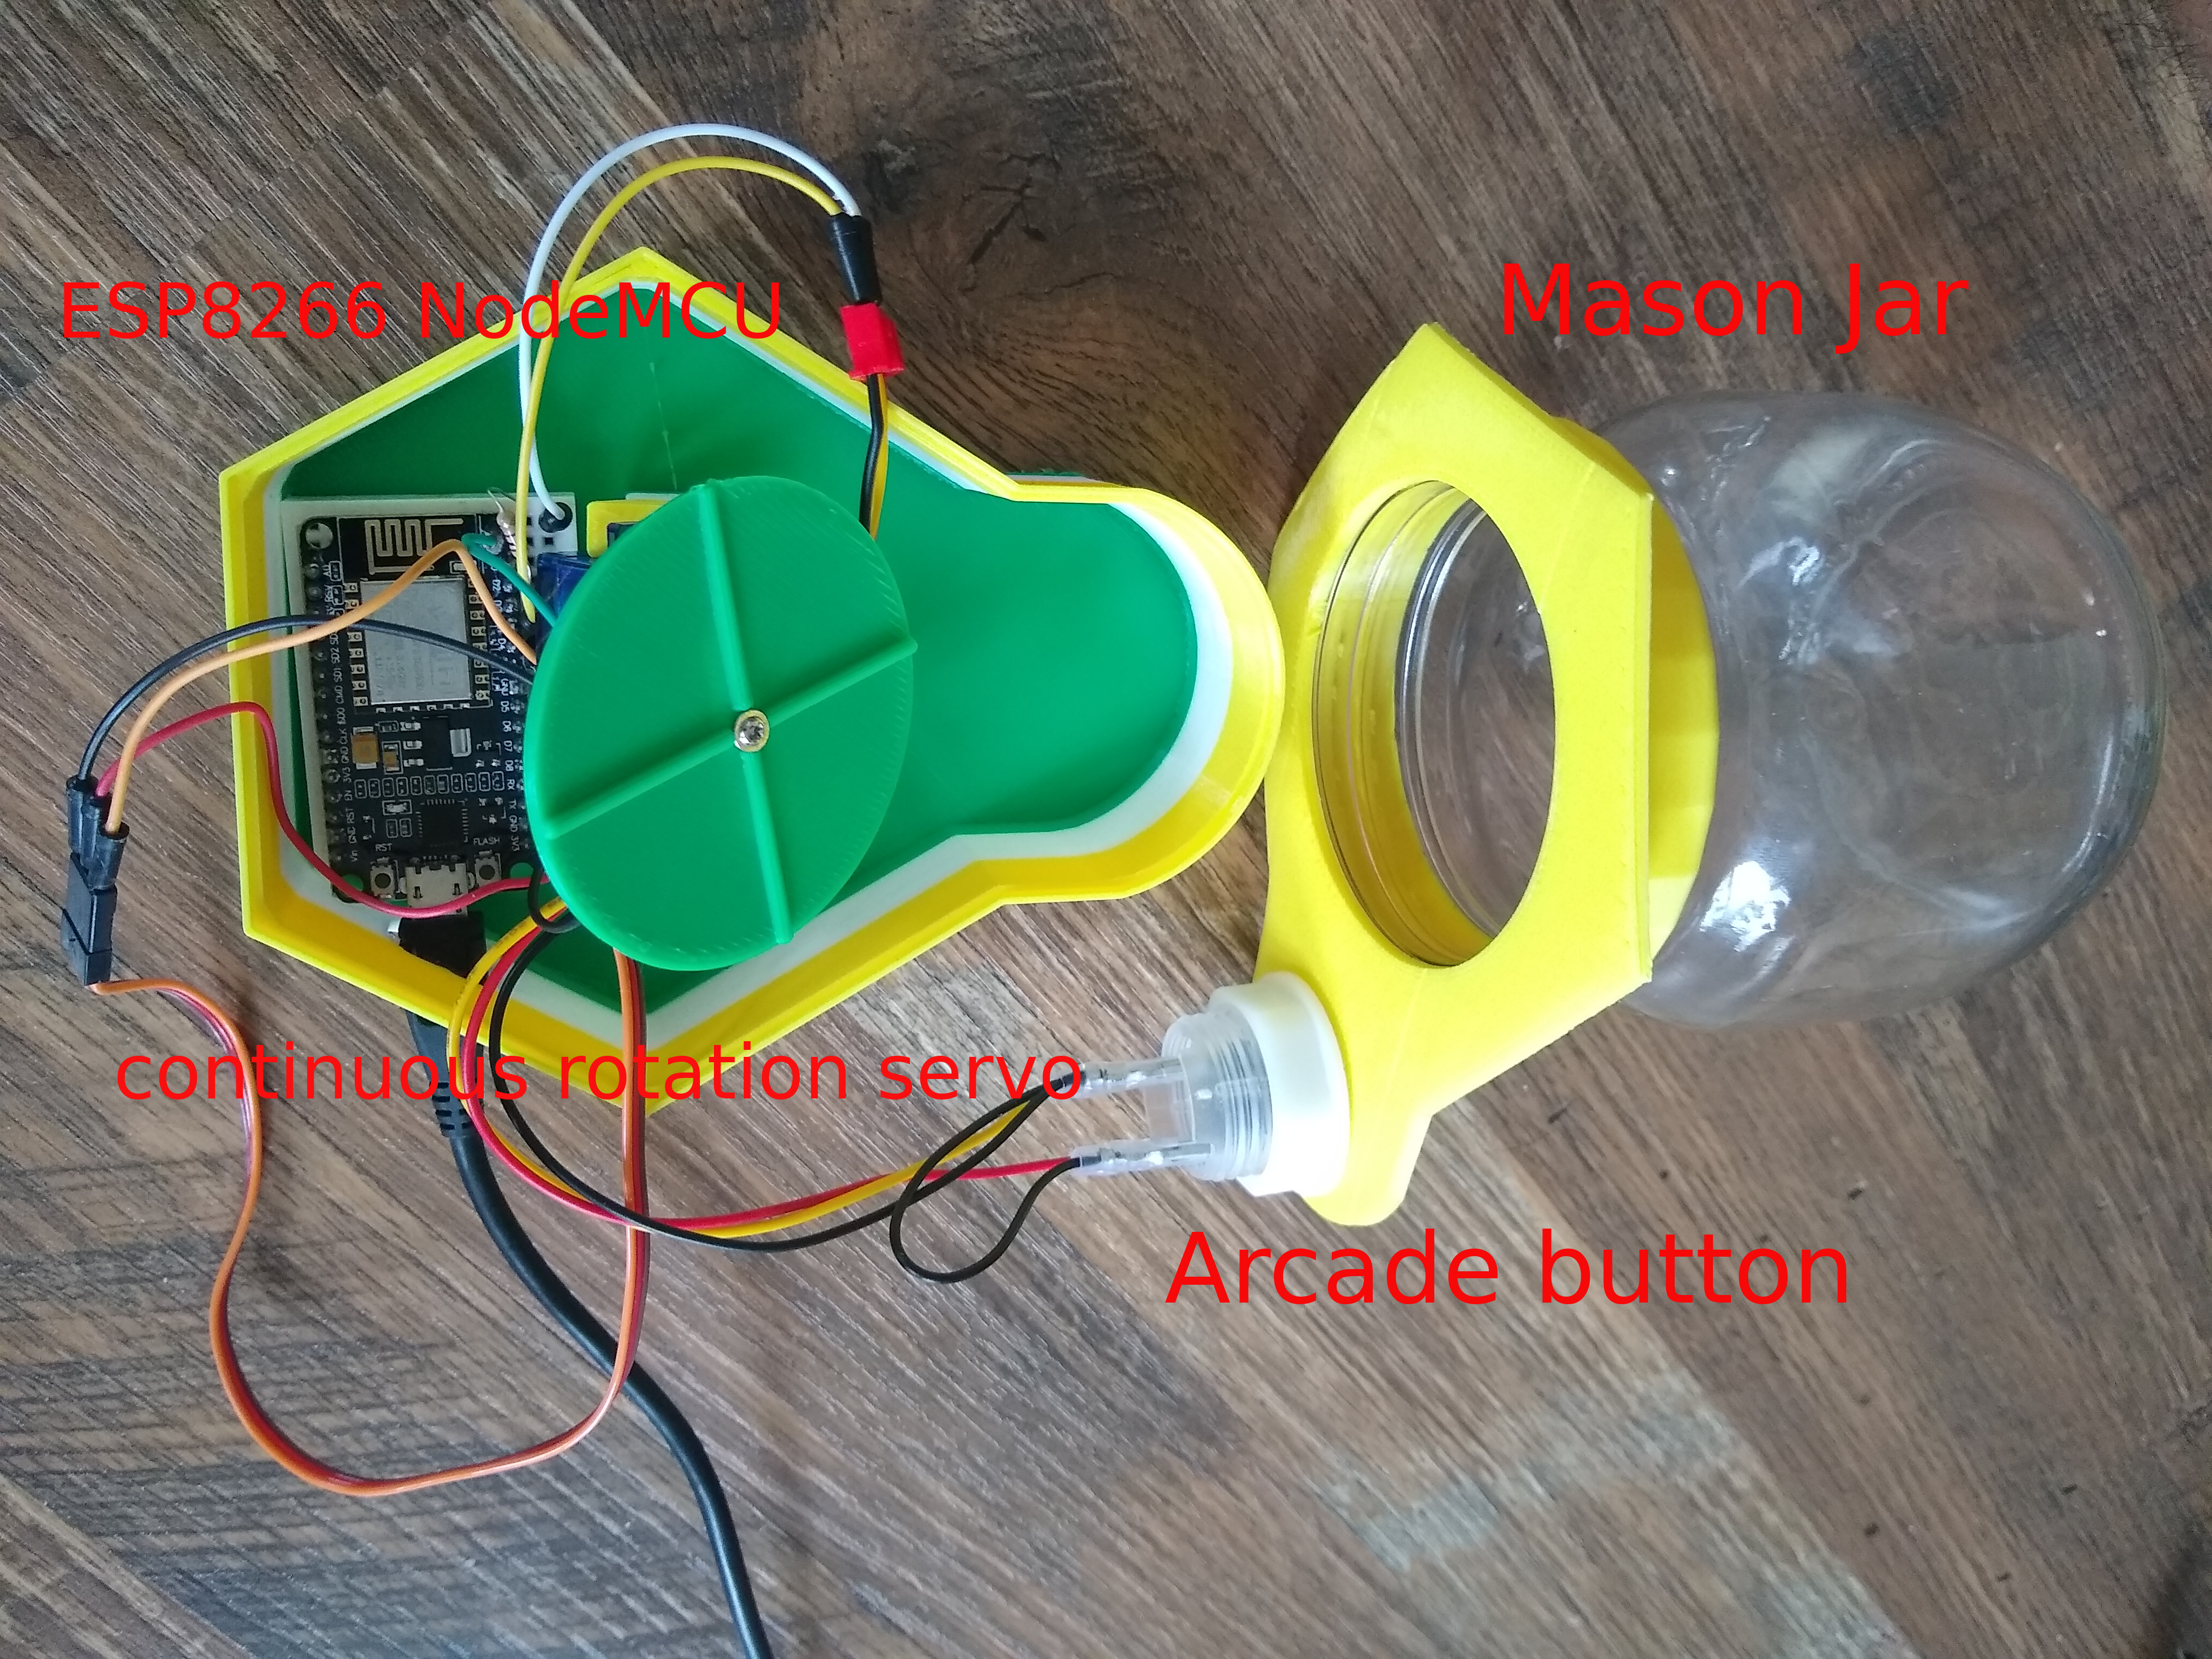
We think this looks great, and is a great reuse of a glass jar. The brains of this operation is an ESP8266, which drives a continuous-rotation servo underneath the dice. Push the button or use the web app and the servo disturbs the plate, moving the dice around.

Besides the sanitary aspect, one benefit of using the web app is that there are four different speed presets for the servo. As a bonus, [CJA3D] included the files for a pair of printed 6-sided dice. Click through to the project to see it in action.

We know you take games seriously, and so do we. Just look at this dice roller that uses machine vision to ensure fairness.

Minimal TinyAVR 0 Programming

When [Alain] wanted to use some of the new TinyAVR 0 chips — specifically, the Attiny406 — it seemed overkill to use the Windows IDE. There are plenty of sources of information on programming other AVR chips using simple command line tools, but not for these newer 0-series parts which use a new programming protocol known as UPDI. That led to a deep diving into how to program a TinyAVR 0 with a text editor, makefile, and USB-to-serial cable.

The Attiny406 has 4K of flash, 256 bytes of RAM and can run at 20 MHz with no external clock. You might think programming would be similar to a regular AVR part, but these tiny devices use UPDI (Unified Programming and Debug Interface) which uses 3 pins for programming. Older devices used different protocols.

It is very easy to create a UPDI programmer. A USB to logic-level serial cable and a 4.7K resistor is all it takes. There’s Python code that knows how to drive the protocol, too. You can also use the logic-level serial port on the Raspberry Pi with some device tree modifications explained in the code’s documentation.

[Alain] made a nice breakout board for the device. It fits a breadboard, allows for 5V or 3.3V operation, and has an LED and switch. Nothing fancy, but handy. Once you know how to ship a hex file to the chip, the rest is pretty standard. While the AVR version of gcc doesn’t cross-compile for the ATTiny out of the box, there is a device pack from Microchip that enables that feature.

The trend is to go to bigger processors, not smaller, but when you need to cram something in a small space, save a few pennies per unit, or draw very little power, these tiny processors can be just the ticket. The processors may be small, but if you work you can do some pretty big things with them.

Indian RISC-V Chip Is Team’s Third Successful Chip

There was a time when creating a new IC was a very expensive proposition. While it still isn’t pocket change, custom chips are within reach of sophisticated experimenters and groups. As evidence, look at the Moushik CPU from the SHAKTI group. This is the group’s third successful tapeout and is an open source RISC-V system on chip.

The chip uses a 180 nm process and has 103 I/O pins. The CPU runs around 100 MHz and the system includes an SDRAM controller, analog to digital conversion, and the usual peripherals. The roughly 25 square mm die houses almost 650 thousand gates.

This is the same group that built a home-grown chip based on RISC-V in 2018 and is associated with the Indian Institute of Technology Madras. We aren’t clear if everything you’d need to duplicate the design is in the git repository, but since the project is open source, we presume it is.

If you think about it, radios went from highly-specialized equipment to a near-disposable consumer item. So did calculators and computers. Developing with FPGAs is cheaper and easier every year. At this rate it’s not unreasonable to think It won’t be long before creating a custom chip will be as simple as ordering a PCB — something else that used to be a big hairy deal.

Of course, we see FPGA-based RISC-V often enough. While we admire [Sam Zeloof’s] work, we don’t think he’s packing 650k gates into that size. Not yet, anyway.

Continue reading “Indian RISC-V Chip Is Team’s Third Successful Chip”

Even More Firmware In Your Firmware

There are many ways to update an embedded system in the field. Images can fly through the air one a time, travel by sneaker or hitch a ride on other passing data. OK, maybe that’s a stretch, but there are certainly a plethora of ways to get those sweet update bytes into a target system. How are those bytes assembled, and what are the tools that do the assembly? This is the problem I needed to solve.

Recall, my system wasn’t a particularly novel one (see the block diagram below). Just a few computers asking each other for an update over some serial busses. I had chosen to bundle the payload firmware images into the binary for the intermediate microcontroller which was to carry out the update process. The additional constraint was that the blending of the three firmware images (one carrier and two payload) needed to happen long after compile time, on a different system with a separate toolchain. There were ultimately two options that fit the bill.

The system thirsty for an update

Continue reading “Even More Firmware In Your Firmware”

Pulse Generator Does The Job With An STM8

When working with hardware, whether a repair or a fresh build, it’s often necessary to test something. Depending on what you’re working with, this can be easy or a total pain if you can’t get the right signal to the right place. To eliminate this frustrating problem, [WilkoL] built a useful pulse generator for use in the lab.

[WilkoL] notes that historically, the job of generating pulses of varying length and frequency would be achieved with a smattering of 555 timers. While this is a perfectly cromulent way to do so, it was desired to take a different approach for the added flexibility modern hardware can offer. The pulse generator is instead built around an STM8 microcontroller; an unusual choice in this era, to be sure. [WilkoL] specified the part for its incredibly low cost, and highly capable timer hardware – perfect for the job.

Combined with an ST7735 TFT LCD screen, and programmed in bare metal for efficiency’s sake, the final project is installed in a project box with controls for frequency and pulse length – no more, no less. Capable of pulse lengths from 250 ns to 90 s, and frequencies from 10 mHz to 2 MHz, it’s a tool that should be comfortable testing everything from servos to mechanical counters.

Of course, if you need to get down to picosecond timescales, an avalanche pulse generator might be more your speed. Video after the break.

Continue reading “Pulse Generator Does The Job With An STM8”

ESP32 Vulnerability Affects Older Chips

There is a scene from the movie RED (Retired, Extremely Dangerous) where Bruce Willis encounters a highly-secure door with a constantly changing lock code deep inside the CIA. Knowing the lock would be impossible to break, he simply destroyed the wall next to the door, reached through, and opened the door from the other side. We thought about that when we saw [raelize’s] hack to bypass the ESP32’s security measures.

Before you throw out all your ESP32 spy gadgets, though, be aware that the V3 silicon can be made to prevent the attack. V1 and V2, however, have a flaw that — if you know how to exploit it — renders secure boot and flash encryption almost meaningless.

Continue reading “ESP32 Vulnerability Affects Older Chips”

Circuit Board Origami Puts You Face-to-Face With Low-Poly Electronics

Paper craft has been around almost as long as paper itself. It’s fun to mimic paper craft and origami with low-poly 3D prints, and [Stephen Hawes] wondered whether it could be done with copper-clad PCBs. Two years after the question arose, we have the answer in the form of a fantastical mask with light-up eyes. Check it out in the video below.

[Stephen] started with a model (Update: [kongorilla]’s 2012 low poly mask model from back in 2012 was the starting point for this hack) from the papercraft program Pepakura Designer, then milled out dozens of boards. Only a few of them support circuitry, but it was still quite the time-consuming process. The ATmega32U4 on the forehead along with the fold-traversing circuitry serve to light up the WS2812B eyes. Power runs up the copper tube, which doubles as a handy mounting rod to connect to the 3D printed base.

Continue reading “Circuit Board Origami Puts You Face-to-Face With Low-Poly Electronics”