This Joy-Con Grip Steers Its Way To Sweaty Victory

Here at Hackaday we’re always exited to see hacks that recycle our favorite childhood consoles into something new and interesting. In that context, it’s not so uncommon to see mods which combine new and unusual control methods with old devices in ways that their manufacturers never intended. What [Mike Choi] has built with the Labo Fit Adventure Kit is the rare hack that combines radically new control schemes with a modern console: without actually modifying any hardware.

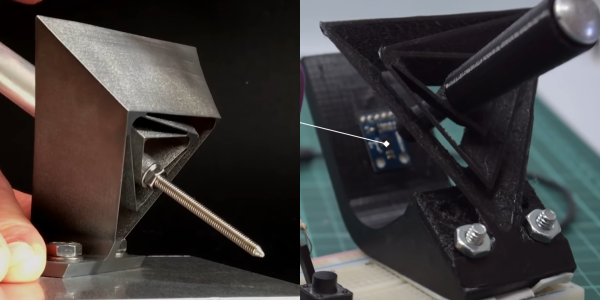
Face button pusher in blue

In short, the Labo Fit Adventure Kit lets the player play Mario Kart on the Nintendo Switch by riding a stationary exercise bike, steering with a wheel, and squeezing that wheel to use items. The Fit Kit combines the theme of Labo, Nintendo’s excellent cardboard building kit for the Nintendo Switch with the existing Ring-Con accessory for the unrelated Nintendo game Ring Fit Adventure plus a collection of custom hardware to tie it all together. That hardware senses cadence on the stationary bike, watches for the user to squeeze the handheld wheel controller, and translates those inputs to button presses on the controller to play the game.

Shoulder button pusher in green

The most fascinating element of this project is the TAPBO module which adapts the Joy-Con controller to remote input. The module includes electronics, actuators, and a clever mechanical design to allow it to be mounted to the Ring-Con in place of an unmodified Joy-Con. Electrically the components will be familiar to regular Hackaday readers; there is a breakout board for a Teensy which also holds an XBee module to receive inputs remotely and drive a pair of servos. The entire module is described in detail starting at 4:42 in the video.

Mechanically the TAPBO relies on a pair of cam-actuated arms which translate rotational servo motion into linear action to press shoulder or face buttons. The module directly measures flex of the Ring-Con with an added flexible resistor and receives cadence information from another module embedded in the stationary bike via Zigbee. When these inputs exceed set thresholds they drive the servos to press the appropriate controller buttons to accelerate or use an item.

We’ve focused pretty heavily on the technical aspects of this project, but this significantly undersells the level of polish and easy to understand documentation [Mike] has produced. It includes a TAPBO Amiibo in customized packaging, and more. Check out the full video to get the complete scope of this project.

Continue reading “This Joy-Con Grip Steers Its Way To Sweaty Victory”

Master Video Call Control Panel Is Made Of PCBs

[memestra] is a teacher whose life has become a series of videoconferences over the last year or so. With all the classes and meetings, they spend the whole day switching between either Zoom, Teams, or Meet. If anyone needs a single piece of hardware to control them all, it’s [memestra]. Well, and every other teacher out there.

The hardware — an Arduino Pro Micro and some buttons — should come as no surprise, except for maybe [memstra]’s use of a resistor network for the LEDs. Still, there’s a lot to like about this little box, starting with the enclosure. That’s not milled or laser-cut metal — each side is a PCB, and they’re all soldered together into a box.

We especially like the top panel, which fits down over the PCB that all the components are soldered to. Each of the non-volume buttons has multiple functions that are accessed by pressing, long pressing, or double pressing. But even the volume buttons do double duty: press them together to mute and un-mute. If [memestra] ever forgets which button does what and how, there’s a handy reference table silkscreened on the bottom panel.

In true teacher fashion, [memestra] has written comprehensive instructions for anyone looking to build a similar device. The heavily-commented code should make it a cinch to drop in keyboard shortcuts for Discord or anything else you might be using, though it’s worth noting that this box is optimized for the desktop apps and not the browser-based versions.

Just looking for a fun way to end video calls? Pull chains are pretty fun.

Giant DIY Mouse Sets The Ball Free

Make the move to a split keyboard and the first thing you’ll notice is that you have all this real estate between the two halves. (Well, as long as you’re doing it right). This is the perfect place to keep your cat, your coffee cup, or in [Jacek]’s case, your fantastic DIY trackball mouse.

Don’t be fooled by the orange plastic base — all the electronics are rolled up inside that big sexy ball, which [Jacek] printed in two halves and glued together. Inside the ball there’s an Adafruit Feather nRF52840 Sense, which has an onboard accelerometer, gyroscope, and magnetometer. As you’ll see in the video after the break, the Feather takes readings from these and applies a sensor-fusing algorithm to determine the ball’s orientation in 3D space before sending its position to the computer. To send the click events, [Jacek] baked some mouse buttons into the keyboard’s firmware. Among the other Feather sensors is a PDM MEMS microphone, so detecting taps on the ball and translating them to clicks is not out of the question for a future version.

Here comes the really clever part: there are two reed switches inside the ball. One is used as a power switch, and the other is for setting the ‘up’ direction of the trackball. The ball charges wirelessly in a 3D printed base, which also has a small neodymium magnet for activating the reed switches. Check out the demo after the break, which shows [Jacek] putting the trackball through its paces on a mouse accuracy testing program.

If you prefer your DIY trackballs to be more standard looking, click on over to the Ploopy project.

Continue reading “Giant DIY Mouse Sets The Ball Free”

This Negative Reinforcement Keyboard May Shock You

We wouldn’t be where we are today without Mrs. Coldiron’s middle school typing class. Even though she may have wanted to, she never did use negative reinforcement to improve our typing speed or technique. We unruly teenagers might have learned to type a lot faster if those IBM Selectrics had been wired up for discipline like [3DPrintedLife]’s terrifying, tingle-inducing typist trainer keyboard (YouTube, embedded below).

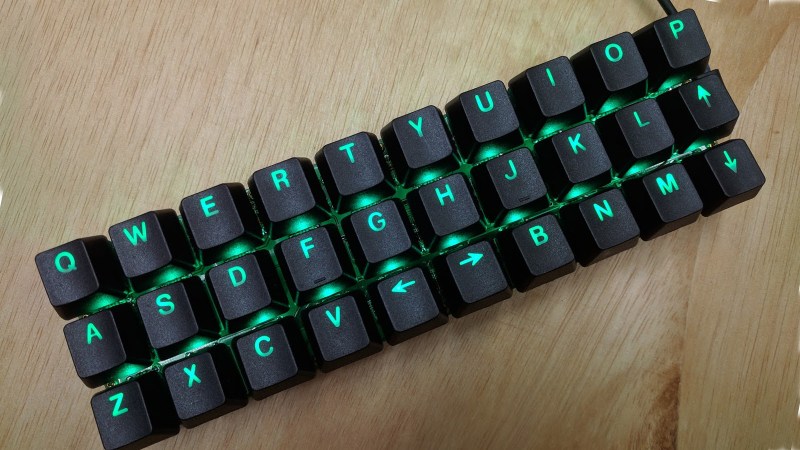
This keyboard uses capsense modules and a neural network to detect whether the user is touch-typing or just hunting and pecking. If you’re doing it wrong, you’ll get a shock from the guts of a prank shock pen every time you peck the T or Y keys. Oh, and just for fun, there’s a 20 V LED bar across the top that is supposed to deter you from looking down at your hands with randomized and blindingly bright strobing light.

Twenty-four of the keys are connected in groups of three by finger usage — for example Q, A, and Z are wired to the same capsense module. These are all wired up to a Raspberry Pi Zero along with the light bar. [3DPrintedLife] was getting a lot of cross-talk between capsense modules, so they solved the problem in software by training a TensorFlow model with a ton of both proper and improper typing data.

We love the little meter on the touchscreen that shows at a glance how you’re doing in the touch typing department. As the meter inches leftward, you know you’re in for a shock. [3DPrintedLife] even built in some games that use pain to promote faster and more accurate typing. Check out the build video after the break, but don’t say we didn’t warn you about the strobing lights.

The secret to the shock pen is a tiny flyback transformer like the kind used in CRT televisions. Find a full-sized flyback transformer and you can build yourself a handheld high-voltage power supply.

Continue reading “This Negative Reinforcement Keyboard May Shock You”

A Physical Front Panel For Oscilloscope Software

For hackers on a tight budget or with limited bench space, a USB oscilloscope can be a compelling alternative to a dedicated piece of hardware. For plenty of hobbyists, it’s a perfectly valid option. But while the larger discussion about the pros and cons of these devices is better left for another day, there’s one thing you’ll definitely miss when the interface for your scope is a piece of software: the feel of physical buttons and knobs.

But what if it doesn’t have to be that way? The ScopeKeypad by [Paul Withers] looks to recreate the feel of a nice bench oscilloscope when using a virtual interface. Is such a device actually necessary? No, of course not. Although one could argue that there’s a certain advantage to the feedback you get when spinning through the detents on a rotary encoder versus dragging a slider on the screen. Think of it like a button box for a flight simulator: sure you can fly the plane with just the keyboard and mouse, but you’re going to have a better time with a more elaborate interface.

The comparison with a flight simulator panel actually goes a bit deeper, since that’s essentially what the ScopeKeypad is. With an STM32 “Blue Pill” microcontroller doing its best impression of a USB Human Interface Device, the panel bangs out the prescribed virtual key presses when the appropriate encoder is spun or button pressed. The project is designed with PicoScope in mind, and even includes a handy key map file you can load right into the program, but it can certainly be used with other software packages. Should you feel so inclined, it could even double as a controller for your virtual spaceship in Kerbal Space Program.

Affordable USB oscilloscopes have come a long way over the years, and these days, using one is hardly the mark of shame it once was. But the look and feel of the classic bench scope is about as timeless as it gets, so we can certainly see the appeal of a project that tries to combine the best of both worlds.

Continue reading “A Physical Front Panel For Oscilloscope Software”

Two-Key Keyboard Build Log Starts Small, But Thinks Big

Interested in making a custom keyboard, but unsure where to start? Good news, because [Jared]’s build log for an adorable “2% Milk” two-key mini-keyboard covers everything you need to know about making a custom keyboard, including how to add optional RGB lighting. The only difference is that it gets done in a smaller and cheaper package than jumping directly in with a full-size DIY keyboard.

[Jared] is definitely no stranger to custom keyboard work, but when he saw parts for a two-key “2% Milk” keyboard for sale online, he simply couldn’t resist. Luckily for us, he took plenty of photos and his build log makes an excellent tutorial for anyone who wants to get into custom keyboards by starting small.

The hardware elements are clear by looking at photos, but what about the software? For that, [Jared] uses a Teensy  Pro Micro clone running QMK, an open source project for driving and configuring custom input devices. QMK drives tiny devices like the 2% Milk just as easily as it does larger ones, so following [Jared]’s build log therefore conveys exactly the same familiarity that would be needed to work on a bigger keyboard, which is part of what makes it such a great project to document.

Interested in going a little deeper down the custom keyboard rabbit hole? You can go entirely DIY, but there’s also no need to roll everything from scratch. It’s possible to buy most of the parts and treat the project like a kit, and Hackaday’s own [Kristina Panos] is here to tell you all about what that was like.

MouSTer Brings USB To Retro Computers

Folks who like the take the old Amiga out for the occasional Sunday drive usually do it because they have wistful memories of the simpler times. Back when you could edit documents or view spreadsheets on a machine that had RAM measured in kilobytes instead of gigabytes. But even the most ardent retro computer aficionado usually allows for a bit of modern convenience.

Enter the mouSTer. This tiny device converts a common USB HID mouse into something older computers can understand. It even supports using Sony’s PlayStation 4 controller as a generic game pad. While the firmware is still getting tweaked, the team has confirmed its working on several classic machines and believe it should work on many more. Considering the prices that some of these old peripherals command on the second hand market, using a USB mouse or controller on your vintage computer isn’t just more convenient, but will likely be a lot cheaper.

Confirmed retrocomputing superfan [Drygol] is a member of the team working on mouSTer, and in a recent post to his retrohax blog, he talks a bit about what’s happened since his last update over the summer. He also talks a bit about the challenges they’ve faced to get it into production. Even if you’re not into poking around on vintage computers, there are lessons to be learned here about what it takes to move from a handful of prototypes to something you can actually sell to the public.

We especially liked the details about the mouSTer enclosure, or lack thereof. Originally [Drygol] says they were going to have the cases injection molded, but despite initial interest from a few companies they talked to, nobody ended up biting because it needed to be done with relatively uncommon low pressure injection. While 3D printing is still an option, the team ended up using clear heatshrink tubing to create a simple conformal protective shell over the electronics. Personally we think it looks great like this, but it sounds like this is only a temporary solution until something a bit more robust can be implemented.

As you might imagine we’ve seen DIY projects that aimed to bring modern input devices to vintage computers like the Atari ST, but the diminutive proportions of the mouSTer and the fact that it’s a turn-key product is sure to appeal to those who want to minimize headaches when working with their classic gear.

Continue reading “MouSTer Brings USB To Retro Computers”