Arduino V. Arduino

Arduino LLC is suing Arduino Srl (the Italian version of an LLC). Sounds confusing? It gets juicier. What follows is a summary of the situation as we learned it from this article at MakeMagazin.de (google translatrix)

Arduino LLC is the company founded by [Massimo Banzi], [David Cuartielles], [David Mellis], [Tom Igoe] and [Gianluca Martino] in 2009 and is the owner of the Arduino trademark and gave us the designs, software, and community support that’s gotten the Arduino where it is. The boards were manufactured by a spinoff company, Smart Projects Srl, founded by the same [Gianluca Martino]. So far, so good.

Things got ugly in November when [Martino] and new CEO [Federico Musto] renamed Smart Projects to Arduino Srl and registered arduino.org (which is arguably a better domain name than the old arduino.cc). Whether or not this is a trademark infringement is waiting to be heard in the Massachussetts District Court.

According to this Italian Wired article, the cause of the split is that [Banzi] and the other three wanted to internationalize the brand and license production to other firms freely, while [Martino] and [Musto] at the company formerly known as Smart Projects want to list on the stock market and keep all production strictly in the Italian factory.

Naturally, a lot of the original Arduino’s Open Source Hardware credentials and ethos are hanging in the balance, not to mention its supply chain and dealer relationships. However the trademark suit comes out, we’re guessing it’s only going to be the first in a series of struggles. Get ready for the Arduino wars.

We’re not sure if this schism is at all related to the not-quite-open-source hardware design of the Yun, but it’s surely the case that the company is / the companies are going through some growing pains right now.

Thanks [Philip Steffan] for the pointer to the MakeMagazin.DE article. (And for writing it.)

Controlling Analog with SPI

We Assume Control: SPI And A Digital Potentiometer

In the last video I demonstrated a Universal Active Filter that I could adjust with a dual-gang potentiometer, here I replace the potentiometer with a processor controlled solid-state potentiometer. For those that are too young to remember, we used to say “solid-state” to differentiate between that and something that used vacuum tubes… mostly we meant you could drop it without it breakage.

The most common way to control the everyday peripheral chips available is through use of one of the common Serial Protocols such as I2C and SPI.  In the before-time back when we had only 8 bits and were lucky if 7 of them worked, we used to have to memory map a peripheral or Input/Output (I/O) controller which means we had to take many control and data lines from the microprocessor such as Data, Address, Read/Write, system clocks and several other signals just to write to a couple of control registers buried in a chip.

Nowadays there is a proliferation of microcontrollers that tend to have built-in serial interface capability it is pretty straightforward to control a full range of peripheral functions; digital and analog alike.  Rather than map each peripheral using said data and address lines,which is a very parallel approach,  the controller communicates with peripherals serially using but a handful of signal lines such as serial data and clock. A major task of old system design, mapping of I/O and peripherals, is no longer needed.

Continue reading “We Assume Control: SPI And A Digital Potentiometer”

Logic Noise: The Switching Sequencer Has The Beat

Logic Noise is all about using logic circuits to make sounds. Preferably sound that will be enjoyable to hear and useful for making music. This week, we’ll be scratching the surface of one of my favorite chips to use and abuse for, well, nearly anything: the 4051 8-way analog switch. As the name suggests, you can hook up eight inputs and select one from among them to be connected up to the output. (Alternatively, you can send a single input to one of eight destinations, but we won’t be doing that here.)

Why is this cool? Well, imagine that you wanted to make our oscillator play eight notes. If you worked through our first installment, you built an abrasive-sounding but versatile oscillator. I had you tapping manually on eight different resistors or turning a potentiometer to eight different positions. This week, we’ll be letting the 4051 take over some of the controls, leaving us to do the more advanced knob twiddling.

Continue reading “Logic Noise: The Switching Sequencer Has The Beat”

Ground Stations Are Just The Beginning: The SatNOGS Story

When you think of satellites, you may think of the Space Shuttle extending its robot arm with a huge piece of high-tech equipment waiting to pirouette into orbit. This misconception is similar to picturing huge mainframes when thinking about computers. The future (and arguably even the present) reality of satellites is smaller, cheaper, and more prolific. This future is also an “open” one if the Libre Space Foundation has anything to say about it.

This group that plans to make satellite communications available to anyone started out as a build at a hackerspace. One good idea, a shared set of skills and experience, and a little bit of time led them to accomplish amazing things. We are, of course, talking about the Grand Prize winners of the 2014 Hackaday Prize. The SatNOGS team built a working satellite ground station and laid the foundation for a data-sharing network to connect to it. But even this description can be a bit daunting, so come with me to learn what this is all about, and how it matters to you.

Continue reading “Ground Stations Are Just The Beginning: The SatNOGS Story”

Show Me The Data: Hackaday.io Year #01

Today marks exactly one year since we announced to the world the first product from our software lab – Hackaday.io. In what has been an incredibly exciting year for all of us, we evolved from a simple idea and a prototype to a truly massive community that’s making its mark on the world. Day after day, carefully listening to the invaluable feedback from our users, we have improved and moved forward, one line of code at the time.

We still have a long way to go, but we’ll pause for a second now and reflect on how far we’ve come. Then get right back to fixing bugs and developing new features.

It all started with a simple idea – building a better project hosting website. Though there are project and content websites galore out there, with new ones popping up every day, it all still felt too bland. We thought we could do better. After all, the medium is the message. The place where something lives sooner or later becomes a key part of its identity. So in order to prevent a dystopian future in which we’re all hosting our projects using the (fictional) Microsoft Maker Suite 2020 and simply don’t care, we started to work on providing an alternative.

We quickly realized that we had a much bigger mission on our hands. Sure, a better project hosting website would be nice, but what we felt we really needed was something [Brian Benchoff] has been talking about for quite some time – a “virtual hackerspace.” Not just a place where you can post your builds once you’re done (and hope someone sees it), but a living, breathing community: a place where you can start with an idea and get feedback as it develops, find collaborators, iterate, and ultimately end up building something way more amazing than you would have accomplished on your own.

This has been the aim of Hackaday for many years, but most of the collaboration was constrained to the limited space of post comment threads and biased by the editorial choice of articles and topics. With the introduction of Hackaday.io, we open up a space for anyone to unleash their creativity and expertise, and together, change the way people build things.

The Data

Unfortunately, making bold claims about how we’re out there changing the world is pretty much a commodity these days. As most Web startups can testify, it doesn’t take more than a simple landing page with nice photography and some uplifting message for any arbitrary claims to appear credible.

So instead of trying to convince you with words about how awesome the last year had been, we’ll just stick with the data.

Continue reading “Show Me The Data: Hackaday.io Year #01”

Mapping WiFi Signals In 3 Dimensions

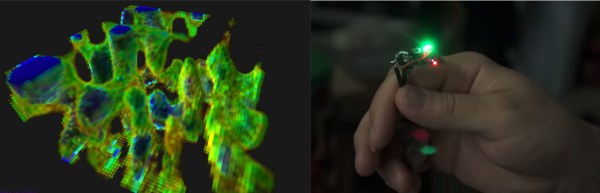
[Charles] is on a quest to complete ever more jaw-dropping hacks with the popular low-cost ESP8266 WiFi modules. This week’s project is plotting WiFi received signal strength in 3D space. While the ESP8266 is capable of providing a Received Signal Strength Indication (RSSI), [Charles] didn’t directly use it. He wrote a simple C program on his laptop to ping the ESP8266 at around 500Hz. The laptop would then translate the RSSI from the ping replies to a color value, which it would then send to the ESP8266. Since the ESP8266 was running [Charles’] custom firmware (as seen in his WiFi cup project), it could directly display the color on a WS2812 RGB LED.

The colors seemed random at first, but [Charles] noticed that there was a pattern. He just needed a way to visualize the LED over time. A single frame long exposure would work, but so would video. [Charles] went the video route, creating SuperLongExposure, an FFMPEG-based tool which extracts every video frame and composites them into a single frame. What he saw was pretty cool – there were definite stripes of good and bad signal.

wifiPOVThumbArmed with this information, [Charles] went for broke and mounted his ESP8266 on a large gantry style mill. He took several long exposure videos of a 360x360x180mm area. The videos were extracted into layers. The whole data set could then be visualized with Voxeltastic, [Charles’] own HTML5/WEBGL based render engine. The results were nothing short of amazing. The signal strength increases and decreases in nodes and anti-nodes which correspond to the 12.4 cm wavelength of a WiFi signal. The final render looks incredibly organic, which isn’t completely surprising. We’ve seen the same kind of image from commercial antenna simulation characterization systems.
Once again [Charles] has blown us away, we can’t wait to see what he does next!

Continue reading “Mapping WiFi Signals In 3 Dimensions”

Camry Battery

Fixing A Toyota Camry Hybrid Battery For Under Ten Dollars

[scoodidabop] is the happy new owner of a pre-owned Toyota Camry hybrid. Well at least he was up until his dashboard lit up like a Christmas tree. He did some Google research to figure out what all of the warning lights meant, but all roads pointed to taking his car into the dealer. After some diagnostics, the Toyota dealer hit [scoodidabop] with some bad news. He needed a new battery for his car, and he was going to have to pay almost $4,500 for it. Unfortunately the car had passed the manufacturer’s mileage warranty, so he was going to have to pay for it out-of-pocket.

[scoodidabop] is an electrician, so he’s obviously no stranger to electrical circuits. He had previously read about faulty Prius batteries, and how a single cell could cause a problem with the whole battery. [scoodidabop] figured it was worth testing this theory on his own battery since replacing a single cell would be much less expensive than buying an entire battery.

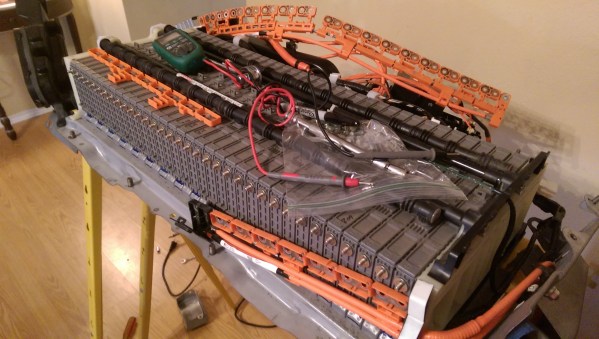
He removed the battery from his car, taking extra care not to electrocute himself. The cells were connected together using copper strips, so these were first removed. Then [scoodidabop] tested each cell individually with a volt meter. Every cell read a voltage within the normal range. Next he hooked up each cell to a coil of copper magnet wire. This placed a temporary load on the cell and [scoodidabop] could check the voltage drop to ensure the cells were not bad. Still, every cell tested just fine. So what was the problem?

[scoodidabop] noticed that the copper strips connecting the cells together were very corroded. He thought that perhaps this could be causing the issue. Having nothing to lose, he soaked each and every strip in vinegar. He then wiped down each strip with some steel wool and placed them into a baking soda bath to neutralize the vinegar. After an hour of this, he reassembled the battery and re-installed it into his car.

It was the moment of truth. [scoodidabop] started up his car and waited for the barrage of warning lights. They never came. The car was running perfectly. It turned out that the corroded connectors were preventing the car from being able to draw enough current. Simply cleaning them off with under $10 worth of supplies fixed the whole problem. Hopefully others can learn from this and save some of their own hard-earned money.