A screenshot of pinball schematics

Get A Grip On Troubleshooting Your Vintage Pinball Machine

Restoring vintage technology can be a tricky business, especially without the appropriate schematics and documentation. To this end [Mark] has spent the past twelve months building a comprehensive schematic editor and circuit simulator library for electromechanical pinball machines.

Rather than explore each and every table in excruciating detail, the emSim software aims to examine how specific circuits work, and how they are used as part of the gaming experience. The aim of the project is to aid in the diagnosis and repair of vintage electromechanical pinball machines, the types that rely on a dizzying array of switches, gears, motors and coils in their operation, operating like clockwork underneath the play field. While these older pinball machines typically use alternating current, the game logic (for the most part) is still binary, and can be effectively described with Boolean operators.

Like any machine with moving parts, these systems will eventually wear down and require servicing, a task which may not be in the wheelhouse for your casual pinball enthusiast. [Mark]’s hope is that his circuit simulations will allow just about anyone to repair these classic tables, and keep them around for future generations to explore and enjoy.

If tinkering with pinball innards isn’t for you, then make sure to check out our coverage of this awesome virtual pinball table.

A man welds on a chassis

Electric Wheelchair Dump Truck Hack Really Hauls

Have you ever looked at a derelict electric wheelchair and thought “I bet I could make something great with that!” Of course you have- this is Hackaday, after all! And so did [Made in Poland], who managed to get a hold of a broken down electric wheelchair and put the full utility of his well equipped metalworking shop to work. The results? Lets just say it hauls.

What we really enjoyed about the build was that there wasn’t much that couldn’t be done by an average garage hacker with a drill press, angle grinder, and a stick welder. While it’s definitely nicer to have a lathe and a high quality welding table, plasma cutter, and everything in between, nothing that [Made in Poland] did in the video is such high precision that it would require those extensive tools. There may be some parts that would be a lot more difficult, or lower precision, but still functional.

Another aspect of the build is of course the control circuitry and user interface. Keeping the skid steer and castor approach meant that each motor would need to be controllable independently. To achieve this, [Made in Poland] put together a purely electromechanical drive controlled with momentary rocker switches and automotive relays to form a simple H-Bridge for each motor.

Of course you just have to watch until the end, because it really proves that a man will do anything to get out of hauling wood around! Old electric wheelchairs can also make a great base for big robots, as it turns out.

Continue reading “Electric Wheelchair Dump Truck Hack Really Hauls”

The End Of The Electromechanical Era

When viewed from the far future, the early years of the 21st century will probably be seen as the end of a short era in human technological development. In the beginning of the 20th century, most everything was mechanical. There were certainly some electric devices, but consumer products like gramophone players and “movie” cameras were purely mechanical affairs. You cranked them up, and they ran on springs. Nowadays, almost every bit of consumer gear you buy will be entirely electronic. In between, there was a roughly 50 year period that I’m going to call the Electromechanical Era.

Jenny List’s teardown this week of an old Fuji film movie camera from 1972 captures the middle of this era perfectly. There’s a small PCB and an electric motor, but most of the heavy lifting in the controls was actually put on the shoulders of levers, bearings, and ridiculously clever mechanisms. The electrical and mechanical systems were loosely coupled, with the electrical controlled by the mechanical.

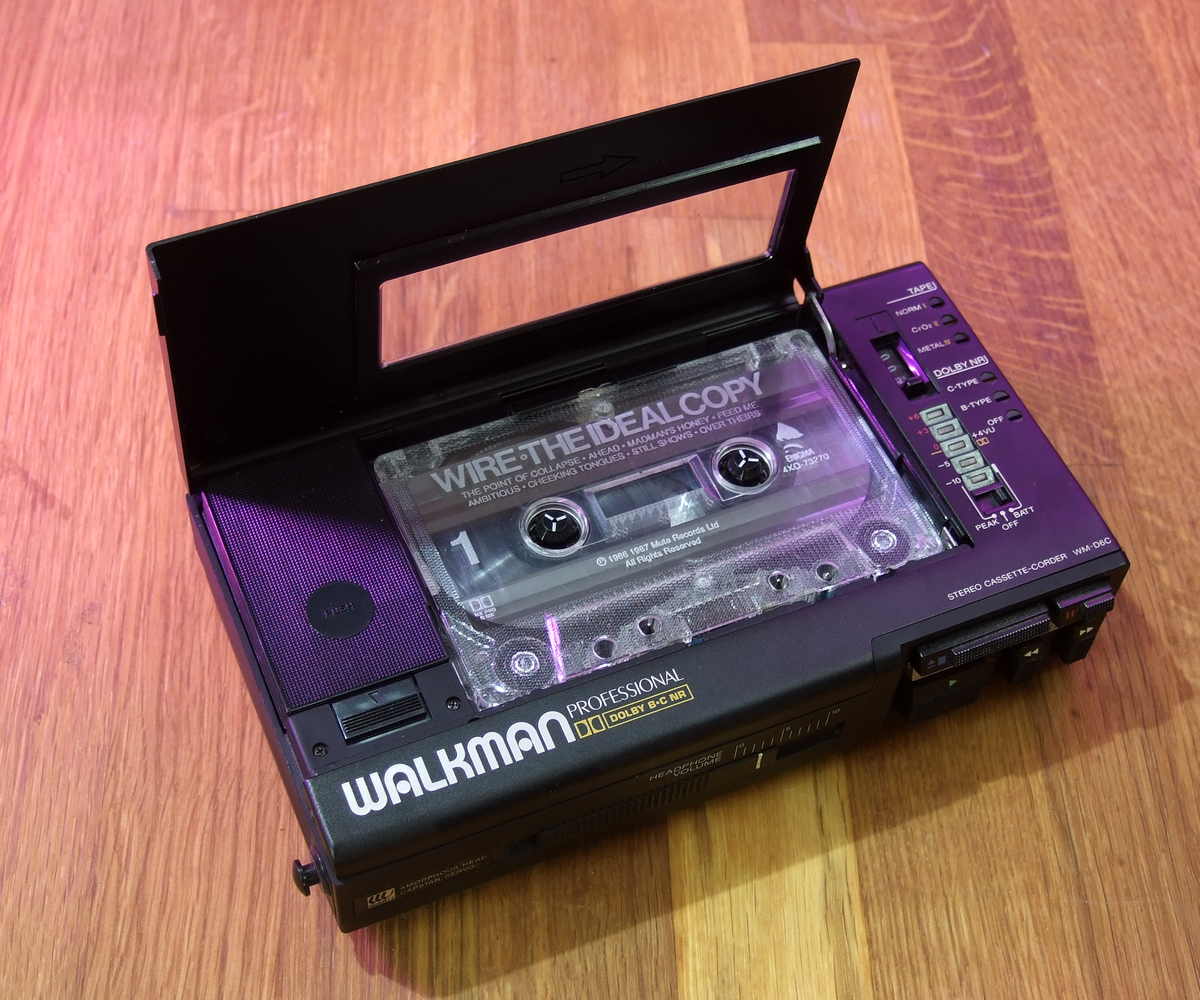
I’m willing to argue the specifics, but I’d preliminarily date the peak of the Electromechanical Era somewhere around 1990. Last year, I had to replace all of the rotted rubber drive belts in a Sony Walkman WM-D6C, a professional portable tape player and recorder produced from 1984-2002.

It’s not a simple tape recorder — the motors are electronically regulated to keep ridiculously constant speed for such a small device, and mine has Dolby B and C noise reduction circuitry packed inside along with some decent mic preamps. But still, when you press the fast-forward button, it physically shoves rubber-coated drive wheels out of the way, and sliding pieces of metal make it change modes of operation by making and breaking electrical contacts. Its precision lies as much in the mechanical assemblies and motors as in the electronics. It’s truly half electronic and half mechanical.

But that era is long over. The coming of the CD player signaled the end, although we didn’t see it at the time. Sure, there is a motor, but all the buttons are electronic, and all the “mechanism” is implemented almost entirely in silicon. The digital camera was possibly the last nail in the Electromechanical Era’s coffin: with no need to handle physical film, the last demand for anything mechanical evaporated. Open up a GoPro if you don’t know what I mean.

While I’ll be happy to never have to replace the drive rubber in a cassette recorder again, it’s with a little sadness that I think on the early iPods with their spinning metal hard drives, and how they gave way to the entirely silicon Zoom H5 recorder that I use now. It has a S/N ratio and quiet pre-amps, no wow or flutter, and a quality that would have been literally unbelievable when I bought the WM-D6C.

Still, if you find yourself in the thrift store, and you’ve never done so before, buy and take apart one of these marvels from a bygone era. A cassette recorder, even a cheap one, hides a wealth of electromechanical design.

Mechanical Seven-Segment Display, Smaller And Better Than The Original

One thing we love here at Hackaday is when we get to track the evolution of a project over time. Seeing a project grow over time is pretty typical — scope creep is real, after all. But watching a project shrink can be a real treat too, as early versions get refined into sleeker and more elegant solutions.

This slimmed-down mechanical seven-segment display is a perfect example of that downsizing trend. When we saw [IndoorGeek]’s first vision of an electromechanical display, it was pretty chunky. Then as now, each segment is a 3D-printed piece with a magnet attached to the rear. The segments hover over solenoid coils, which when energized repel the magnet and protrude the segment, forming the desired digit. The old version used large, hand-wound coils, though, making the display pretty bulky front to back.

Version 2 of the display takes a page from [Carl Bugeja]’s playbook and replaces the wound coils with PCB coils. We’ve seen [Carl]’s coils on both rigid substrates and flex PCBs; [IndoorGeek] used plain old FR4 here. The coils occupy four layers so they have enough oomph to extend and retract each segment, and the PCB includes space for H-bridge drivers for each segment. The PCB forms the rear cover for the display, which is also considerably slimmed down for this version. What’s the same, though, is how good this display looks, especially with strong side-lighting — the shadows cast by the extended segments are striking against the plain white face of the display.

Congratulations to [IndoorGeek] on a great-looking build and a useful improvement over the original.

Continue reading “Mechanical Seven-Segment Display, Smaller And Better Than The Original”

Building This Mechanical Digital Clock Took Balls

In the neverending quest for unique ways to display the time, hackers will try just about anything. We’ve seen it all, or at least we thought we had, and then up popped this purely mechanical digital clock that uses nothing but steel balls to display the time. And we absolutely love it!

Click to embiggen (you’ll be glad you did)

One glimpse at the still images or the brief video below shows you exactly how [Eric Nguyen] managed to pull this off. Each segment of the display is made up of four 0.25″ (6.35 mm) steel balls, picked up and held in place by magnets behind the plain wood face of the clock. But the electromechanical complexity needed to accomplish that is the impressive part of the build. Each segment requires two servos, for a whopping 28 units plus one for the colon. Add to that the two heavy-duty servos needed to tilt the head and the four needed to lift the tray holding the steel balls, and the level of complexity is way up there. And yet, [Eric] still managed to make the interior, which is packed with a laser-cut acrylic skeleton, neat and presentable, as well he might since watching the insides work is pretty satisfying.

We love the level of craftsmanship and creativity on this build, congratulations to [Eric] on making his first Arduino build so hard to top. We’ve seen other mechanical digital displays before, but this one is really a work of art.

Continue reading “Building This Mechanical Digital Clock Took Balls”

Rotary Controller Dials In PC Volume

As wonderful as mechanical keyboards are, most of the pre-fab and group buy models out there have zero media controls. If you want rotary encoders and OLED screens to show what function layer you’re working in, you’ll probably have to build your own keyboard from the ground up.

Hackaday alum [Cameron Coward] got around this problem by building an electromechanical buddy for his keyboard that works as a volume control. Now that we don’t rely on them to make phone calls, rotary dials are a fun throwback to a time that seems simpler based on its robust and rudimentary technology. This one is from a lovely burnt orange Bell Trimline phone, which was peak rotary dial and one of the idea’s last gasps before tone dialing took over completely.

Operationally speaking, [Cameron] is reading in the dial’s pulses with an Arduino Nano and using a Python script to monitor the serial connection and translate the pulses to volume control. We like that this is isn’t a volume knob in the traditional sense — it’s a game of percentages. Dialing ‘2’ gives 20% volume across all programs, and ‘8’ raises it to 80% of maximum. Need to mute? Just dial ‘0’, and you’ll begin to understand why people wanted to move on from rotary dialing. It won’t take that long, but it’s not instant. Check out the demo after the break.

This isn’t the first time we’ve seen a rotary dial used to control volume, but that’s one of the minor selling points of this rotary cell phone.

Continue reading “Rotary Controller Dials In PC Volume”

Tiptoe Through The Tulip Mania

Spring is headed back toward the northern hemisphere, and we’ll soon see brilliant tulips waking up from their dirt naps to dot the thawing landscape with vibrant hues. These harbingers of spring are closely associated with the Netherlands, but they are actually native to Turkey and central Asia, and weren’t brought to Europe until the 1500s. Tulips became so immensely popular that the market reached what is considered the first speculative financial fever pitch, and crashed hard in 1637.

This electromechanical parlor game arranges the tulips with another artifact of the Dutch Golden Age —  hand-painted Delft tiles designed to line fireplaces. [BuiltByBlatt] made all 114 of his on a CNC with a paint pen. To play the game, you roll a small ball toward a row of holes with different point values. Each hole has a break beam detector so the Raspberry Pi knows what you scored.

There’s also a rotating bonus hole that changes based on how many balls are left. As your score goes up, Titus the Tulip works his way to the right. It seems like it’d be fairly easy to hit the 5-point hole in the middle, but the tiles give it a horizontal Pachinko feel that makes it move less predictably. Slip into your clogs and check it out after the break.

We love the heavy clacks of electromechanical contraptions, especially old pinball machines. You can even tear ’em down and build them into other games.

Continue reading “Tiptoe Through The Tulip Mania”