An Arcade Cabinet With Displays To Spare

We’ve all got a pretty good mental image of what an arcade cabinet looks like, so you probably don’t need to be reminded that traditionally they are single-screen affairs. But that idea dates back to when they were built around big and bulky CRT displays. Now that we have modern LCD, LED, and OLED panels, who says you have to follow the old rules?

That’s precisely the sort of out of the box thinking that lead [Al Linke] to build this unique multi-display arcade cabinet. The game itself is still played on a single screen, but several smaller sub-displays are dotted all around the cabinet to indicate various bits of ancillary information. Are they necessary? Hardly. But we can’t deny it’s a clever idea, and we wouldn’t be surprised if we start seeing something similar in other DIY cabinets.

The build started with a commercially available cabinet from Arcade1Up, which at this point are popular enough that some of the Big Box retailers have them in stock. All of the electronics except for the display were stripped out, and replaced with a Dell OptiPlex 9020 computer and high-quality joysticks and buttons. [Al] then installed his various displays all over the cabinet, including a gorgeous LED marquee that we’ve featured previously.

So what do all these little screens do? [Al] explains them in the video after the break, but the general idea is that they provide contextual information about the game you currently have loaded up. A two-color OLED display shows the name of the game and what it’s rated, while a seven segment LED display shows the year the game was released. The displays are located both by the controls and where you’d expect the coin slot to be, so whether you’re actively playing or across the room, you can see all the information.

We’re always amazed to see how builders find ways to make their own personal arcade cabinets stand out. While it’s an idea that at this point we’ve seen quite a lot of, no two projects have ever been quite the same.

Continue reading “An Arcade Cabinet With Displays To Spare”

A Custom Raspberry Pi 4 Arcade Cabinet

Over the years we’ve covered quite a few Raspberry Pi based arcade cabinets, and admittedly many of them have been fairly similar. After all, there’s only so much variation you can make before it stops looking like a traditional arcade machine. But even still, we never tire of seeing a well executed build like the one [Dawid Zittrich] recently shared with us.

These days you can order a kit that has pre-cut panels to build your cabinet with, but looking for a completely custom build, [Dawid] decided to first model his design in SketchUp and then cut out the panels himself with a jigsaw. This obviously is quite a bit more work, and assumes you’ve got sufficient woodworking tools, but we think the final result looks great. Not to mention the fact that it’s going to be a lot stronger than something made out of MDF.

He also created the side artwork himself, taking the logos and names from his favorite arcade and Amiga games and putting them on a retro-looking gradient pattern.  The marquee on the top has an acrylic front and is illuminated from behind with strips of LEDs. It’s mounted on a hinge so that it can be lifted up and a new piece of art slid in without taking apart the whole cabinet. While it might be a little more labor intensive to switch out than some of the electronic marquees we’ve seen, we do like that you still have the ability to change the artwork on a whim.

With the cabinet itself completed, [Dawid] turned his attention to the electronics. Inside you’ve got the aforementioned Raspberry Pi 4 (with a Noctua fan to keep it cool), an external hard drive, a HDMI to VGA converter with scanline generator to drive the 4:3 ratio Eizo Flex Scan S2100 monitor, and a rather beefy amplifier hanging off the Pi’s 3.5 mm analog audio output. All of which is easily accessible via a maintenance hatch built into the cabinet so [Dawid] doesn’t need to tear everything down when he wants to tweak something.

If you’d like to have that arcade cabinet feel but don’t have the space and equipment to put something like this together, you could always stick a Raspberry Pi into an iCade and call it a day.

Raspberry Pi 4 And The State Of Video Game Emulation

The modern ideal of pixel art is a fallacy. Videogame art crammed onto cartridges and floppy discs were beholden to the CRT display technology of their day. Transmitting analog video within the confines of dingy yellow-RCA-connector-blur, the images were really just a suggestion of on-screen shapes rather than clearly defined graphics. Even when using the superior RGB-video-over-SCART cables, most consumer grade CRT televisions never generated more than about 400 lines, so the exacting nature of digitized plots became a fuzzy raster when traced by an electron beam. It wasn’t until the late 90s when the confluence of high resolution PC monitors, file sharing, and open source emulation software that the masses saw pixels for the sharp square blocks of color that they are.

More importantly, emulation software is not restricted to any one type of display technology any more than the strata of device it runs on. The open-source nature of videogame emulators always seems to congregate around the Lowest Common Denominator of devices, giving the widest swath of gamers the chance to play. Now, that “L.C.D.” may very well be the Raspberry Pi 4. The single board computer’s mix of tinker-friendly IO at an astonishingly affordable entry price has made it a natural home for emulators, but at fifty bucks what options unlock within the emulation scene?

Continue reading “Raspberry Pi 4 And The State Of Video Game Emulation”

Teardown: 168-in-1 Retro Handheld Game

The holidays are upon us, and that can mean many furrowed brows trying to figure out what token gift they can give out this year as stocking-stuffers. Something that’s a bit more interesting than a coupon book or a lotto scratcher, but also affordable enough that you can buy a few of them without having to take part in that other great holiday tradition: unnecessary credit debit.

Includes the NES classic Super Militarized Police Bros 3

Which is how I came to possess, at least temporarily, one of these cheap handheld multi-games that are all over Amazon and eBay. The one I ordered carries the brand name Weikin, but there are dozens of identical systems available, all being sold at around the same $20 USD price point. With the outward appearance of a squat Game Boy, these systems promise to provide precisely 168 games for your mobile enjoyment, and many even include a composite video out cable and external controller for the less ambulatory classic game aficionado.

At a glance, the average Hackaday reader will probably see right through this ploy. Invariably, these devices will be using some “NES on a Chip” solution to emulate a handful of legitimate classics mixed in with enough lazy ROM hacked versions of games you almost remember to hit that oddly specific number of 168 titles. It’s nearly a foregone conclusion that at the heart of this little bundle of faux-retro gaming lies a black epoxy blob, the bane of hardware tinkerers everywhere.

Of course, there’s only one way to find out. Let’s crack open one of these budget handhelds to see what cost reduction secrets are inside. Have the designers secured their place on the Nice List? Or have we been sold the proverbial lump of coal?

Continue reading “Teardown: 168-in-1 Retro Handheld Game”

An Epic Quest To Build The Perfect Retro Handheld

It’s a good time to be a fan of classic video games. Most of us carry around a smartphone that’s more than capable of emulating pretty much everything from the 32-bit era on down, and if you want something a little more official, the big players like Sony and Nintendo have started putting out “retro” versions of their consoles. But even still, [Mangy_Dog] wasn’t satisfied. To get the portable emulation system of his dreams, he realized he’d have to design and build it himself.

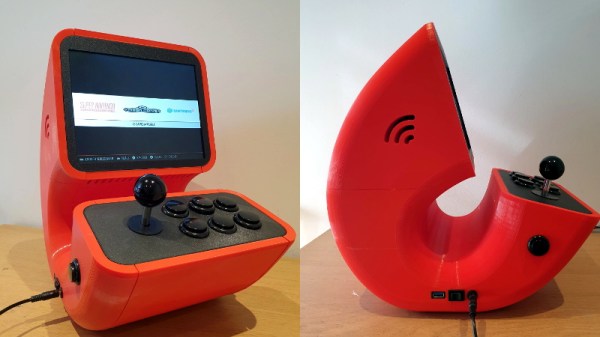
The resulting system, which he calls the “Playdog Blackbone”, is without a doubt one of the most impressive DIY builds we’ve ever seen. While there are still some issues that he’s planning on addressing in a later version of the hardware, it wouldn’t be an exaggeration to say that there’s commercially available game systems that didn’t have half as much thought put into them as the Blackbone.

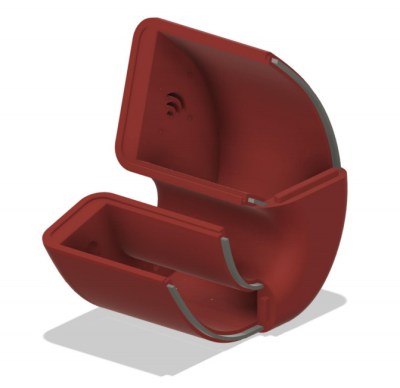
Which is, incidentally, how this whole thing got started. The original plan was to buy one of those cheap emulation handhelds, which invariably seem to come in the form of a PSP clone, and fit it with a Raspberry Pi. But [Mangy_Dog] quickly realized that not only were they too small to get everything he wanted inside, but they also felt terrible in the hand. Since he wanted the final product to be comfortable to play, his first step was to design the case and get feedback on it from other retro game enthusiasts.

After a few iterations, he arrived at the design we see today. Once he printed the case out on his SLA printer, he could move on with fitting all of his electronics inside. This takes the form of a custom PCB “motherboard” which an Orange Pi Zero Plus2 (sorry Raspberry fans) connects to. There’s actually a surprising amount of room inside the case, enough for niceties like dual speakers and a fan complete with ducting to keep the board cool.

Unsurprisingly, [Mangy_Dog] says a lot of people have been asking him if they can buy their own version of the Blackbone, and have suggested he do a crowdfunding campaign to kick off mass production. While he’s looking at the possibility of resin or injection molding the case so he can produce a few more copies, on the whole, his attention has moved on to new projects. Which frankly, we can’t wait to see.

If you’re interested in slightly more modern games, we’ve seen a number of handhelds based on “trimmed” Nintendo Wii’s which you might be interested in. While they might not have the sleek external lines of the Blackbone, the work that goes into the electronics is nothing short of inspirational.

Continue reading “An Epic Quest To Build The Perfect Retro Handheld”

Two Vintage Calculators In One

The FPGA revolution that occurred within the past few decades was a boon to many people interested in “antique” electronics. The devices “wire together” logic elements as needed rather than emulating chips completely in a software layer, which makes them uniquely suited for replicating chips that are rare, no longer in production, damaged, or otherwise lost. They also make it easy to experiment with hardware, like this project which combines two antique calculators into one single unit.

The two calculators used in this combination device are the TI Datamath and the Sinclair Scientific, both released in the early 1970s, the former of which has been extensively documented and reverse engineered on at least one occasion. The reproduction from [zpekic] has a toggle that allows the user to switch between the two “modes”. This showcases the power of microprogramming and microcode, and of the FPGA platform itself. Although both modes are functional, there are still a few bugs resulting from how different the two pieces of hardware were, which is really more of an interesting facet of this project than anything.

The build is a great showcase of FPGA technology, not to mention a great read-through for understanding these two calculators and their fundamental differences in data entry and manipulation, clock cycles, memory, and everything in between. It’s worth checking out, even if you don’t plan on using a decades-old calculator in your day-to-day life.

An Atari Graphics Chip, Ready For You To Build

The most notable of the home computer and console hardware from the 8-bit golden era didn’t get their impressive sound and graphics from off-the-shelf silicon, instead they relied on secretive custom chipsets to get the edge over their competitors. Unfortunately for vintage gaming aficionados, those chips are now long out of production and in many cases there’s little information to be had about their operation.

Which makes discovery of the schematics (PDF link) for the “Tia Maria” graphics chip found in the Atari 7800 console an unusual occurrence, and one which should be of special interest to the emulation community. They can be found alongside the rest of the Atari Museum’s 7800 information.

That such a useful document is available at all is due to a lucky find in a dumpster following the demise of Atari, when a treasure trove of documents was discarded. It seems that the existence of these schematics has been known within the Atari community for some time, and we expect before long this information will find its way into FPGA implementations of the 7800; especially since the system features nearly complete backwards compatibility with the massively successful Atari 2600.

When that happens we hope we’ll be able to bring it to you, but it’s not the first time someone’s made an Atari on an FPGA.

Via RetroRGB

Header image: Bilby [CC BY 3.0]