If you haven’t heard from other websites yet, earlier this year a leak of various Nintendo intellectual properties surfaced on the Internet. This included prototype software dating back to the Game Boy, as well as Verilog files for systems up to the Nintendo 64, GameCube and Wii. This leak seems to have originated from a breach in the BroadOn servers, a small hardware company Nintendo had contracted to make, among other things, the China-only iQue Player.
So, that’s the gist of it out of the way, but what does it all mean? What is the iQue Player? Surely now that a company’s goodies are out in the open, enthusiasts can make use of it and improve their projects, right? Well, no. A lot of things prevent that, and there’s more than enough precedent for it that, to the emulation scene, this was just another Tuesday.
Today if you wanted a little gadget to sit on your shelf and let you play classic games from the early console era, you’d likely reach for the Raspberry Pi. With slick emulator front-ends like RetroPie and DIY kits available on Amazon, you don’t even need to be a technical wizard or veteran penguin wrangler to set it up. If you can follow an online tutorial, you can easily cram the last few decades of gaming into a cheap and convenient package.
But things were a bit different back in 2005. There weren’t a lot of options for playing old games on the big screen, and what was out there tended to be less than ideal. You could hack an original Xbox or gut an old laptop to make an emulation box that could comfortably blend in with your DVD player, but that wasn’t exactly in everyone’s wheelhouse. Besides, what if you had the original cartridges and just wanted to play them on a slightly more modern system?
I’m willing to bet whoever wrote this owns a katana.
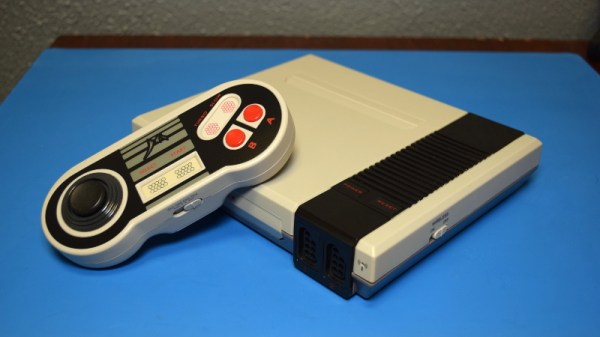
Enter Messiah, and their Generation NEX console. As you might have gathered from their ever-so-humble name, Messiah claimed their re-imagined version of the Nintendo Entertainment System would “Bring Gaming Back to Life” by playing the original cartridges with enhanced audio and visual clarity. It also featured integrated support for wireless controllers, which at the time was only just becoming the standard on contemporary consoles. According to the manufacturer, the Generation NEX used custom hardware based on the “NES algorithm” that offered nearly 100% game compatibility.
Unfortunately, the system was a complete bomb. Despite Messiah’s claims, the Generation NEX ended up being yet another “NES-on-a-chip” (NOAC) clone, and a pretty poor one at that. Reviewers at the time reported compatibility issues with many popular titles, despite the fact that they were listed as working on Messiah’s website. The touted audio and video improvements were nowhere to be found, and in fact many users claimed the original NES looked and sounded better in side-by-side comparisons.
It didn’t matter how slick the console looked or how convenient the wireless controllers were; if the games themselves didn’t play well, the system was doomed. Predictably the company folded not long after, leaving owners stuck with the over-priced and under-performing consoles. Realistically, most of them ended up in landfills. Today we’ll take a look inside a relatively rare survivor and see just what nostalgic gamers got for their money in 2005.
Custom arcade machines have always been a fairly common project in the hacker and maker circles, but they’ve really taken off with the advent of the Raspberry Pi and turn-key controller kits. With all the internals neatly sorted, the only thing you need to figure out is the cabinet itself. Unfortunately, that’s often the trickiest part. Without proper woodworking tools, or ideally a CNC router, it can be tough going to build a decent looking cabinet out of the traditional MDF panels.
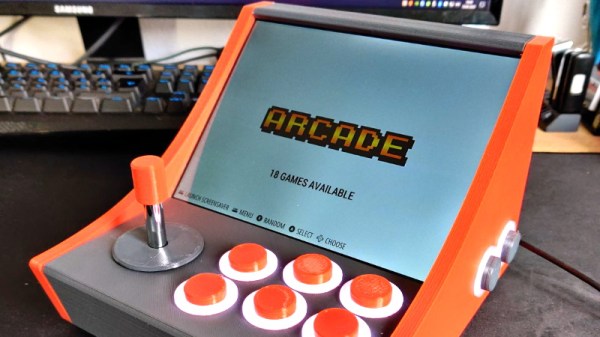
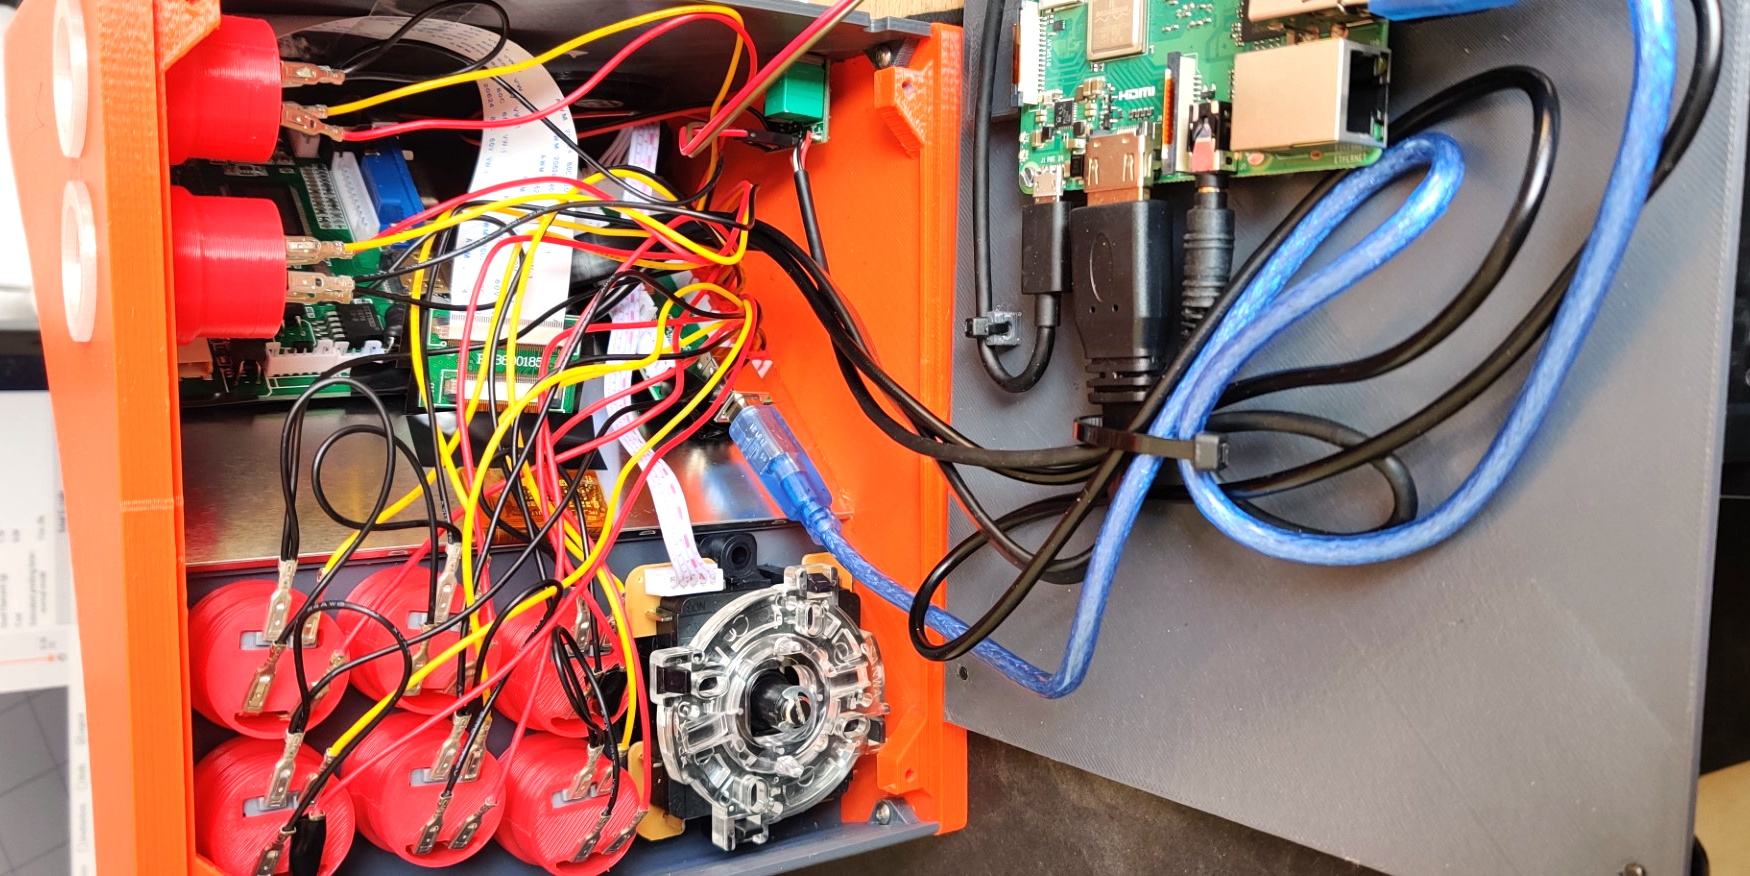
But if you’re willing to leave wood behind, [Gerrit Gazic] might have a solution for you. This bartop arcade, which he calls the simplyRetro D8, uses a fully 3D printed cabinet. He’s gone through the trouble of designing it so there are no visible screw holes, so it looks like the whole thing was hewn from a chunk of pure synthwave ore. He notes that this can make the assembly somewhat tricky in a few spots, but we think it’s a worthy compromise.
Given the squat profile of the simplyRetro, the internals are packed in a bit tighter than we’re accustomed to seeing in a arcade build. But there’s still more than enough room for the Raspberry Pi, eight inch touch screen HDMI panel, and all the controls. To keep things as neat as possible, [Gerrit] even added integrated zip tie mount points; a worthwhile CAD tip that’s certainly not limited to arcade cabinets.
[Gerrit] has included not only the STL files for this design, but also the Fusion 360 Archive should you want to make any modifications. There’s also a complete Bill of Materials, as well as detailed instructions on how to pull it all together. If you’ve ever wanted your own arcade machine but felt a bit overwhelmed about figuring out all the nuances on your own, the simplyRetro could be the project you’ve been waiting for.
We’ve all got a pretty good mental image of what an arcade cabinet looks like, so you probably don’t need to be reminded that traditionally they are single-screen affairs. But that idea dates back to when they were built around big and bulky CRT displays. Now that we have modern LCD, LED, and OLED panels, who says you have to follow the old rules?
That’s precisely the sort of out of the box thinking that lead [Al Linke] to build this unique multi-display arcade cabinet. The game itself is still played on a single screen, but several smaller sub-displays are dotted all around the cabinet to indicate various bits of ancillary information. Are they necessary? Hardly. But we can’t deny it’s a clever idea, and we wouldn’t be surprised if we start seeing something similar in other DIY cabinets.
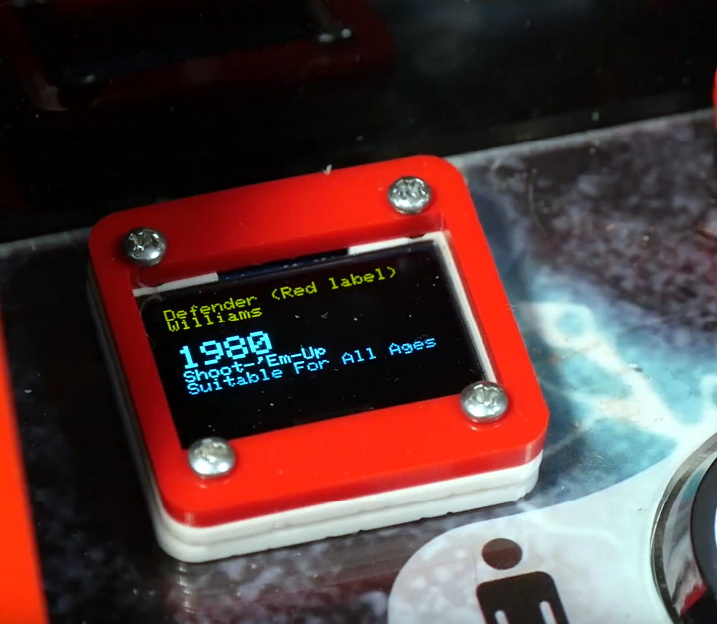
The build started with a commercially available cabinet from Arcade1Up, which at this point are popular enough that some of the Big Box retailers have them in stock. All of the electronics except for the display were stripped out, and replaced with a Dell OptiPlex 9020 computer and high-quality joysticks and buttons. [Al] then installed his various displays all over the cabinet, including a gorgeous LED marquee that we’ve featured previously.
So what do all these little screens do? [Al] explains them in the video after the break, but the general idea is that they provide contextual information about the game you currently have loaded up. A two-color OLED display shows the name of the game and what it’s rated, while a seven segment LED display shows the year the game was released. The displays are located both by the controls and where you’d expect the coin slot to be, so whether you’re actively playing or across the room, you can see all the information.
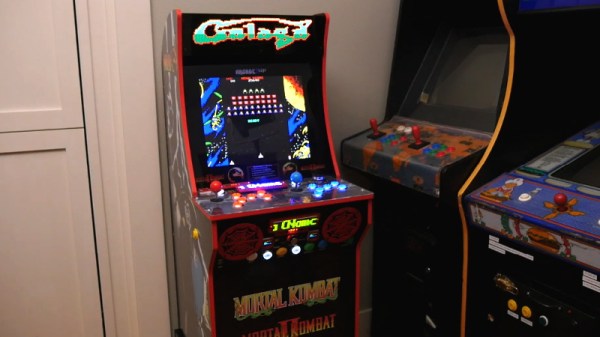
Over the years we’ve covered quite a few Raspberry Pi based arcade cabinets, and admittedly many of them have been fairly similar. After all, there’s only so much variation you can make before it stops looking like a traditional arcade machine. But even still, we never tire of seeing a well executed build like the one [Dawid Zittrich] recently shared with us.
These days you can order a kit that has pre-cut panels to build your cabinet with, but looking for a completely custom build, [Dawid] decided to first model his design in SketchUp and then cut out the panels himself with a jigsaw. This obviously is quite a bit more work, and assumes you’ve got sufficient woodworking tools, but we think the final result looks great. Not to mention the fact that it’s going to be a lot stronger than something made out of MDF.
He also created the side artwork himself, taking the logos and names from his favorite arcade and Amiga games and putting them on a retro-looking gradient pattern. The marquee on the top has an acrylic front and is illuminated from behind with strips of LEDs. It’s mounted on a hinge so that it can be lifted up and a new piece of art slid in without taking apart the whole cabinet. While it might be a little more labor intensive to switch out than some of the electronic marquees we’ve seen, we do like that you still have the ability to change the artwork on a whim.
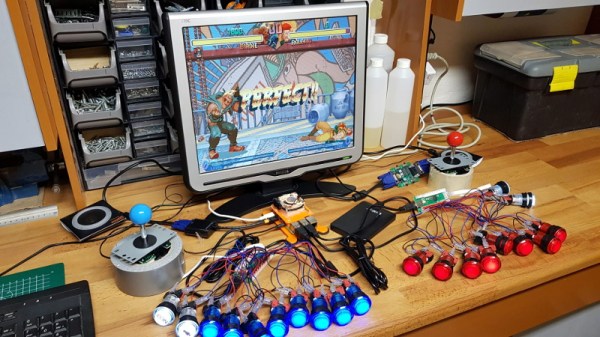
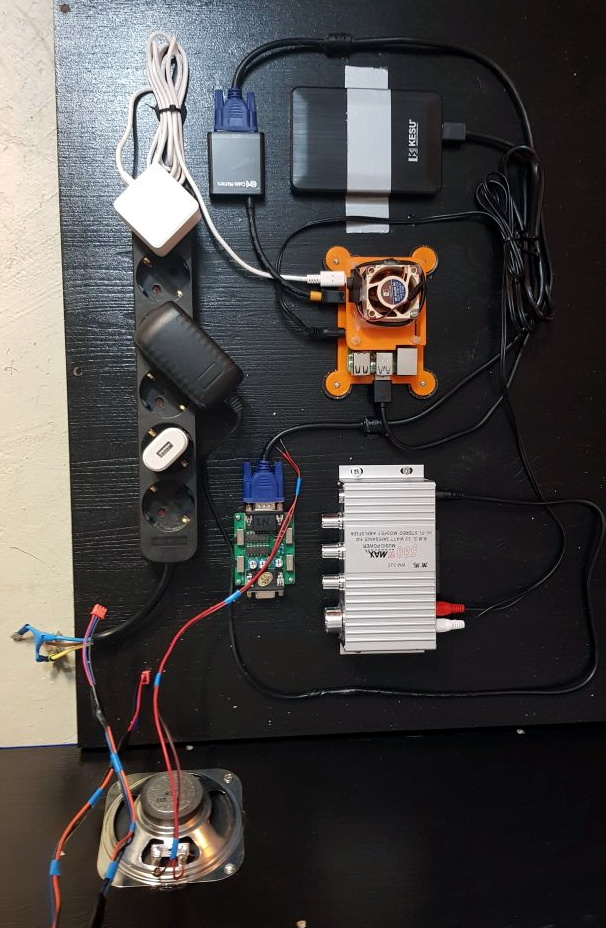
With the cabinet itself completed, [Dawid] turned his attention to the electronics. Inside you’ve got the aforementioned Raspberry Pi 4 (with a Noctua fan to keep it cool), an external hard drive, a HDMI to VGA converter with scanline generator to drive the 4:3 ratio Eizo Flex Scan S2100 monitor, and a rather beefy amplifier hanging off the Pi’s 3.5 mm analog audio output. All of which is easily accessible via a maintenance hatch built into the cabinet so [Dawid] doesn’t need to tear everything down when he wants to tweak something.
The modern ideal of pixel art is a fallacy. Videogame art crammed onto cartridges and floppy discs were beholden to the CRT display technology of their day. Transmitting analog video within the confines of dingy yellow-RCA-connector-blur, the images were really just a suggestion of on-screen shapes rather than clearly defined graphics. Even when using the superior RGB-video-over-SCART cables, most consumer grade CRT televisions never generated more than about 400 lines, so the exacting nature of digitized plots became a fuzzy raster when traced by an electron beam. It wasn’t until the late 90s when the confluence of high resolution PC monitors, file sharing, and open source emulation software that the masses saw pixels for the sharp square blocks of color that they are.
More importantly, emulation software is not restricted to any one type of display technology any more than the strata of device it runs on. The open-source nature of videogame emulators always seems to congregate around the Lowest Common Denominator of devices, giving the widest swath of gamers the chance to play. Now, that “L.C.D.” may very well be the Raspberry Pi 4. The single board computer’s mix of tinker-friendly IO at an astonishingly affordable entry price has made it a natural home for emulators, but at fifty bucks what options unlock within the emulation scene?
The holidays are upon us, and that can mean many furrowed brows trying to figure out what token gift they can give out this year as stocking-stuffers. Something that’s a bit more interesting than a coupon book or a lotto scratcher, but also affordable enough that you can buy a few of them without having to take part in that other great holiday tradition: unnecessary credit debit.
Includes the NES classic Super Militarized Police Bros 3
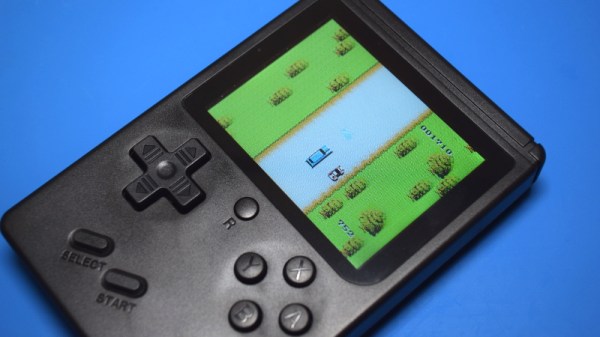
Which is how I came to possess, at least temporarily, one of these cheap handheld multi-games that are all over Amazon and eBay. The one I ordered carries the brand name Weikin, but there are dozens of identical systems available, all being sold at around the same $20 USD price point. With the outward appearance of a squat Game Boy, these systems promise to provide precisely 168 games for your mobile enjoyment, and many even include a composite video out cable and external controller for the less ambulatory classic game aficionado.
At a glance, the average Hackaday reader will probably see right through this ploy. Invariably, these devices will be using some “NES on a Chip” solution to emulate a handful of legitimate classics mixed in with enough lazy ROM hacked versions of games you almost remember to hit that oddly specific number of 168 titles. It’s nearly a foregone conclusion that at the heart of this little bundle of faux-retro gaming lies a black epoxy blob, the bane of hardware tinkerers everywhere.
Of course, there’s only one way to find out. Let’s crack open one of these budget handhelds to see what cost reduction secrets are inside. Have the designers secured their place on the Nice List? Or have we been sold the proverbial lump of coal?