Heated DryBox Banishes Filament Moisture For Under $20

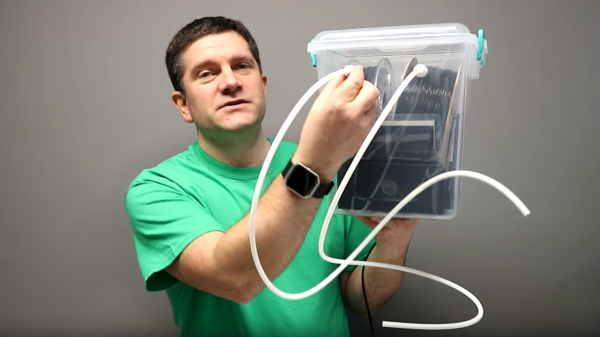
There has been a lot of activity from [Richard Horne] regarding 3D printing filaments lately; most recently he has shared two useful designs for upping one’s filament storage and monitoring game. The first is for a DIY Heated DryBox for 3D printing filament. It keeps filament dry not just by sealing it into a plastic box with some desiccant, but by incorporating a mild and economical heater intended for reptile habitats inside. Desiccant is great, but a gently heated enclosure can do wonders for driving away humidity in the right environment. The DryBox design also incorporates a handy little temperature and humidity sensor to show how well things are working.
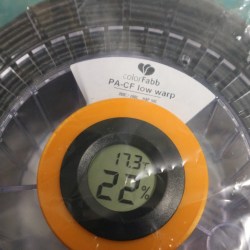
Spool-mounted adapter for temperature and humidity sensor (and desiccant) to monitor storage bag conditions.

The second design is a simple spin-off that we particularly liked: a 3D printed adapter that provides a way to conveniently mount one of the simple temperature and humidity sensors to a filament spool with a desiccant packet. This allows storing a filament spool in a clear plastic bag as usual, but provides a tidy way to monitor the conditions inside the bag at a glance. The designs for everything are on Thingiverse along with the parts for the Heated DryBox itself.

[Richard] kindly shares the magic words to search for on eBay for those seeking the build’s inexpensive key components: “15*28CM Adjustable Temperature Reptile Heating Heater Mat” and “Mini LCD Celsius Digital Thermometer Hygrometer Temperature Humidity Meter Gauge”. There are many vendors selling what are essentially the same parts with minor variations.

Since the DryBox is for dispensing filament as well as storing it, a good spool mounting system is necessary but [Richard] found that the lack of spool standardization made designing a reliable system difficult. He noted that having spool edges roll on bearings is a pretty good solution, but only if one doesn’t intend to use cardboard-sided spools, otherwise it creates troublesome cardboard fluff. In the end, [Richard] went with a fixed stand and 3D printable adapters for the spools themselves. He explains it all in the video, embedded below.

Continue reading “Heated DryBox Banishes Filament Moisture For Under $20”
Optical Tach Addresses The Need For Spindle Speed Control

With CNC machines, getting the best results depends on knowing how fast your tool is moving relative to the workpiece. But entry-level CNC routers don’t often include a spindle tachometer, forcing the operator to basically guess at the speed. This DIY optical spindle tach aims to fix that, and has a few nice construction tips to boot.

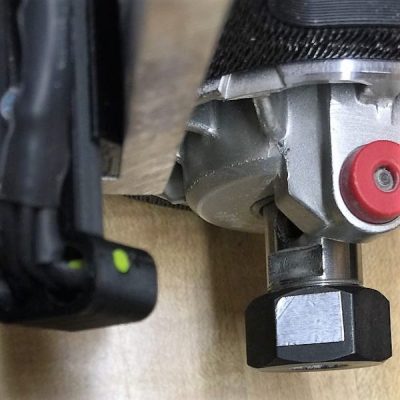
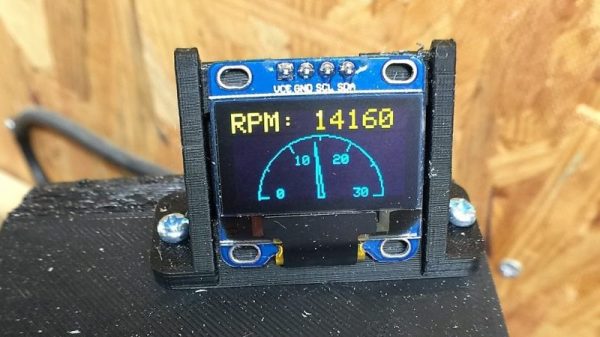
The CNC router in question is the popular Sienci, and the 3D-printed brackets for the photodiode and LED are somewhat specific for that machine. But [tmbarbour] has included STL files in his exhaustively detailed write-up, so modifying them to fit another machine should be easy. The sensor hangs down just far enough to watch a reflector on one of the flats of the collet nut; we’d worry about the reflector surviving tool changes, but it’s just a piece of shiny tape that’s easily replaced.  The sensor feeds into a DIO pin on a Nano, and a small OLED display shows a digital readout along with an analog gauge. The display update speed is decent — not too laggy. Impressive build overall, and we like the idea of using a piece of PLA filament as a rivet to hold the diodes into the sensor arm.
Want to measure machine speed but don’t have a 3D printer? No worries — a 2D-printed color-shifting tach can work too.

Continue reading “Optical Tach Addresses The Need For Spindle Speed Control”

An Indoor Garden? That’s Arduino-licious

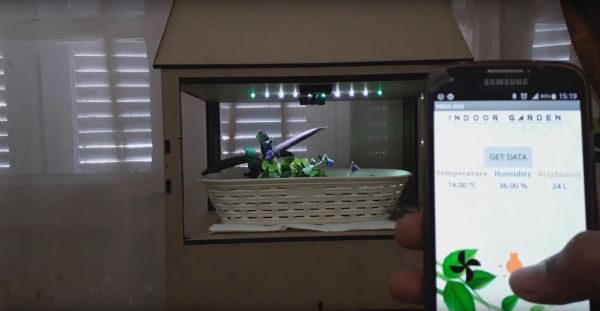
Gardening is a rewarding endeavour, and easily automated for the maker with a green thumb. With simplicity at its focus,  Hackaday.io user [MEGA DAS] has whipped up a automated planter to provide the things plants crave: water, air, and light.

[MEGA DAS] is using a TE215 moisture sensor to keep an eye on how thirsty the plant may be, a DHT11 temperature and humidity sensor to check the airflow around the plant, and a BH1750FVI light sensor for its obvious purpose. To deliver on these needs, a 12V DC water pump and a small reservoir will keep things right as rain, a pair of 12V DC fans mimic a gentle breeze, and a row of white LEDs supplement natural light when required.

The custom board is an Arduino Nano platform, with an ESP01 to enable WiFi capacity and a Bluetooth module to monitor the plant’s status while at home or away. Voltage regulators, MOSFETs, resistors, capacitors, fuses — can’t be too careful — screw header connectors, and a few other assorted parts round out the circuit. The planter is made of laser cut pieces with plenty of space to mount the various components and hide away the rest. You can check out [MEGA DAS]’ tutorial video after the break!

Continue reading “An Indoor Garden? That’s Arduino-licious”

Flying The Friendly Skies With A Hall Effect Joystick

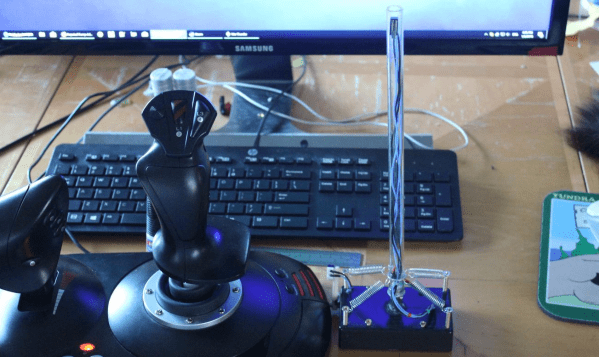
There are plenty of PC joysticks out there, but that didn’t stop [dizekat] from building his own. Most joysticks measure position mechanically using potentiometers or encoders. Only a few high-end models use Hall effect sensors. That’s the route [dizekat] took.

Hall effect sensors are non-contact devices which measure magnetic fields. They can be used to measure the position and orientation of a magnet. That’s exactly how [dizekat] is using a trio of sensors in his design. The core of the joystick is a universal joint from an old R/C car. The center section of the joint (called a spider) has two one millimeter thick disc magnets glued to it. The Hall sensors themselves are mounted in the universal itself. [Dizekat] used a small piece of a chopstick to hold the sensors in position while he found the zero point and glued them in. A third Hall effect sensor is used to measure a throttle stick positioned on the side of the box.

An Arduino micro reads the sensors and converts the analog signal to USB.  The Arduino Joystick Library by [Matthew Heironimus] formats the data into something a PC can understand.

While this is definitely a rough work in progress, we’re excited by how much [dizekat] has accomplished with simple hand tools and glue. You don’t need a 3D printer, laser cutter, and a CNC to pull off an awesome hack!

If you think Hall effect sensors are just for joysticks, you’d be wrong – they work as cameras for imaging magnetic fields too!

DIY Capacitive Rotational Encoder On The Cheap With FR4

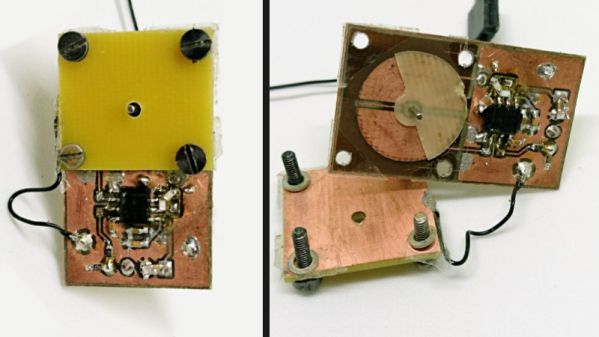
Rotary encoders are critical to many applications, even at the hobbyist level. While considering his own rotary encoding needs for upcoming projects, it occurred to [Jan Mrázek] to try making his own DIY capacitive rotary encoder. If successful, such an encoder could be cheap and very fast; it could also in part be made directly on a PCB.

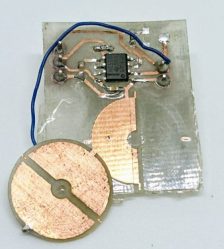
First prototype, two etched plates with transparent tape as dielectric material. Disc is 15 mm in diameter.

The encoder design [Jan] settled on was to make a simple adjustable plate capacitor using PCB elements with transparent tape as the dielectric material. This was used as the timing element for a 555 timer in astable mode. A 555 in this configuration therefore generates a square wave that changes in proportion to how much the plates in the simple capacitor overlap. Turn the plate, and the square wave’s period changes in response. Response time would be fast, and a 555 and some PCB space is certainly cheap materials-wise.

The first prototype gave positive results but had a lot of problems, including noise and possibly a sensitivity to temperature and humidity. The second attempt refined the design and had much better results, with an ESP32 reliably reading 140 discrete positions at a rate of 100 kHz. It seems that there is a tradeoff between resolution and speed; lowering the rate allows more positions to be reliably detected. There are still issues, but ultimately [Jan] feels that high-speed capacitive encoders requiring little more than some PCB real estate and some 555s are probably feasible.

This project is a reminder that FR4 (whether copper-clad, etched, or blank) shows up in clever applications: copper tape and blank FR4 can be used to quickly prototype RF filters, PocketNC built an entire small CNC tool around FR4, and our own [Voja] wrote a full guide on making beautiful enclosures from FR4.

Automated Chamber Passes Just The Right Gas

It sounds like an overly complicated method a supervillain would use to slowly and painfully eliminate enemies — a chamber with variable oxygen concentration. This automated environmental chamber isn’t for torturing suave MI6 agents, though; rather, it enables cancer research more-or-less on the cheap.

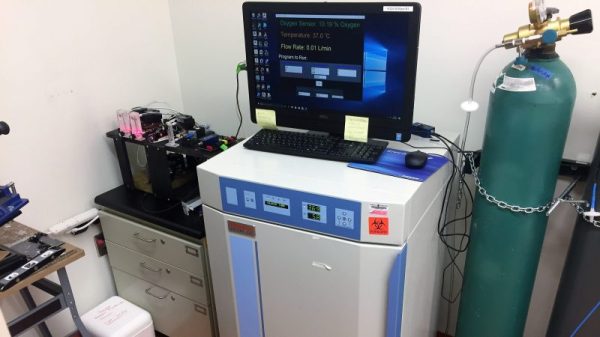
Tasked with building something to let his lab simulate the variable oxygen microenvironments found in some kinds of tumors, [RyanM415] first chose a standard lab incubator as a chamber to mix room air with bottled nitrogen. With a requirement to quickly vary the oxygen concentration from the normal 21% down to zero, he found that the large incubator took far too long to equilibrate, and so he switched to a small acrylic box. Equipped with a mixing fan, the smaller chamber quickly adjusts to setpoints, with an oxygen sensor providing feedback and controlling the gas valves via a pair of Arduinos. It’s quite a contraption, with floating ball flowmeters and stepper-actuated variable gas valves, but the results are impressive. If it weren’t for the $2000 oxygen sensor, [RyanM145] would have brought the whole project in for $500, but at least the lab can use the sensor elsewhere.

Modern biology and chemistry labs are target-rich environments for hacked instrumentation. From DIY incubators to cheap electrophoresis rigs, we’ve got you covered.

Continue reading “Automated Chamber Passes Just The Right Gas”

“Hey! Don’t Lock The Door, I’m In Here!”

Those that work in front of a computer for a living spend most of the time making very little sound. Unless you’re a member of the clicky mechanical keyboard club, your working time is a low-observables time during which people can forget about you. You can make sure you’re not overlooked with this smartphone hotspot presence detector.

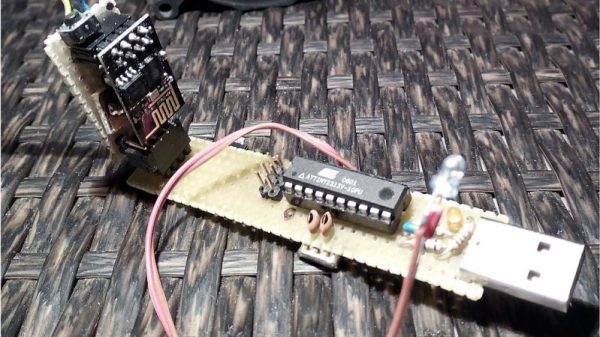
[Emilio Ficara]’s quiet work habits resulted in his housemates locking him in sometimes, to his inconvenience. PIR or microwave occupancy sensors might have worked to fix the problem, except that a few flexing fingers aren’t always enough to trigger them. Luckily, [Emilio] is also wisely distrustful of free WiFi, so his phone is always set up as a mobile hotspot, giving him the means to reliably detect his presence. An ATtiny2313 and an ESP-01 do the business of polling for the SSID of his phone and blinking a bright blue LED by his door for his housemates. It’s not perfect, of course; it could easily be spoofed by anyone else who knows his SSID. But simple works for now.

With almost everyone carrying one now, smartphone detection is a good proxy for the presence of a person. But it doesn’t work in every case, so you may want to familiarize yourself with the aforementioned PIR and microwave methods.