Hacklet 22 – Retro Console Projects

Everyone loves arcade games, and it didn’t take long for designers to figure out that people would love to take the fun home. The home gaming console market has been around for decades. Through the early days of battery-powered pong style consoles through Atari and the video game crash of the early 80’s, to the late 8 and 16 bit era spearheaded by The Nintendo Entertainment System and The Sega Master System and beyond, consoles have become a staple of the hacker home. This week’s Hacklet features some of the best retro console projects from Hackaday.io!
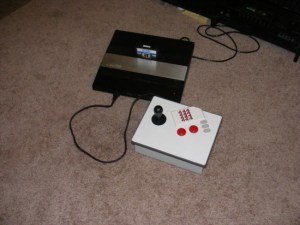
52001We start with [ThunderSqueak] saving the world with her Atari 5200 Custom Controller Build. For those who don’t know, the Atari 5200 “Super System” was an 8 bit system ahead of its time. The 5200 was also saddled with on of the worst controller designs ever. The buttons would stop responding after a few hours of game play. With 17 buttons, (including a full number pad), that was a pretty major design flaw! [ThunderSqueak] hacked a cheap commercial fighting game stick to make it work with the 5200. 12 individual buttons were wired in a matrix to replace the telephone style keys on the original 5200 controller. Atari’s non-centering analog stick was converted over to a standard 4 switch arcade style stick. [ThunderSqueak] did leave the original pots accessible in the bottom of the enclosure for centering adjustments. Many 5200 games work great with the new setup.

 

snes[DackR] is bringing back the glory days of Nintendo with Super Famicade, a homebrew 4 SNES arcade system inspired by Nintendo’s Super System. Nintendo’s original Super System played several customized versions of games which were available on the Super Nintendo Entertainment System (SNES). [DackR] is building his own with parts from four SNES consoles. He’s also adding a few features, like a touch screen, video overlay, and enhanced RGB.

He’s going to add custom memory monitoring hardware, which will allow him to check how many lives a player has left and handle coin operation, all without the original Super System Hardware. If you’re curious what the original Super Systems looked like, check out Hackaday’s Tokyo Speedrun video.You might just catch a glimpse of one!
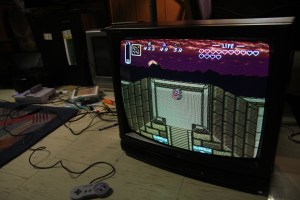
rgb[Bentendo64] is improving on the past with RGB For ‘Murica. European systems have enjoyed the higher quality afforded by separate red, green and blue video lines for decades. North American gamers, however were stuck in the composite or S-Video realm until shortly before the HDTV age. [Bentendo64] had an old hotel CRT based monitor, and decided to hack an RGB input. After opening up the back of the set, he removed the yolk board and added direct inputs to the video amplifiers. We’re not sure if this mod will work with every CRT, but it can’t hurt to try! Just be sure to discharge those high voltage capacitors before wrenching on these old video systems. Even if a set has been unplugged for days, the caps can give a seriously painful (and dangerous) shock!
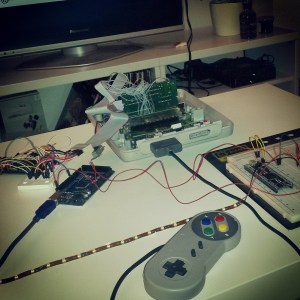
snes2[Ingo S] is also working to improve the SNES with SNES AmbiPak, a mod which brings ambient lighting and “rumble pack” controller feedback to the vintage Super Nintendo. [Ingo S] used the popular SNES9X emulator to figure out where game data is stored while the SNES is running. His proof of concept was the original F-ZERO SNES game. [Ingo S] found that Every time the player’s car hits the wall, the system would perform a write on address 3E:0C23. All he would need to do is monitor that address on the real hardware, and rumble the controller on a write. The real hardware proved to be a bit harder to work with though. Even these “slow” vintage systems clock their ram at around 3MHz, way too fast for an Arduino to catch a bus access.  [Ingo S] is solving that problem with a Xilinx XC9572 Complex Programmable Logic Device (CPLD). CPLDs can be thought of as little brothers to Field Programmable Gate Arras (FPGAs). Even though they generally have less “room” for logic inside, CPLDs run plenty fast for decoding memory addresses.  With this change, [Ingo S] is back on track to building his SNES rumble pack!

It feels like we just got started – but we’re already out of space for this week’s Hacklet! As always, see you next week. Same hack time, same hack channel, bringing you the best of Hackaday.io!

ROM dump

Raiders Of The Lost ROM

Once upon a time, arcades were all the rage. You could head down to your local arcade with a pocket full of quarters and try many different games. These days, video arcades are less popular. As a result, many old arcade games are becoming increasingly difficult to find. They are almost like the artifacts of an ancient age. They are slowly left to rot and are often lost or forgotten with time. Enter, MAME.

MAME (Multiple Arcade Machine Emulator) is a software project, the goal of which is to protect gaming history by preventing these arcade machines from being lost or forgotten. The MAME emulator currently supports over 7000 titles, but there are still more out there that require preservation. The hackers who work on preserving these games are like the digital Indiana Jones of the world. They learn about lost games and seek them out for preservation. In some cases, they must circumvent security measures in order to accurately preserve content. Nothing as scary as giant rolling boulders or poison darts, but security nonetheless.

Many of the arcade cabinets produced by a publisher called NMK used a particular sound processor labeled, “NMK004”. This chip contains both a protected internal code ROM and an unprotected external ROM that controls the sound hardware. The actual music data is stored on a separate unprotected EEPROM and is different for each game. The system reads the music data from the EEPROM and then processes it using the secret data inside the NMK004.

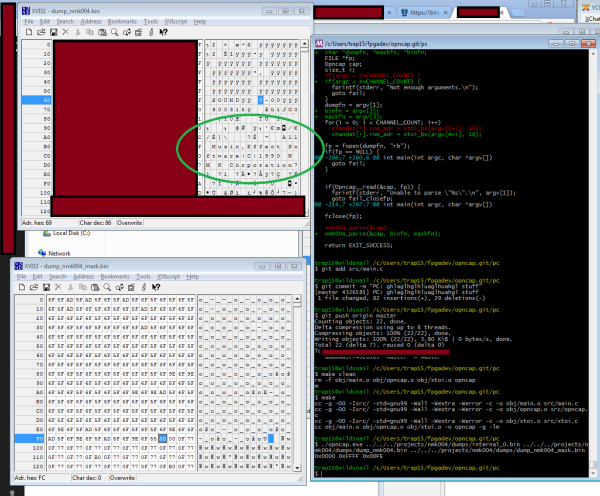
The security in place around the internal ROM has prevented hackers from dumping its contents for all this time. The result is that NMK games using this chip have poorly emulated sound when played using MAME, since no one knows exactly how the original chip processed audio. [trap15] found it ridiculous that after 20 years, no one had attempted to circumvent the security and dump the ROM. He took matters into his own hands.

The full story is a bit long and contains several twists and turns, but its well worth the read. The condensed version is that after a lot of trial and error and after writing many custom tools, [trap15] was able to finally dump the ROM. He was able to accomplish this using a very clever trick, speculated by others but never before attempted on this hardware. [trap15] exploited a vulnerability found in the unprotected external ROM in order to trick the system into playing back the protected internal ROM as though it were the sound data stored on the EEPROM. The system would read through the internal ROM as though it were a song and play it out through the speakers. [trap15] recorded the resulting audio back into his PC as a WAV file. He then had to write a custom tool to decode the WAV file back into usable data.

[trap15] has released all of his tools with documentation so other hackers can use them for their own adventures into hardware hacking. The project was a long time in the making and it’s a great example of reverse engineering and perseverance.

[Thanks Ryan]

Handheld Game System Powered By Arduino

DIY Handheld Game System

These days, it’s easy enough to play games on the go. If you have a smart phone, you are pretty much set. That doesn’t mean you can’t still have fun designing and building your own portable gaming system, though.

[randrews] did just that. He started out by purchasing a small memory LCD display from Adafruit. The screen he chose is low power as far as screens go, so it would be a good fit for this project. After testing the screen with a quick demo program, it was time to start designing the circuit board.

[randrews] used Eagle to design the circuit. He hand routed all of the traces to avoid any weird issues that the auto router can sometimes cause. He made an efficient use of the space on the board by mounting the screen over top of the ATMega chip and the other supporting components. The screen is designed to plug in and out of the socket, this way it can be removed to get to the chip. [randrews] needs to be able to reach the chip in order to reprogram it for different games.

Once the board design was finished, [randrews] used his Shapeoko CNC mill to cut it out of a copper clad board. He warns that you need to be careful doing this, since breathing fiberglass dust is detrimental to living a long and healthy life. Once the board was milled out, [randrews] used a small Dremel drill press to drill all of the holes.

The final piece of the puzzle was to figure out the power situation. [randrews] designed a second smaller PCB for this. The power board holds two 3V coin cell batteries. The Arduino expects 5V, so [randrews] had to use a voltage regulator. This power board also contains the power switch for the whole system.

The power board was milled and populated. Then it was time to do some measurements. [randrews] measured the current draw and calculates that he should be able to get around 15 hours of play time using the two 3V coin cell batteries. Not bad considering the size.

[via Reddit]

Custom Arcade Control Panel

Anybody can fire up an emulator and play arcade games of yesteryear, but if you want to capture more of the nostalgia, you should build a custom arcade control panel. [Quinn] started her build by narrowing down which games she was most interested in playing, and decided on a straightforward 2-player setup. The biggest challenge was finding joysticks that would allow for switchable 4-way or 8-way control: some games such as Ms. Pac Man were made for 4-way joystick input, and the added positions on a 8-way can lead to confused inputs and frustrated players.

[Quinn] found the solution with a pair of Ultimarc Servo Stik joysticks, which use a servo motor to swap between 4 and 8-way mode. The output from both the joysticks and the buttons feed into an iPac encoder, which converts the signal to emulate a USB keyboard. The panel was first mocked up on butcher paper, with dimensions borrowed from various games: the panel itself resembles Mortal Kombat 2, while the buttons are spaced to match X-Men vs Street Fighter 2. [Quinn] chose some spare melamine—plywood with a plastic coating—to construct the panel, drilled some holes and used a router to carve out space for the joysticks. A USB hub was added to power the servos and to make room for future additions, which [Quinn] will have no difficulty implementing considering that her electrical layout is enviably clean. To cap it all off, she fit two “coin slot” buttons: a quarter placed into a slot serves as a start button when pressed.

Be sure to see the videos after the break that demonstrate the coin buttons and the servos, then check out a different retro joystick hack for a tripod controller, or look to the future with the Steam Controller.

Continue reading “Custom Arcade Control Panel”

Here Be Dragons, And VR…and Sheep.

dragonVR

This may qualify less as a hack and more as clever combination of video game input devices, but we thought it was well worth showing off. [Jack] and his team built Dragon Eyes from scratch at the 2013 Dundee Dare Jam. If you’re unfamiliar with “Game Jams” and have any aspirations of working in the video game industry, we highly recommend that you find one and participate. With only 48 hours to design, code, build assets and test, many teams struggle to finish their entry. Dragon Eyes, however, uses the indie-favorite game engine Unity3D to smoothly coordinate its input devices, allowing players to experience dragon flight. The Kinect reads the player’s arm positions (including flapping) to direct the wings for travel, while the Oculus Rift performs its usual job as immersive VR headgear.

Combining a Kinect and a Rift isn’t particularly uncommon, but the function of the microphone is. By blowing into a headset microphone, players activate the dragon’s fire-breathing. How’s that for interactivity? You can see [Jack] roasting some sheep in a demonstration video below. If you have a Kinect and Rift lying around and want some first-person dragon action, [Jack] has kindly provided a download of the build in the project link above.

We’re looking forward to more implementations of the Rift; we haven’t seen many just yet. You can, however, check out a Rift used as an aerial camera on a drone.

Continue reading “Here Be Dragons, And VR…and Sheep.”

Arduino Taipan! Clone Stays True To The Original

taipan

Fans of vintage Apple ][ and TRS-80 games will undoubtedly recognize the image above in short order. Taipan! was a popular game in its time, and [Simon] decided it was a great title to try recreating with an Arduino.

His goal was to use a standard Arduino Duemilanove to reproduce the game, rather than opting for a Mega or something like the Raspberry Pi. Seeing those two options as “too easy”, he ventured into the project with some self-imposed limitations, making it a more fruitful adventure.

In the end, [Simon] had to use two Arduinos – one to control the gameplay and another to run the display. Simon tucked both boards, a keypad, and an LCD screen inside a first run copy of Tai-Pan, a move that is sure to please Apple aficionados and Xzibit fans alike.

[Simon] made sure that no detail was overlooked during the port, making sure to include every line of text as well as every bug found in the original game.

Check out a video of the finished project below, and be sure to swing by his site for a very thorough build log.

Continue reading “Arduino Taipan! Clone Stays True To The Original”

Large Scale Tetris Game Controlled With DDR Pads

led_tetris_using_ddr_pads

Even though Tetris came to the US 25 long years ago, it never fails to entertain. Whatever it is that gives the game such lasting power is a mystery to us, but we’re always interested in seeing fresh takes on the classic game.

MIT students [Leah Alpert] and [Russell Cohen] tweaked Tetris a bit to get players off the couch and literally thinking on their feet. The game boards were constructed using RGB LEDs installed in laser-cut acrylic tubes, arranged in a pair of large 6 foot tall floor standing matrices.

Game play progresses as you would expect, with two players battling head to head to achieve the high score, while simultaneously sabotaging their opponent. Instead of controllers however, each player stands on a Dance Dance Revolution mat, manipulating their game pieces with their feet.

While the DDR pads aren’t exactly a Kinect controller, we have no doubt that playing Tetris this way is incredibly fun – we would certainly install a pair of these boards in our game room without a second thought.

Thanks to everyone who sent this in!

Continue reading “Large Scale Tetris Game Controlled With DDR Pads”