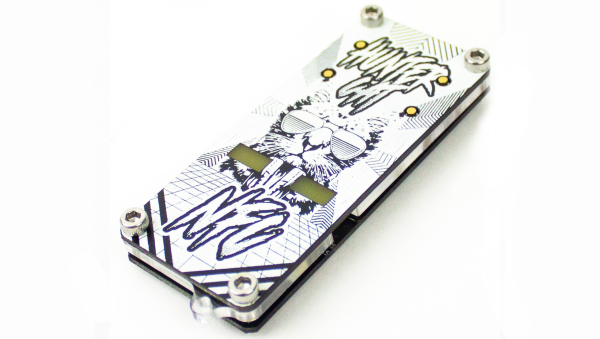
Teaching A Machine To Be Worse At A Video Game Than You Are

Is it really cheating if the aimbot you’ve built plays the game worse than you do?

We vote no, and while we take a dim view on cheating in general, there are still some interesting hacks in this AI-powered bot for Valorant. This is a first-person shooter, team-based game that has a lot of action and a Counter-Strike vibe. As [River] points out, most cheat-bots have direct access to the memory of the computer which is playing the game, which gives it an unfair advantage over human players, who have to visually process the game field and make their moves in meatspace. To make the Valorant-bot more of a challenge, he decided to feed video of the game from one computer to another over an HDMI-to-USB capture device.

The second machine has a YOLOv5 model which was trained against two hours of gameplay, enough to identify friend from foe — most of the time. Navigation around the map was done by analyzing the game’s on-screen minimap with OpenCV and doing some rudimentary path-finding. Actually controlling the player on the game machine was particularly hacky; rather than rely on an API to send keyboard sequences, [River] used a wireless mouse dongle on the game machine and a USB transmitter on the second machine.

The results are — iffy, to say the least. The system tends to get the player stuck in corners, and doesn’t recognize enemies that pop up at close range. The former is a function of the low-res minimap, while the latter has to do with the training data set — most human players engage enemies at distance, so there’s a dearth of “bad breath range” encounters to train to. Still, we’re impressed that it’s possible to train a machine to play a complex FPS game at all, let alone this well.

A Wireless Speaker Pair From Dead Earbuds

Building a Bluetooth speaker is easy with the availability of cheap Bluetooth receivers, but surprisingly there isn’t a simple way to build a pair of truly wireless stereo speakers. [Matt] from DIY Perks realized that modern Bluetooth earbuds contain all the electronics to do just that.

Due to the popularity of these earbuds, a broken pair can be picked up very cheaply on eBay. Usually, it’s only the battery or speaker unit that give out, neither of which are required for this build. [Matt] goes through the process of taking a pair of earbuds apart, and then soldering on battery and speaker wires. The speaker wires are connected to an audio amp, which drives a mid-range and treble speaker driver, and a subwoofer. The outputs to the amp are also filtered to match the speakers. Power is provided by a set of four 18650 cells.

[Matt] housed the driver and electronics in some attractive CNC machined wood enclosures. In the video, he places a lot of emphasis on properly sealing all the gaps to get the best possible audio quality. As with all of his projects, the end result looks and performs like a high-end commercial product. We’re almost surprised that he didn’t add any brass to the speakers, as he did on his USB-C monitor or PS5 enclosure build. Continue reading “A Wireless Speaker Pair From Dead Earbuds”

DIY Wireless Serial Adapter Speaks (True) RS-232

There is a gotcha lurking in wait for hackers who look at a piece of equipment, see a port labeled “Serial / RS-232”, and start to get ideas. The issue is the fact that the older the equipment, the more likely it is to be a bit old-fashioned about how it expects to speak RS-232. Vintage electronics may expect the serial data to be at bipolar voltage levels that are higher than what the typical microcontroller is used to slinging, and that was the situation [g3gg0] faced with some vintage benchtop equipment. Rather than deal with cables and wired adapters, [g3gg0] decided to design a wireless adapter with WiFi and Bluetooth on one end, and true RS-232 on the other.

The adapter features an ESP32 and is attached to a DB-9 plug, so it’s nice and small. It uses the ST3232 chip to communicate at 3 V logic levels on the microcontroller side, supports bipolar logic up to +/-13 V on the vintage hardware side, and a rudimentary web interface allows setting hardware parameters like baud rate. The nice thing about the ST3232 transceiver is that it is not only small, but can work from a 3 V supply with only four 0.1 uF capacitors needed for the internal charge pumps.

As for actually using the adapter, [g3gg0] says that the adapter’s serial port is exposed over TCP on port 23 (Telnet) which is supported by some programs and hardware. Alternately, one can connect an ESP32 to one’s computer over USB, and run firmware that bridges any serial data directly to the adapter on the other end.

Design files including schematic, bill of materials, and PCB design are shared online, and you can see a brief tour of the adapter in the video, embedded below.

Continue reading “DIY Wireless Serial Adapter Speaks (True) RS-232”

Wireless Quad Voltmeter Brings It All Together

If you’re reading Hackaday, you almost certainly have a voltmeter. Matter of fact, we wouldn’t be surprised to hear you had two of them. But what if you needed to monitor four voltage levels at once? Even if you had four meters, getting them all connected and in a convenient enough place where you can see them all at once is no small feat. In that case, it sounds like the multi-channel wireless voltmeter put together by [Alun Morris] is for you.

Built as an exercise in minimalism, this project uses an array of components that most of us already have kicking around the parts bin. For each transmitter you’ll need an ATtiny microcontroller, a nRF24L01+ radio, a small rechargeable battery, and a handful of passive components. On the receiver side, there’s an OLED screen, another nRF radio module, and an Arduino Nano. You could put everything together on scraps of perfboard like [Alun] has, but if you need something a bit more robust for long-term use, this would be a great excuse to create some custom PCBs.

While the hardware itself is pretty simple, [Alun] clearly put a lot of work into the software side. The receiver’s 128 x 32 display is able to show the voltages from four transmitters at once, complete with individual indicators for battery and signal level. When you drill down to a single transmitter, the screen will also display the minimum and maximum values. With the added resolution of the full screen display, you even get a very slick faux LCD font to ogle.

Of course, there are some pretty hard limitations on such a simple system. Each transmitter can only handle positive DC voltages between 0 and 20, and depending on the quality of the components you use and environmental considerations like temperature, the accuracy may drift over time and require recalibration. Still, if you need a way to monitor multiple voltages and potentially even bring that data onto the Internet of Things, this is definitely a project to take a look at.

Continue reading “Wireless Quad Voltmeter Brings It All Together”

Roll Your Own Tracking

The smartphone is perhaps the signature device of our modern lives. For most of the population it is never more than an arm’s length away, it’s on your person more than any other device in your life. Smartphones are packed with all sorts of radios and ways to communicate wireless. [Amine Mansouri] built an ESP8266 based tracking device that takes advantage of this.

Most WiFi-enabled devices will send out “probe requests” frames trying to search for the SSIDs they were connected to. These packets contain the device MAC address as well as the SSIDs you’ve connected to. Using about 12 components, [Amine] laid out a small board in Eagle. By putting the ESP8266 in monitor mode, the probe frames can be logged and uploaded. The code can be updated OTA making it easy to service while in the field.

With permission from his local library, eight repeater boards were scattered throughout the building to forward the probe packets to where the tracker could pick them up. A simple web interface was built that allows the library to figure out how many people are in the library and how often they frequent the premises.

While an awesome project with open-source code on Github, it is important to stress how important is it to get permission to do this kind of tracking. While some phones implement MAC randomization, there are still many out in the wild that don’t. While this is similar to another project that listens to radio signals to determine the coming and going of ships and planes, tracking people with this sort of granularity is in a different category altogether.

Thanks [Amine] for sending this one in!

Cell Phone Signal Booster Gets Teardown And Demo

Ever wonder what was inside a cell phone booster, or what it is like to set up or use one? If so, [Kerry Wong]’s got you covered with his teardown of a Cel-Fi Go X Cell Signal Booster by Nextivity. [Kerry] isn’t just ripping apart a cheap unit for laughs; his house has very poor reception and this unit was a carefully-researched, genuine investment in better 4G connectivity.

The whole setup consists of three different pieces: the amplifier unit pictured above, and two antennas. One is an omnidirectional dome antenna for indoors, and the other is a directional log-periodic dipole array (LPDA) antenna for outdoors. Mobile phones connect to the indoor antenna, and the outdoor antenna connects to the distant cell tower. The amplifier unit uses a Bluetooth connection and an app on the mobile phone to manage settings and actively monitor the device, which works well but bizarrely doesn’t seem to employ any kind of password protection or access control whatsoever.

Overall [Kerry] is happy, and reports that his mobile phone enjoys a solid connection throughout his house, something that was simply not possible before. Watch a hands-on of the teardown along with a short demonstration in the video embedded below.

Continue reading “Cell Phone Signal Booster Gets Teardown And Demo”

DropController Sets The Bar For Documentation

dropController has the kind of documentation we wish would spontaneously generate itself whenever we build something. [Martyn Currey] built a robust rig for water droplet photography, and we don’t want to dismiss the hardware, but the most impressive part might be the website. It might not be very fancy, but it’s thorough and logically organized. You can find parts lists, assembly manuals, tutorials, sketches, and schematics. If only all the projects that came our way were so well detailed.

Water droplet photography is pretty cool, although freehanding it will make your patience fall faster than 9.81 m/s². The concept is that a solenoid valve will flicker open to release a drop of water, wait for a certain number of microseconds, and then trigger your DSLR via a wired remote cable. The tricky part comes from controlling as many as six valves and three flashes. We don’t have enough fingers and toes to press all those buttons.

The bill of materials contains many commonly available parts like an Arduino Nano, an LM2596 voltage regulator, some MOSFETS, an HC-06 Bluetooth module, plus standard audio connectors to hook everything up. Nothing should break the bank, but if money is not an issue, [Martyn] sells kits and complete units.

Waterdrop controllers are not the newest kids on the block, and strobe photography is a time-honored tradition.

Continue reading “DropController Sets The Bar For Documentation”