PET Bottles Diligently Turned Into Filament

While the price of 3D printers has come down quite a lot in the past few years, filament continues to be rather pricey especially for those doing a lot of printing. This has led to some people looking to alternatives for standard filament, including recycling various forms of plastic. We’ve seen plenty of builds using various materials, but none so far have had this level of quality control in the final project.

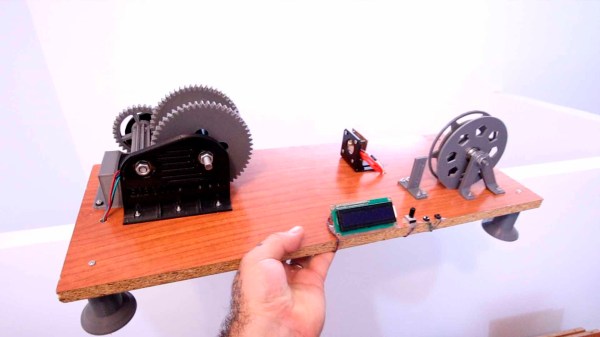
What sets this machine apart from others is that it’s built around an Arduino Nano and includes controls that allow the user to fine-tune a PID controller during the conversion of the recycled plastic into filament. Different plastic bottles have different material qualities, so once the machine is started it can be adjusted to ensure that the filament produced has the exact specifications for the printer. The PCB is available for download, and the only thing that needs to be done by hand besides feeding the machine to start it is to cut the plastic into strips for the starter spool. There is also a separate 3D printed tool available to make this task easy, though.

Not only could this project save printing costs, but it also keeps harmful plastics out of landfills and other environments. Recycling plastic tends to be quite difficult since producing new plastic is incredibly cheap, and the recycled material can’t be used as often as other materials such as aluminum. But there are still plenty of people out there trying to reuse as much of it as they can.

Continue reading “PET Bottles Diligently Turned Into Filament”

All-In-One Automated Plant Care

Caring for a few plants, or even an entire farm, can be quite a rewarding experience. Watching something grow under and then (optionally) produce food is a great hobby or career, but it can end up being complicated. Thanks to modern technology we can get a considerable amount of help growing plants, even if it’s just one plant in a single pot.

Plant Bot from [YJ] takes what would normally be a wide array of sensors and controllers and combines them all into a single device. To start, there is a moisture sensor integrated into the housing so that when the entire device is placed in soil it’s instantly ready to gather moisture data. Plant Bot also has the capability to control LED lighting if the plant is indoors.  It can control the water supply to the plant, and it can also communicate information over WiFi or Bluetooth.

The entire build is based around an ESP32 which is integrated into the PCB along with all of the other sensors and components needed to monitor a single plant. Plant Bot is an excellent all-in-one solution for caring for a plant automatically. If you need to take care of more than one at a time take a look at this fully automated hydroponic mini-farm.

Physical Control Panel Elevates Flight Sim Experience

Like so many of us, [pgsanchez] has been bitten by the flight simulator bug. It’s a malady that can only be treated, but never cured — and like so many hobbies, it has a nasty tendency to spawn more hobbies. A software developer by trade, [pgsanchez] is also adept with Arduino and electronics, and his blog post about the PGS-2 Flight Simulator Control Panel demonstrates his fine abilities well, as does the video below the break.

A player of Digital Combat Simulator, he grew tired of having to remember awkward key combinations to control the simulator. Flying a jet, even in a simulator, can require quick thinking bound with quick reflexes, so having a button to press, a switch to flip, or a knob to turn can be vastly superior to even the simplest keyboard based command.

An Arduino interfaces the buttons to the computer, and a white acrylic case is employed to keep all the parts flying in formation. Yes, a white case — with great care taken to allow the case to be backlit. The effect is excellent, and it looks like the panel would be right at home in the Sukhoi Su-25T that it’s designed to control in the game.

We appreciated the attention to detail in the panel, as even the gear status lights and flap indicators match those in the simulator, a nice touch! What more could [pgsanchez] build? We’d like to see! If you’re into flight sims and the like, you might be interested in this fully 3D printed flight sim controller.

Continue reading “Physical Control Panel Elevates Flight Sim Experience”

Hoverbike Turns Hoverboard Into Ebike

Hoverboards were a popular trend with the youths and in-crowd a few years ago, and now that the fad has largely died out there are plenty of them sitting unused in closets and basements around the world. That only means opportunities to put the parts from these unique transportation devices into other builds. A more practical method of transportation is a bicycle, and this build scavenges most of the parts from a hoverboard to turn a regular bicycle into a zippy ebike.

This bike build starts with a mountain bike frame and the parts from the hoverboard are added to it piece by piece. The two motors are mounted to the frame and drive the front chain ring of the bike, allowing it to still take advantage of the bike’s geared drivetrain. Battery packs from two hoverboards were combined into a single battery which give the bike a modest 6-10 km of range depending on use. But the real gem of this build is taking the gyroscopic controller board from the hoverboards and converting it, with the help of an Arduino Due, to an ebike controller.

Eventually a battery pack will be added to give the bike a more comfortable range, but for now we appreciate the ingenuity that it took to adapt the controller from the hoverboard into an ebike controller complete with throttle and pedal assist. For other household objects turned into ebikes, be sure to check out one of our favorites based on a washing machine motor: the Spin Cycle.

Retro Gaming With Retro Joysticks

One of the biggest reasons for playing older video games on original hardware is that emulators and modern controllers can’t replicate the exact feel of how those games would have been originally experienced. This is true of old PC games as well, so if you want to use your original Sidewinder steering wheel or antique Logitech joystick, you’ll need something like [Necroware]’s GamePort adapter to get them to communicate with modern hardware.

In a time before USB was the standard, the way to connect controllers to PCs was through the GamePort, typically found on the sound card. This has long since disappeared from modern controllers, so the USB interface [Necroware] built relies on an Arduino to do the translating. Specifically, the adapter is designed as a generic adapter for several different analog joysticks, and a series of DIP switches on the adapter select the appropriate mode. Check it out in the video after the break. The adapter is also capable of automatically calibrating the joysticks, which is necessary as the passive components in the controllers often don’t behave the same way now as they did when they were new.

Plenty of us have joysticks and steering wheels from this era stored away somewhere, so if you want to experience Flight Simulator 5.0 like it would have been experienced in 1993, all it takes is an Arduino. And, if you want to run these programs on bare metal rather than in an emulator, it is actually possible to build a new Intel 486 gaming PC, which operates almost exactly like a PC from the 90s would have.

Continue reading “Retro Gaming With Retro Joysticks”

Custom Piano Tickles The Ivories

The core ethos of “hacking” is usually interpreted as modifying something for a use that it wasn’t originally built for. Plenty of builds are modifications or improvements on existing technology, but sometimes that just isn’t enough. Sometimes we have to go all the way down and build something completely from scratch, and [Balthasar]’s recent piano-like musical instrument fits squarely into this category.

This electronic keyboard is completely designed and built from scratch, including the structure of the instrument and the keys themselves. [Balthasar] made each one by hand out of wood and then built an action mechanism for them to register presses. While they don’t detect velocity or pressure, the instrument is capable of defining the waveform and envelope for any note, is able to play multiple notes per key, and is able to change individual octaves. This is thanks to a custom 6×12 matrix connected to a STM32 microcontroller. Part of the reason [Balthasar] chose this microcontroller is that it can do some of the calculations needed to produce music in a single clock cycle, which is an impressive and under-reported feature for the platform.

With everything built and wired together, the keyboard is shockingly versatile. With the custom matrix it is easy to switch individual octaves on the piano to any range programmable, making the 61-key piano capable of sounding like a full 88-key piano. Any sound can be programmed in as well, further increasing its versatility, which is all the more impressive for being built from the ground up. While this build focuses more on the electronics of a keyboard, we have seen other builds which replicate the physical action of a traditional acoustic piano as well.

Continue reading “Custom Piano Tickles The Ivories”

Game Boy Becomes Super Game Boy With A Pair Of Pis

For the Nintendo aficionados of the 90s, the Super Game Boy was a must-have cartridge for the Super Nintendo which allowed gamers to play Game Boy games on your TV. Not only did it allow four-color dot-matrix gaming on the big screen, but it let you play those favorite Game Boy titles without spending a fortune on AA batteries. While later handhelds like the PSP or even Nintendo Switch are able to output video directly to TVs without issue, the original Game Boy needed processing help from an SNES or, as [Andy West] shows us, it can also get that help from a modern microcontroller.

Testing the design before installing it in the NES case.

The extra processing power in this case comes from a Raspberry Pi Pico which is small enough to easily fit inside of a donor NES case and also powerful enough to handle the VGA directly. For video data input, the Pico is connected to the video pins on the Game Boy’s main board through a level shifter. The main board is also connected to a second Pico which handles the controller input from an NES controller. Some fancy conversion needed to be done at this point because although the controller layouts are very similar, they are handles by the respective consoles completely differently.

With all of the technical work largely out of the way, [Andy] was able to put the finishing touches on the build. These included making sure the power buttons, status LEDs, and reset button all functioned, and restoring the NES case complete with some custom “Game Guy” graphics to match the original design of the Game Boy. We commend the use of original Game Boy hardware in this build as well, which even made it possible for [Andy] and his wife to play a head-to-head game of Dr. Mario through a link cable with another Game Boy. If you’re looking for a simpler way of playing on original hardware without burning a hole in your wallet buying AA batteries, take a look at this Game Boy restoration which uses a Lithium battery instead.

Continue reading “Game Boy Becomes Super Game Boy With A Pair Of Pis”