Tracktorino Shields You From Poor Interfaces

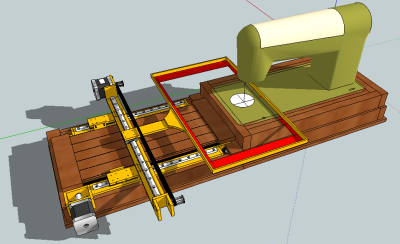
On-screen controls in a digital audio workstation expand the power of a DJ or musician, but they are not intuitive for everyone. The tactility of buttons, knobs, sliders and real-world controls feels nothing like using a mouse, trackpad, or even a touchscreen. Unfortunately, devices meant to put control into a DJs hands can be unavailable due to location or cost. [Gustavo Silveira] took charge of the situation so he could help other DJs and musicians take control of their workstations with a customized MIDI interface for Traktor DJ software.

MIDI is a widely used serial protocol which has evolved from a DIN connector to USB, and now it is also wireless. This means that the Traktorino is not locked to Traktor despite the namesake. On the Hackaday.io page, there’s even a list of other workstations it will work with, but since many workstations, all the good ones anyway, accept MIDI hardware like this, the real list is a lot longer.

The custom circuit board is actually a shield. Using an Arduino UNO, the current poster child of the Arduino world, opens up the accessibility for many people who don’t know specialized software. A vector drawing for a lasercut enclosure is also included. This means that even the labeling on the buttons are not locked into English language.

Here’s another project which combined laser cutting and MIDI to make some very clever buttons or turn your DIN MIDI connector into USB.

Continue reading “Tracktorino Shields You From Poor Interfaces”

No, Cat, This Is Not The Litter Box

Hackaday.io user [peterquinn] has encountered a problem with his recently unruly cat peeing under the dining table. Recognizing that the household cat’s natural enemy is the spray bottle, he built an automatic cat sprayer to deter her antics.

The build is clear-cut: an Arduino Uno clone for a brain, an MG995 servo, PIR sensor, spray bottle, and assorted electronics components. [peterquinn] attached the servo to the spray bottle with a hose clamp — ensuring that the zero position is pointing at the trigger — and running a piece of cabling around the trigger that the servo will tug on. Adding a capacitor proved necessary after frying the first Uno clone, as the servo powering up would cause the Uno to reset.

The code is set up to trigger the servo — spraying the cat twice — once the PIR detects the cat for more than ten seconds. After toying with a few options, [peterquinn] is using a 9V, 2A power supply that works just fine. For now, he hopes the auto-sprayer should do the trick. If it somehow doesn’t work, [peterquinn] has mused that a drastic upgrade to the vacuum may be necessary.

Vintage Sewing Machine To Computerized Embroidery Machine

It is February of 2018. Do you remember what you were doing in December of 2012? If you’re [juppiter], you were starting your CNC Embroidery Machine which would not be completed for more than half of a decade. Results speak for themselves, but this may be the last time we see a first-generation Raspberry Pi without calling it retro.

The heart of the build is a vintage Borletti sewing machine, and if you like machinery porn, you’re going to enjoy the video after the break. The brains of the machine are an Arduino UNO filled with GRBL goodness and the Pi which is running CherryPy. For muscles, there are three Postep25 stepper drivers and corresponding NEMA 17 stepper motors.

The first two axes are for an X-Y table responsible for moving the fabric through the machine. The third axis is the flywheel. The rigidity of the fabric frame comes from its brass construction which may have been soldered at the kitchen table and supervised by a big orange cat. A rigid frame is the first ingredient in reliable results, but belt tension can’t be understated. His belt tensioning trick may not be new to you, but it was new to some of us. Italian translation may be necessary.

The skills brought together for this build were vast. There was structural soldering, part machining, a microcontroller, and motion control. The first time we heard from [juppiter] was December 2012, and it was the result of a Portable CNC Mill which likely had some influence on this creation. Between then, he also shared his quarter-gobbling arcade cabinet with us.

Continue reading “Vintage Sewing Machine To Computerized Embroidery Machine”

A Clear Christmas Tree Means More Lights!

For all the hustle and bustle of the holiday season, people still find ways to make time for their passions. In the lead up to Christmas, [Edwin Mol] and a few co-workers built themselves an LED Christmas tree that adds a maker’s touch to any festive decor.

Before going too far, they cut out a cardboard mock-up of the tree. This an easy step to skip, but it can save headaches later! Once happy with the prototype, they printed off the design stencils and cut the chunks of clear acrylic using power tools — you don’t need a laser cutter to produce good stuff — and drilled dozens of holes in the plastic to mount LEDs, and run wires.

A Raspberry Pi 3 and Arduino Uno make this in league with some pretty smart Christmas trees. MAX6968 5.5V constant-current LED driver chips and MOFSETs round out the control circuit. During the build, the central LED column provided a significant challenge — how often do you build a custom jig to solder LEDs? That done, it’s time for a good ol’-fashioned assembly montage! The final product can cycle through several different lighting animations in a rainbow of colours — perfect for a festive build. Continue reading “A Clear Christmas Tree Means More Lights!”

Gamify Your Workout With This Wearable Console Controller

‘Tis soon to be the season when resolutions falter and exercise equipment purchased with the best of intentions is cast aside in frustration. But with a little motivation, like making your exercise machine a game console controller, you can maximize your exercise gear investment and get in some guilt-free gaming to boot.

Honestly, there is no better motivation for keeping up with exercise than taking classes, but not many people have the discipline — or the pocketbook — to keep going to the gym for the long haul. With this in mind, [Jason] looked for a way to control PS4  games like Mario Karts or TrackMania with his recumbent bike. In an attempt to avoid modifying the bike, [Jason] decided on a wearable motion sensor for his ankle. Consisting of an Uno, an MPU9250 accelerometer, and a transmitter for the 433-MHz ISM band, the wearable sends signals to a receiver whenever the feet are moving. This simulates pressing the up arrow controller key to set the game into action. Steering and other game actions are handled by a regular controller; we’d love to see this expanded to include strain gauges on the recumbent bike’s handles to allow left-right control by shifting weight in the seat. Talk about immersive gameplay!

While we like the simplicity of [Jason]’s build and the positive reinforcement it provides, it’s far from the first exercise machine hack we’ve seen. From making Google Street View bike-controlled to automatically logging workouts, exercise machines are ripe for the hacking.

Continue reading “Gamify Your Workout With This Wearable Console Controller”

Modernizing A 170 Year Old Antique Grandfather Clock

Frankly, we let out a yelp of despair when we read this in the tip line “Antique Grandfather clock with Arduino insides“! But before you too roll your eyes, groan, or post snark, do check out [David Henshaw]’s amazing blog post on how he spent almost eight months working on the conversion.

Before you jump to any conclusions about his credentials, we must point out that [David] is an ace hacker who has been building electronic clocks for a long time. In this project, he takes the antique grandfather clock from 1847, and puts inside it a new movement built from Meccano pieces, stepper motors, hall sensors, LEDs, an Arduino and lots of breadboard and jumper wires while making sure that it still looks and sounds as close to the original as possible.

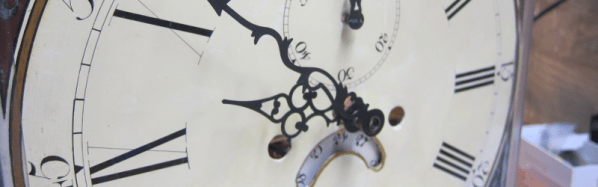
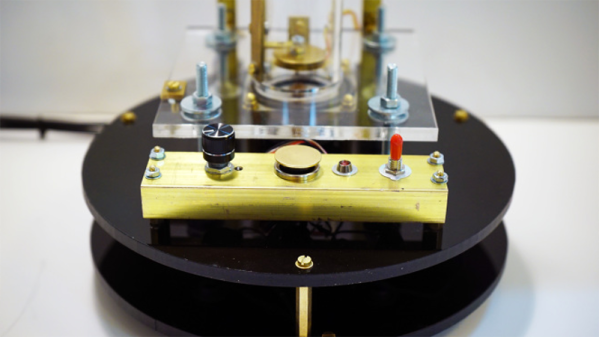
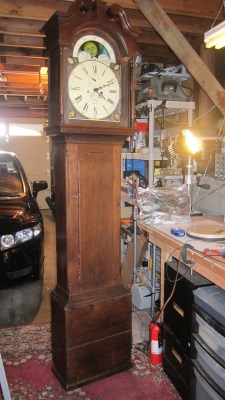
He starts off by building a custom electro-mechanical clock movement, and since he’s planning as he progresses, meccano, breadboard and jumper wires were the way to go. Hot glue helps preserve sanity by keeping all the jumper wires in place. To interface with all of the peripherals in the clock, he decided to use a bank of shift registers driven from a regular Arduino Uno. The more expensive DS3231 RTC module ensures better accuracy compared to the cheaper DS1307 or similar clones. A bank of RGB LEDs acts as an annunciator panel inside the clock to help provide various status indications. The mechanical movement itself went through several iterations to get the time display working with a smooth movement of the hands. Besides displaying time, [David] also added a moon phase indicator dial. A five-rod chime is struck using a stepper motor driven cam and a separate solenoid is used to pull and release three chime hammers simultaneously to generate the loud gong sounds.

And here’s the amazing part – he did all of this before laying his hands on the actual grandfather clock – which was shipped to him in California from an antique clock specialist in England and took two months to arrive. [David] ordered just the clock housing, dial/face and external parts, with none of the original inner mechanism. Once he received it, his custom clock-work assembly needed some more tweaking to get all the positions right for the various hands and dials. A clock like this without its typical “ticktock” sound would be pretty lame, so [David] used a pair of solenoids to provide the sound effect, with each one being turned on for a different duration to produce the characteristic ticktock.

At the end of eight months, the result – christened Judge – was pretty satisfying. Check the video below to judge the Judge for yourself. If you would like to see some more of [David]’s clockwork, check out Dottie the Flip Dot Clock and A Reel to Reel Clock.

Continue reading “Modernizing A 170 Year Old Antique Grandfather Clock”

Follow The Bouncing Ball Of Entropy

When [::vtol::] wants to generate random numbers he doesn’t simply type rand() into his Arduino IDE, no, he builds a piece of art. It all starts with a knob, presumably connected to a potentiometer, which sets a frequency. An Arduino UNO takes the reading and generates a tone for an upward-facing speaker. A tiny ball bounces on that speaker where it occasionally collides with a piezoelectric element. The intervals between collisions become our sufficiently random number.

The generated number travels up the Rube Goldberg-esque machine to an LCD mounted at the top where a word, corresponding to our generated number, is displayed. As long as the button is held, a tone will continue to sound and words will be generated so poetry pours forth.

If this take on beat poetry doesn’t suit you, the construction of the Ball-O-Bol has an aesthetic quality that’s eye-catching, whereas projects like his Tape-Head Robot That Listens to the Floor and 8-Bit Digital Photo Gun showed the electronic guts front and center with their own appeal.

Continue reading “Follow The Bouncing Ball Of Entropy”