Inputs Of Interest: The Differently Dexterous DataHand Directionalizes Digits

If you had debilitating pain from repetitive stress injury in the 1990s, there were a lot of alternative keyboard options out there. One of the more eye-catching offerings was the DataHand keyboard made by DataHand Systems out of Phoenix, AZ. The DataHand debuted in 1993 with a price tag around $2,000. While this is admittedly pretty steep for the average consumer, it was well within the IT budgets of companies that wanted to avoid workman’s comp claims and keep their employees typing away.

In theory, this is holy grail territory for anti-RSI keyboards. The DataHand was designed to eliminate wrist motion altogether by essentially assigning a d-pad plus a regular push-down button to each finger. The layout resembles QWERTY as closely as possible and uses layers to access numbers, symbols, and other functions, like a rudimentary mouse.

Although if you put them this close together, you’re kind of missing the point. Image via Bill Buxton

Ergonomic to the Max

Typing on the DataHand is supposed to be next to effortless. The directional switches are all optical, which probably has a lot to do with the eye-popping price point. But instead of being spring-loaded, these switches use magnets to return to the neutral position.

Continue reading “Inputs Of Interest: The Differently Dexterous DataHand Directionalizes Digits”

Test Unknown Fuses Without Destroying Them

There’s a problem with fuses. On the face of it, testing would seem to be a one-shot deal — exceed the rated current and see if it blows. But once you know the answer, the device is useless. If only there were a way to test fuses without damaging them.

As it turns out there is, and [Kerry Wong] weaves quite a tale about his attempts to non-destructively test fuses. The fuses in question are nothing fancy — just the standard glass tube type, from a cheap assortment kit off Amazon. Therein lies the problem: can such cheap devices be trusted? Finding out requires diving much deeper into the technology of fuses than many people will have done, including understanding how the thermal and electrical characteristics of the fuse element behave.

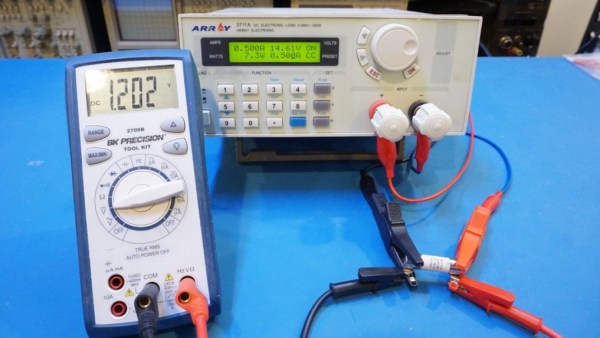
[Kerry]’s test setup is simple, consisting of a constant current power supply and a voltmeter across the fuse to measure the voltage drop caused by the resistance of the fuse element. As he ramps up the current, the voltage drop increases linearly due to the increase in resistance of the alloy with increasing temperature. That only lasts up to a point, where the fuse resistance starts increasing exponentially. Pushing much past the point where the resistance has doubled would blow the fuse, so that’s the endpoint of his tests. Perhaps unsurprisingly, his no-name fuses all went significantly beyond their rated current, proving that you get what you pay for. See the video below for the tests and an analysis of the results.

It’s handy to know there’s a way to check fuses without popping them, and we’ll file this one away for future reference. Don’t forget that you should always check the fuse when troubleshooting, because you never know what the last person did to it.

Continue reading “Test Unknown Fuses Without Destroying Them”

Roll Your Own Automation With ESPHome

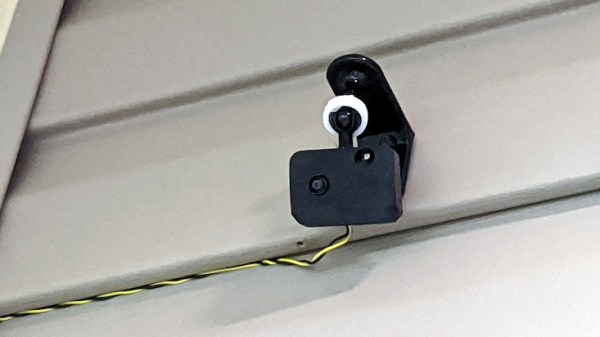
There are several different paths to a smart home, and [Marcus] eventually settled on using ESPHome and ESP8266/ESP32 based devices to create a complete DIY smart home solution which covers his garage door, sprinklers, LED strips, light bulbs, and outlets. There’s even an experimental (and very economical) ESP32-CAM based camera, shown here.

In fact, [Marcus]’s write-up could double as a sort of reference design. If you’re curious about ESPHome, be sure to read what he has to say because he explains exactly how he configured each device and any challenges he encountered in the process.

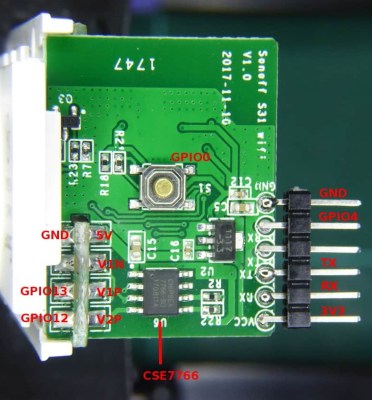
Beyond the software guidance, the post is also a great resource on how to flash a new firmware onto several different smart devices. [Marcus] provides nicely labeled images of the boards that show where you need to connect your programmer, which just might save you some trouble down the line. Though he did manage to set fire to one of the bulbs, so keep an eye out for that.

Tasmota is another open source option for controlling ESP8266-based devices, and if you’d like to explore that direction don’t forget that flashing Sonoff devices with Tasmota firmware recently got much, much easier.

Magnetic Bubble Memory Farewell Tour

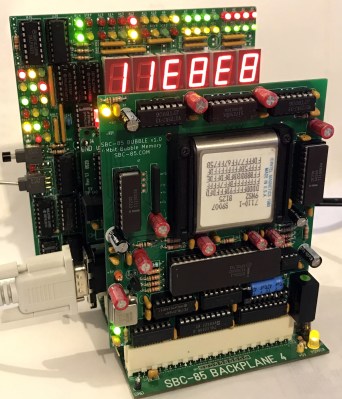
There’s something both satisfying and sad about seeing an aging performer who used to pack a full house now playing at a local bar or casino. That’s kind of how we felt looking at [Craig’s] modern-day bubble memory build. We totally get, however, the desire to finish off that project you thought would be cool four decades ago and [Craig] seems to be well on the way to doing just that.

If you don’t recall, bubble memory was going to totally wipe out the hard drive industry back in the late 1970s and early 1980s. A byproduct of research on twistor memory, the technology relied on tiny magnetic domains or bubbles circulating on a thin film. Bits circulated to the edge of the film where they were read using a magnetic pickup. Then a write head put them back at the other edge to continue their journey. It was very much like the old delay line memories, but with tiny magnetic domains instead of pressure waves through mercury.

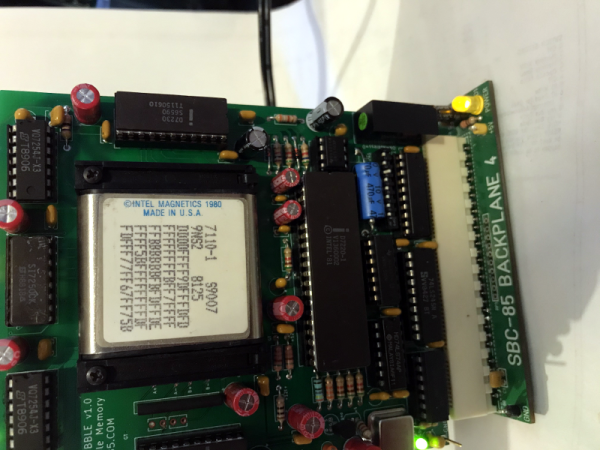
We don’t know where [Craig] got his Intel 7110 but they are very pricey nowadays thanks to their rarity. In some cases, it’s cheaper to buy some equipment that used bubble memory and steal the devices from the board. You can tell that [Craig] was very careful working his way to testing the full board.

Because these were state-of-the-art in their day, the chips have extra loops and would map out the bad loops. Since the bubble memory is nonvolatile, that should be a one time setup at the factory. However, in case you lost the map, the same information appears on the chip’s label. [Craig’s] first test was to read the map and compare it to the chip’s printed label. They matched, so that’s a great sign the chip is in good working order and the circuit is able to read, at least.

We’ve talked about bubble memory before along with many other defunct forms of storage. There were a few military applications that took advantage of the non-mechanical nature of the device and that’s why the Navy’s NEETS program has a section about them.

Gain An Understanding Of Injection Molding’s Design Gotchas

When it comes to manufacturing, sheet metal and injection molding make the world go ’round. As a manufacturing method, injection molding has its own range of unique design issues and gotchas that are better to be aware of than not. To help with this awareness, [studiored] has a series of blog posts describing injection molding design issues, presented from the perspective of how to avoid and address them.

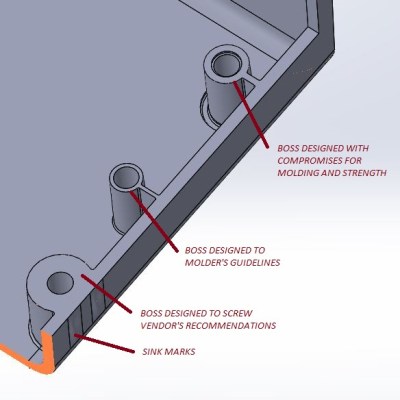
Design of screw bosses demonstrating conflict between molder’s guidelines and vendor’s recommendations. Compromising between both is a science and an art.

Because injection molding involves heat, warp is one issue to be aware of and its principles will probably be familiar to anyone with nitty-gritty experience in 3D printing. Sink marks are also an issue that comes down to differential cooling causing problems, and can ruin a smooth and glossy finish. Both of these play a role in how best to design bosses.

Minimizing and simplifying undercuts (similar to overhangs in 3D printer parlance) is a bit more in-depth, because even a single undercut means much more complex tooling for the mold. Finally, because injection molding depends on reliably molding, cooling, and ejecting parts, designing parts with draft (a slight angle to aid part removal) can be a fact of life.

[studiored] seems to have been working overtime on sharing tips for product design and manufacture on their blog, so it’s worth keeping an eye on it for more additions. We mentioned earlier that much of the manufacturing world revolves around injection molding and sheet metal, so to round out your knowledge we published a primer on everything you need to know about the art and science of bending sheet metal. With a working knowledge of the kinds of design issues that affect these two common manufacturing methods, you’ll have a solid foundation for any forays into either world.

Hackaday Links Column Banner

Hackaday Links: April 19, 2020

While the COVID-19 pandemic at least seems to be on a downward track, the dystopian aspects of the response to the disease appear to be on the rise. As if there weren’t enough busybodies and bluenoses shaming their neighbors for real or imagined quarantine violations on social media, now we have the rise of social-distancing enforcement drones. These have been in use in hot zones around the world, of course, but have only recently arrived in the US. From New Jersey to Florida, drones are buzzing about in search of people not cowering in fear in their homes and blaring messages about how they face fines and arrest for seeking a little fresh air and sunshine. We’re all in favor of minimizing contact with potentially infected people, but it seems like these methods might be taking things a bit too far.

If you somehow find yourself with some spare time and want to increase your knowledge, or at least expand your virtual library, Springer Publishing has some exciting news for you. The journal and textbook publisher has made over 400 ebook titles available for free download. We had a quick scan over the list, and while the books run the gamut from social sciences to astrophysics, there are plenty of titles that are right in the wheelhouse of most Hackaday readers. There are books on power electronics, semiconductor physics, and artificial intelligence, as well as tons more. They all seem to be recent titles, so the information isn’t likely to be too dated. Give the list a once-over and happy downloading.

Out of all the people on this planet, the three with the least chance of being infected with SARS-CoV-2 blasted off from Kazakhstan this week on Soyuz MS-16 to meet up with the ISS. The long-quarantined crew of Anatoly Ivanishin, Ivan Vagner, and Chris Cassidy swapped places with the Expedition 62 crew, who returned to Earth safely in the Soyuz MS-15 vehicle. It’s a strange new world they return to, and we wish them and their ISS colleagues all the best. What struck us most about this mission, though, was some apparently surreptitiously obtained footage of the launch from a remarkably dangerous position. We saw some analysis of the footage, and based on the sound delay the camera was perhaps as close as 150 meters to the launchpad. It’s hard to say if the astronauts or the camera operator was braver.

And finally, because neatness counts, we got this great tip on making your breadboard jumpers perfectly straight. There’s something satisfying about breadboard circuits where the jumpers are straight and exactly the length the need to be, and John Martin’s method is so simple you can’t help but use it. He just rolls the stripped jumpers between his bench and something flat; he uses a Post-it note pad but just about anything will do. The result is satisfyingly straight jumpers, ready to be bent and inserted. We bet this method could be modified to work with the stiffer wire normally used in circuit sculptures like those of Mohit Bhoite; he went into some depth about his methods during his Supercon talk last year, and it’s worth watching if you haven’t seen it yet.

DIY Magsafe Charger Feeds Off 12 V Solar Battery

[Steve Chamberlin] has a spiffy solar-charged 12 V battery that he was eager to use to power his laptop, but ran into a glitch. His MacBook Pro uses Apple’s MagSafe 2 connector for power, but plugging the AC adapter into the battery via a 110 VAC inverter seemed awfully inefficient. It would be much better to plug it into the battery directly, but that also was a problem. While Apple has a number of DC power adapters intended for automotive use, none exist for the MagSafe 2 connector [Steve]’s mid-2014 MacBook Pro uses. His solution was to roll his own MagSafe charger with 12 VDC input.

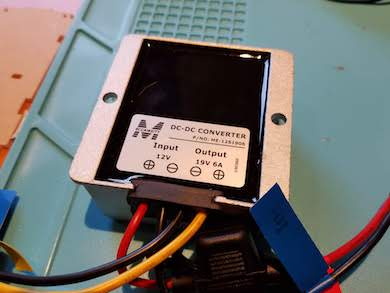
Since MagSafe connectors are proprietary, his first duty was to salvage one from a broken wall charger. After cleaning up the wires and repairing any frayed bits, it was time to choose a DC-DC converter to go between the MagSafe connector and the battery. The battery is nominally 12 volts, so the input of the DC-DC converter was easy to choose, but the output was a bit uncertain. Figuring out what the MagSafe connector expects took a little educated guesswork.

The original AC adapter attached to the charger claimed an output of 20 volts, another Apple adapter claimed a 14.85 V output, and a third-party adapter said 16.5 volts. [Steve] figured that the MagSafe connectors seemed fine with anything in the 15 to 20 V range, so it would be acceptable to use a 12 V to 19 V DC-DC boost converter which he had available. The result worked just fine, and [Steve] took measurements to verify that it is in fact much more efficient than had he took the easy way out with the inverter.

MagSafe has been displaced by USB-C nowadays, but there are plenty of MagSafe devices still kicking around. In a pinch, keep in mind that a little bit of filing or grinding is all that’s needed to turn MagSafe 1 into MagSafe 2.