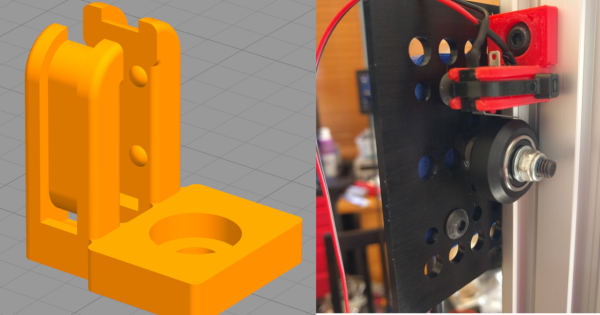
Convert That Cheap Laser Engraver To 100% Open-Source Toolchain

laserweb-on-cheap-laser-squareLaserWeb is open-source laser cutter and engraver software, and [JordsWoodShop] made a video tutorial (embedded below) on how to convert a cheap laser engraver to use it. The laser engraver used in the video is one of those economical acrylic-and-extruded-rail setups with a solid state laser emitter available from a variety of Chinese sellers (protective eyewear and any sort of ventilation or shielding conspicuously not included) but LaserWeb can work with just about any hardware, larger CO2 lasers included.

LaserWeb is important because most laser engravers and cutters have proprietary software. The smaller engravers like the one pictured above use a variety of things, and people experienced with larger CO2 laser cutters may be familiar with a piece of software called LaserCut — a combination CAD program and laser control that is serviceable, but closed (my copy even requires a USB security dongle, eww.)

LaserWeb allows laser engravers and cutters to be more like what most of us expect from our tools: a fully open-source toolchain. For example, to start using LaserWeb on one of those affordable 40 W blue-box Chinese laser cutters the only real hardware change needed is to replace the motion controller with an open source controller like a SmoothieBoard. The rest is just setting up the software and enjoying the added features.

Continue reading “Convert That Cheap Laser Engraver To 100% Open-Source Toolchain”

The Ninja Run: A VR Movement Experiment

VR is an area that is seeing plenty of DIY experimentation, and [FultonX] has an interesting hack of sorts in that he’s discovered something that meshes well with how we perceive motion and movement. It’s an experimental movement system for VR he calls the Ninja Run, and it somewhat resembles skiing.

ninja-run-analysis-optimizedEven room-scale VR suffers from the fact that the player is more or less stuck in one place. Moving the player from one spot to another isn’t currently a gracefully solved problem, and many existing methods are not immersive or have other drawbacks. One solution in use is a sort of teleportation, another “slides” the player to another area on command (like gliding across ice). [FultonX] found these existing solutions lacking, and prototyped the Ninja Run concept which he found was surprisingly intuitive and effective. Video demo embedded below.

Continue reading “The Ninja Run: A VR Movement Experiment”

Revealed: Homebrew Controller Working In Steam VR

[Florian] has been putting a lot of work into VR controllers that can be used without interfering with a regular mouse + keyboard combination, and his most recent work has opened the door to successfully emulating a Vive VR controller in Steam VR. He uses Arduino-based custom hardware on the hand, a Leap Motion controller, and fuses the data in software.

We’ve seen [Florian]’s work before in successfully combining a Leap Motion with additional hardware sensors. The idea is to compensate for the fact that the Leap Motion sensor is not very good at detecting some types of movement, such as tilting a fist towards or away from yourself — a movement similar to aiming a gun up or down. At the same time, an important goal is for any added hardware to leave fingers and hands free.

Continue reading “Revealed: Homebrew Controller Working In Steam VR”

Hybrid Raspberry Pi + PIC32 = Oscilloscope And Function Generator

The PicBerry is a student final project by [Advitya], [Jeff], and [Danna] that takes a hybrid approach to creating a portable (and affordable) combination digital oscilloscope and function generator. It’s based on the Raspberry Pi, features an intuitive Python GUI, and can generate and measure simultaneously.

But wait! The Raspberry Pi is a capable little Linux machine, but meeting real-time deadlines isn’t its strong suit. That’s where the hybrid approach comes in. The Pi takes care of the user interface and other goodies, and a PIC32 over SPI is used for 1 MHz sampling and running a DAC at 500 kHz. The idea of combining them into PicBerry is to get the best of both worlds, with the Pi and PIC32 each doing what they are best at. The readings are sent in batches from the PIC32 to the Pi, where the plot is updated every 30 ms so that user does not perceive any visible lag.

The project documentation notes that improvements can be made, the speeds are a far cry from regular bench equipment, and the software lacks some typical features such as triggering, but overall not bad at all for under $50 of parts. In fact, there are hardly any components at all beyond the Raspberry Pi, the PIC32, and a MCP4822 digital-to-analog converter. A short demo video is embedded below.

Continue reading “Hybrid Raspberry Pi + PIC32 = Oscilloscope And Function Generator”

DIY Mini Printer Is 95% Wood, Prints Tiny Cute Images

This little DIY 64×64 graphical printer by [Egor] is part pen plotter in design, somewhat dot matrix-ish in operation, and cleverly designed to use unmodified 9G servos. The project page is all in Russian (translation to English here) but has plenty of photos that make the operation and design clear. Although nearly the entire thing is made from laser-cut wood, [Egor] says that a laser cutter is optional equipment. The first version was entirely cut with hand tools.

screenshot-2016-12-06-10-49-13Small DIY CNC machines driven over a serial line commonly use Arduinos and CD-ROM drive guts (like this Foam Cutter or this Laser Paper Cutter) but this build uses its own custom rack-and-pinion system, and has some great little added details like the spring-loaded clip to hold paper onto the print pad.

The frame and parts (including all gears) are laser-cut from 4 mm plywood and the unit is driven by three small servos. A simple Java program processes images and an Arduino UNO handles the low-level control. A video of everything in action is embedded below.
Continue reading “DIY Mini Printer Is 95% Wood, Prints Tiny Cute Images”

Life On Contract: How To Fail At Contracting Regardless Of Skill

I believe higher quality learning happens from sharing failure than from sharing stories of success. If you have set your mind to living on contract, I present this cheat sheet of some of the most simple and effective ways to muck it all up that have surprisingly little or nothing to do with your technical skill, knowledge, or even deliverables.

The previous installment of Life on Contract discussed how one might find clients as an engineering contractor or consultant while also taking a bit of time to pull apart the idea of whether life on contract is appropriate as opposed to, for example, bootstrapping a business instead. Assuming you are set on working as a contractor, let’s talk about what happens after you have found a prospective client (or perhaps more likely: after they have found you.)

WARNING: this article features an utter lack of success tips and tricks. Partly because those can be found in any seminar or business self-help book, but mostly because I do not have a foolproof recipe for success, and cheat codes to unlock easy mode still elude me. But I have witnessed (or committed) and reflected on many excellent ways to fail at contracting; or at the very least succeed in not being invited back.

Just because I won’t be sharing success stories doesn’t mean success has no learning value. Got a success story, or a better way to fail? Tell us about it in the comments!

Continue reading “Life On Contract: How To Fail At Contracting Regardless Of Skill”

Exquisitely Crafted Nixie Tube Weatherclock

The Weatherclock is more than just a clock sporting Nixie tubes and neon lamps. There is even more to it than the wonderful workmanship and the big, beautiful pictures in the build log. [Bradley]’s Weatherclock is not only internet-connected, it automatically looks up local weather and sets the backlights of the numbers to reflect current weather conditions. For example, green for roughly room temperature, blue for cold, red for warm, flashing blue for rain, flashing white for lightning, scrolling white for fog and ice, and so on.

neonixieclock_02The enclosure is custom-made and the sockets for the tubes are seated in a laser-cut plastic frame. While seating the sockets, [Bradley] noticed that an Adafruit Neopixel RGB LED breakout board fit perfectly between the tube leads. By seating one Neopixel behind each Nixie indicator, each number could have a programmable backlight that just happened to look fabulous.

Witpreboxh an Electric Imp board used for WiFi the capabilities of the Weatherclock were rounded out on the inside. On the outside, a custom enclosure ties it all together. [Bradley] says his family had gotten so used to having the Weatherclock show them the outside conditions that they really missed it when it was down for maintenance or work – which shouldn’t happen much anymore as the project is pretty much complete.

It’s interesting to see new features in Nixie clocks. Nixie tubes have such enduring appeal that using them alone has its own charm, and at least one dedicated craftsman actually makes new ones from scratch.