Software Defined Television On An ESP32

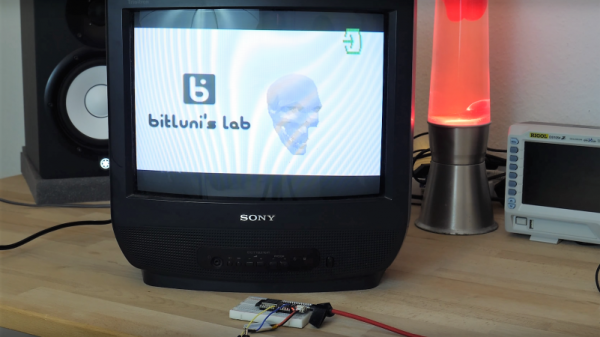
Composite video from a single-board computer? Big deal — every generation of Raspberry Pi has had some way of getting composite signals out and onto the retro monitor of your choice. But composite video from an ESP32? That’s a thing now too.

There are some limitations, of course, not least of which is finding a monitor that can accept a composite input, but since [bitluni]’s hack uses zero additional components, we can overlook those. It really is as simple as hooking the monitor up to pin 25 and ground because, like his recent ESP32 AM radio station, the magic is entirely in software. For video, [bitluni] again uses his I²S tweaks to push a lot of data into the DAC really fast, reproducing the sync and image signals in the 0-1 volt range of the PAL composite standard. His code also supports the NTSC standard, but alas because of frequency limitations in the hardware it’s monochrome only for both standards, at least for now. He’s also got a neat trick to improve performance by running the video signal generation and the 3D-rendering on separate cores in the ESP32. Check out the results in the video below.

It looks like the ESP32 is getting to be one of those “Is there anything it can’t do?” systems. Aside from radio and video, we’ve seen audio playback, vector graphics, and even a Basic interpreter easter egg.

Continue reading “Software Defined Television On An ESP32”

3D-Printed Parts Torture-Tested In Nitro Engine — Briefly

Additive manufacturing has come a long way in a short time, and the parts you can turn out with some high-end 3D-printers rival machined metal in terms of durability. But consumer-grade technology generally lags the good stuff, so there’s no way you can 3D-print internal combustion engine parts on a run of the mill printer yet, right?

As it turns out, you can at least 3D-print connecting rods, if both the engine and your expectations are scaled appropriately. [JohnnyQ90] loves his miniature nitro engines, which we’ve seen him use to power both a rotary tool and a hand drill before. So taking apart a perfectly good engine and replacing the aluminum connecting rod with a PETG print was a little surprising. The design process was dead easy with such a simple part, and the print seemed like a reasonable facsimile of the original when laid side-by-side. But there were obvious differences, like the press-fit bronze bearings and oil ports in the crank and wrist ends of the original part, not to mention the even thickness along the plastic part instead of the relief along the shaft in the prototype.

Nonetheless, the rod was fitted into an engine with a clear plastic cover that lets us observe the spinning bits right up to the inevitable moment of failure, which you can see in the video below. To us it looks like failing to neck down the shaft of the rod was probably not a great idea, but the main failure mode was the bearings, or lack thereof. Still, we were surprised how long the part lasted, and we can’t help but wonder how a composite connecting rod would perform.

Still in the mood to see how plastic performs in two-stroke engines? Break out the JB Weld.

Continue reading “3D-Printed Parts Torture-Tested In Nitro Engine — Briefly”

Mechanisms: Mechanical Seals

On the face of it, keeping fluids contained seems like a simple job. Your fridge alone probably has a dozen or more trivial examples of liquids being successfully kept where they belong, whether it’s the plastic lid on last night’s leftovers or the top on the jug of milk. But deeper down in the bowels of the fridge, like inside the compressor or where the water line for the icemaker is attached, are more complex and interesting mechanisms for keeping fluids contained. That’s the job of seals, the next topic in our series on mechanisms.

Continue reading “Mechanisms: Mechanical Seals”

Relive Radio Shack’s Glory Days By Getting Goofy

The Golden Age of Radio Shack was probably sometime in the mid-1970s, a time when you could just pop into the local store and pay 49 cents for the resistors you needed to complete a project. Radio Shack was the place to go for everything from hi-fi systems to CB radios, and for many of us, being inside one was very much a kid in a candy store scenario.

That’s not to say that Radio Shack was perfect, but one thing it did very well was the education and grooming of the next generation of electronics hobbyists, primarily through their “Science Fair” brand. Some of us will recall the P-Box kits from that line, complete projects with all the parts and instructions in a plastic box with a perfboard top. These kits were endlessly entertaining and educational, and now [NetZener] has recreated the classic neon “Goofy Light” P-Box project.

As it was back in the day, the Goofy Light is almost entirely useless except for learning about DC-DC converters, multivibrators, RC timing circuits, and the weird world of negative resistance. But by using the original Science Fair instructions, compiling a BOM that can be filled from Mouser or Digikey, and making up a reasonable facsimile of the original P-Box chassis, [NetZener] has done a service to anyone looking for a little dose of nostalgia.

It would be interesting if someone brought back the P-Box experience as a commercial venture, offering a range of kits with circuits like the originals. If that happens, maybe some of the offerings will be based on that other classic from Radio Shack’s heyday.

Continue reading “Relive Radio Shack’s Glory Days By Getting Goofy”

Cross-Brand Adapter Makes For Blended Battery Family

Even though he’s a faithful DeWalt cordless tool guy, [Richard Day] admits to a wandering eye in the tool aisle, looking at the Ryobi offerings with impure thoughts. Could he stay true to his brand and stick with his huge stock of yellow tools and batteries, or would he succumb to temptation and add another set of batteries and chargers so he could have access to a few specialty lime green tools?

Luckily, we live in the future, so there’s a third way — building a cross-brand battery adapter that lets him power Ryobi tools with his DeWalt batteries. [Richard]’s solution is a pure hack, as in physically hacking battery packs and forcing them to work and play well together. Mechanically, this was pretty easy — a dead Ryobi pack from the recycling bin at Home Depot was stripped down for its case, which was glued to a Dewalt 20-v to 18-v battery adapter. The tricky part came from dealing with the battery control electronics. Luckily, the donor DeWalt line has that circuitry in the adapter, while Ryobi puts it in the battery. That meant simply transplanting the PCB from the adapter to the Ryobi battery shell would be enough. The video below shows the process and the results — Ryobi tools happily clicking away on DeWalt batteries.

While [Richard] took a somewhat brute-force approach here, we imagine 3D-printed parts might make for a more elegant solution and offer other brand permutations. After all, printing an adapter should be easier than whipping up a cordless battery pack de novo.

Continue reading “Cross-Brand Adapter Makes For Blended Battery Family”

Easy, Modular Alphanumeric Displays Are Full Of Flappy Goodness

There are plenty of ways to make large alphanumeric displays that are readable at great distances. LED signboards come to mind, as do big flat-screen LCD displays. But such displays feel a little soulless, and nothing captures the atmosphere of a busy train station like an arrivals and departures board composed of hundreds of split-flap displays.

In a bid to make these noisy but intriguing displays practical for the home-gamer, [Scott Bezek] has spent the last couple of years on a simple, modular split-flap display unit, and from the look of the video below, it’s pretty close to ready. The build log details the design process, which started with OpenSCAD and took advantage of the parametric nature of the scripting language to support any number of characters, within reason. Costs are kept low with laser-cut MDF frames and running gear, and cheap steppers provide the motion. Character cards are just PVC ID badges with vinyl letters, and a simple opto-sensor prevents missed steps and incorrect characters. The modules can be chained together into multi-character displays, and the sound is satisfyingly flappy.

[Scott] has put a lot of thought into these displays, and even if it’s not the simplest split-flap display we’ve seen, it’s really worth checking out.

Continue reading “Easy, Modular Alphanumeric Displays Are Full Of Flappy Goodness”

Debunking Moon Landing Denial With An Arduino And Science

It’s sad that nearly half a century after the achievements of the Apollo program we’re still arguing with a certain subset of people who insist it never happened. Poring through the historical record looking for evidence that proves the missions couldn’t possibly have occurred has become a sad little cottage industry, and debunking the deniers is a distasteful but necessary ongoing effort.

One particularly desperate denier theory holds that fully spacesuited astronauts could never have exited the tiny hatch of the Lunar Excursion Module (LEM). [AstronomyLive] fought back at this tendentious claim in a clever way — with a DIY LIDAR scanner to measure Apollo artifacts in museums. The hardware is straightforward, with a Garmin LIDAR-Lite V3 scanner mounted on a couple of servos to make a quick pan-tilt head. The rig has a decidedly compliant look to it, with the sensor flopping around a bit as the servos move. But for the purpose, it seems perfectly fine.

[AstronomyLive] took the scanner to two separate museum exhibits, one to scan a LEM hatch and one to scan the suit Gene Cernan, the last man to stand on the Moon so far, wore while training for Apollo 17. With the LEM flying from the rafters, the scanner was somewhat stretching its abilities, so the point clouds he captured were a little on the low-res side. But in the end, a virtual Cernan was able to transition through the virtual LEM hatch, as expected.

Sadly, such evidence will only ever be convincing to those who need no convincing; the willfully ignorant will always find ways to justify their position. So let’s just celebrate the achievements of Apollo.

Continue reading “Debunking Moon Landing Denial With An Arduino And Science”