Creating Easy Glass Circuit Boards At Home

This tip for creating glass substrate circuit boards at home might hew a bit closer to arts and crafts than the traditional Hackaday post, but the final results of the method demonstrated by [Heliox] in her recent video are simply too gorgeous to ignore. The video is in French, but between YouTube’s attempted automatic translation and the formidable mental powers of our beloved readers, we don’t think it will be too hard for you to follow along after the break.

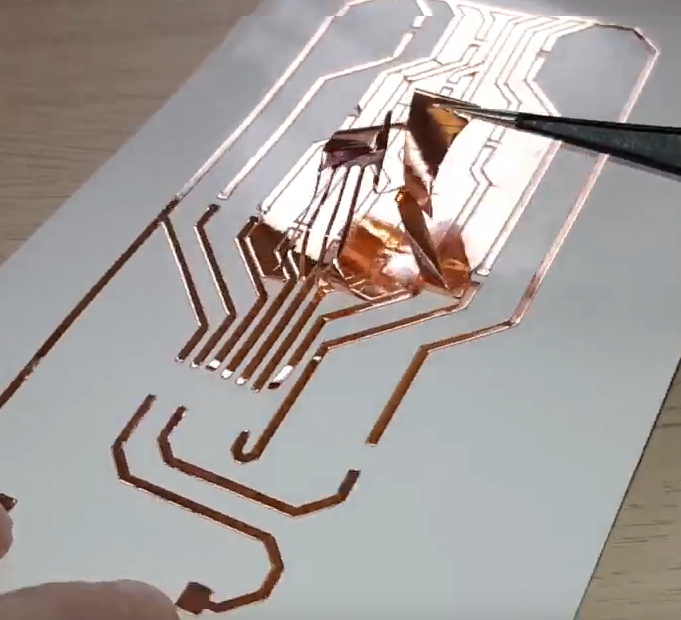
The short version is that [Heliox] loads her Silhouette Cameo, a computer-controlled cutting machine generally used for paper and vinyl, with a thin sheet of copper adhered to a backing sheet to give it some mechanical strength. With the cutting pressure of the Cameo dialed back, the circuit is cut out of the copper but not the sheet underneath, and the excess can be carefully peeled away.

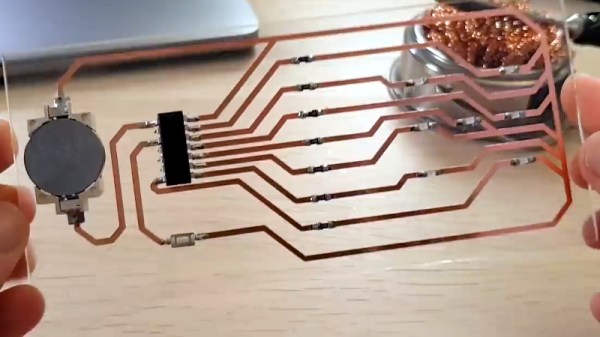
Using transfer paper, [Heliox] then lifts the copper traces off the sheet and sticks them down to a cut piece of glass. Once it’s been smoothed out and pushed down, she pulls the transfer paper off and the copper is left behind.

From there, it’s just a matter of soldering on the SMD components. To make it a little safer to handle she wet sands the edges of the glass to round them off, but it’s still glass, so we wouldn’t recommend this construction for anything heavy duty. While it might not be the ideal choice for your next build, it certainly does looks fantastic when mounted in a stand and blinking away like [Heliox] shows off at the end.

Ironically, when compared to some of the other methods of making professional looking PCBs at home that we’ve seen over the years, this one might actually be one of the easiest. Who knew?

Continue reading “Creating Easy Glass Circuit Boards At Home”

A Python Serial Terminal To Get You Out Of A Jam

When fiddling around with old computers, you can occasionally find yourself in a sticky situation. What may be a simple task with today’s hardware and software can be nearly impossible given the limited resources available to machines with 20 or 30 years on the clock. That’s where [bison] recently found himself when he needed to configure a device over serial, but didn’t have any way of installing the appropriate terminal emulator on his Fujitsu Lifebook C34S.

His solution, since he had Python 2.6 installed on the Debian 6 machine, was to write his own minimal serial terminal emulator. He intended for the code to be as terse as possible so it could be quickly typed in, should anyone else ever find themselves in need of talking to a serial device on Linux but can’t get screen or minicom installed.

The code is very simple, and even if you never find yourself needing to fire up an impromptu terminal, it offers an interesting example of how straightforward serial communications really are. The code opens up the /dev/ttyS0 device for reading, and after appending the appropriate return character, pushes the user’s keyboard input into it. Keep looping around, and you’ve got yourself an interactive terminal.

With this program written, [bison] was able to connect the 266 MHz C34S to his Retro WiFi SI, a modem adapter that bridges the gap between a vintage computer and modern wireless network. Gadgets like these allow you to browse BBSes as the creator intended, and can be fashioned with nothing more exotic than an ESP8266 running some open source code.

A Printed Case For Your ESP Environmental Sensors

We’ve said it before but it’s worth repeating: rolling your own hardware solution is ridiculously easy these days. If you want to make a network attached environmental sensor, you wire a DHT11 up to an ESP8266 and you’re done. Time to move onto the software. In fact, it can take longer to come up with some kind of suitable enclosure for your hardware project than it does to assemble the thing.

Which is why [Pixel Hawk] has come up with this elegant 3D printed enclosure for the ESP8266 and ESP32. It’s designed to hold the microcontroller in the bottom compartment, while the environmental sensor (either the DHT11 or DHT22) is mounted to the top so it’s exposed to the outside. The case snap fits together so you don’t have to worry about gluing it, and there’s even an opening so you can keep the USB cable plugged in.

In the notes for the design, he mentions that in testing it was determined that the heat of the ESP itself can skew the temperature readings. So he recommends putting the microcontroller to sleep whenever possible, and keeping reads short so the enclosure doesn’t have time to heat up. He’s also created an alternate version of the case with more openings which should help combat this issue if you need to keep the chip awake.

If you’re looking for a complete solution, [Pixel Hawk] has included the source code he personally used to get his ESP32 sensor talking to Blynk, but you certainly don’t have to go that route if you don’t want to. There’s no shortage of existing projects out there that will help you get started with whole-house environmental monitoring. Our very own [Elliot Williams] happens to be partial to MQTT when he wants to get all his gadgets to play nice.

US Air Force Says They’re Developing An Open Source Jet Engine; We Say Show Us The Design

The economies of scale generally dictate that anything produced in large enough numbers will eventually become cheap. But despite the fact that a few thousand of them are tearing across the sky above our heads at any given moment, turbine jet engines are still expensive to produce compared to other forms of propulsion. The United States Air Force Research Laboratory is hoping to change that by developing their own in-house, open source turbine engine that they believe could reduce costs by as much as 75%.

The Responsive Open Source Engine (ROSE) is designed to be cheap enough that it can be disposable, which has obvious military applications for the Air Force such as small jet-powered drones or even missiles. But even for the pacifists in the audience, it’s hard not to get excited about the idea of a low-cost open source turbine. Obviously an engine this small would have limited use to commercial aviation, but hackers and makers have always been obsessed with small jet engines, and getting one fired up and self-sustaining has traditionally been something of a badge of honor.

Since ROSE has been developed in-house by the Air Force, they have complete ownership of the engine’s intellectual property. This allows them to license the design to manufacturers for actual production rather than buying an existing engine from a single manufacturer and paying whatever their asking price is. The Air Force will be able to shop ROSE around to potential venders and get the best price for fabrication. Depending on how complex the engine is to manufacture, even smaller firms could get in on the action. The hope is that this competition will serve to not only improve the design, but also to keep costs down.

We know what you’re thinking. Where is the design, and what license is it released under? Unfortunately, that aspect of ROSE seems unclear. The engine is still in development so the Air Force isn’t ready to show off the design. But even when it’s complete, we’re fairly skeptical about who will actually have access to it. Open Source is in the name of the project and to live up to that the design needs to be available to the general public. From a purely tactical standpoint keeping the design of a cheap and reliable jet engine away from potential enemy states would seem to be a logical precaution, but is at cross purposes to what Open Source means. Don’t expect to be seeing it on GitHub anytime soon. Nuclear reactors are still fair game, though.

[Thanks to Polymath99 for the tip.]

Supercon Talk: Sophy Wong Is Designing The Future Of Wearable Technology

For many of us, the term “wearable technology” conjures up mental images of the Borg from Star Trek: harsh mechanical shapes and exposed wiring grafted haphazardly onto a human form that’s left with a range of motion just north of the pre-oilcan Tin Man. It’s simply a projection of the sort of hardware we’re used to. Hacker projects are more often than not a mass of wires and PCBs held in check with the liberal application of hot glue, with little in the way of what could be called organic design. That might be fine when you’re building a bench power supply, but unfortunately there are not many right angles to be found on the human body.

Believe it or not, this garment designed by Sophy Wong is 3D-printed

Thankfully, we have designers like Sophy Wong. Despite using tools and software that most of us would associate with mechanical design, her artistic eye and knowledge of fashion helps her create flexible components that conform to the natural contours of the wearer’s body. Anyone can take an existing piece of hardware and strap it to a person’s arm, but her creations are designed to fit like a tailored piece of clothing; a necessary evolution if wearable technology is ever going to progress past high-tech wrist watches.

During her talk “Made With Machines: 3D Printing & Laser Cutting for Wearable Electronics” at the 2019 Hackaday Superconference in Pasadena, Sophy walked attendees through the design process that she’s honed over years of working on wearable creations. Her designs start in the physical world, occasionally taking the form of sketches drawn directly onto the surface of whatever she’s working on, before being digitized and reproduced.

Featuring graceful curves and tessellated patterns that create a complex and undeniably futuristic look, many of her pieces would be exceptionally difficult to create without modern additive or subtractive manufacturing methods. But even still, Sophy explains that 3D printers and laser cutters aren’t magic; these machines free us from time consuming repetitive tasks, but the skill and effort necessary to create the design files they require are far from trivial.

Continue reading “Supercon Talk: Sophy Wong Is Designing The Future Of Wearable Technology”

An Epic Quest To Build The Perfect Retro Handheld

It’s a good time to be a fan of classic video games. Most of us carry around a smartphone that’s more than capable of emulating pretty much everything from the 32-bit era on down, and if you want something a little more official, the big players like Sony and Nintendo have started putting out “retro” versions of their consoles. But even still, [Mangy_Dog] wasn’t satisfied. To get the portable emulation system of his dreams, he realized he’d have to design and build it himself.

The resulting system, which he calls the “Playdog Blackbone”, is without a doubt one of the most impressive DIY builds we’ve ever seen. While there are still some issues that he’s planning on addressing in a later version of the hardware, it wouldn’t be an exaggeration to say that there’s commercially available game systems that didn’t have half as much thought put into them as the Blackbone.

Which is, incidentally, how this whole thing got started. The original plan was to buy one of those cheap emulation handhelds, which invariably seem to come in the form of a PSP clone, and fit it with a Raspberry Pi. But [Mangy_Dog] quickly realized that not only were they too small to get everything he wanted inside, but they also felt terrible in the hand. Since he wanted the final product to be comfortable to play, his first step was to design the case and get feedback on it from other retro game enthusiasts.

After a few iterations, he arrived at the design we see today. Once he printed the case out on his SLA printer, he could move on with fitting all of his electronics inside. This takes the form of a custom PCB “motherboard” which an Orange Pi Zero Plus2 (sorry Raspberry fans) connects to. There’s actually a surprising amount of room inside the case, enough for niceties like dual speakers and a fan complete with ducting to keep the board cool.

Unsurprisingly, [Mangy_Dog] says a lot of people have been asking him if they can buy their own version of the Blackbone, and have suggested he do a crowdfunding campaign to kick off mass production. While he’s looking at the possibility of resin or injection molding the case so he can produce a few more copies, on the whole, his attention has moved on to new projects. Which frankly, we can’t wait to see.

If you’re interested in slightly more modern games, we’ve seen a number of handhelds based on “trimmed” Nintendo Wii’s which you might be interested in. While they might not have the sleek external lines of the Blackbone, the work that goes into the electronics is nothing short of inspirational.

Continue reading “An Epic Quest To Build The Perfect Retro Handheld”

Patrol The Sprawl With This Battle Ready Cyberdeck

The recent crop of cyberdeck builds are inspired, at least tangentially, by William Gibson’s novel Neuromancer and its subsequent sequels. In the novels, the decks are used as mobile terminals to access the virtual reality of cyberspace. In our world, they’re usually just quasi-retro boxes with Raspberry Pis in them. Artistic license and all that. But the “XMT-19 Cutlass”, a deck built by [CaptNumbNutz], attempts to hew more closely to the source material than most builds we’ve seen.

Of course it won’t be transporting you into the matrix, and ultimately it’s still just a casemod for the Raspberry Pi. But at least it does a fantastic job of fitting the Neuromancer motif. The design is supposed to look like the XMT-19 was a piece of high-tech military hardware that was later co-opted by a cyberspace cowboy operating in the urban megatropolis that Gibson called the Sprawl, with exposed wiring and a visual mish-mash of components.

If you can believe it, the build started out as a locking clipboard of all things. From there, [CaptNumbNutz] started layering on the hand-cut foam greebles and spraying on the WWII inspired color scheme. We especially like the yellow tips on the antennas that invoke the propellers of vintage airplanes, and the serial number stenciled onto the bottom. In a departure from basically every other cyberdeck we’ve seen to date, there appear to be no 3D printed elements on the XMT-19; all the parts are hand made with nothing more than an a sharp knife and a heap of patience.

In terms of the electronics, the whole build has been greatly simplified by the use of a SmartiPi Touch case, which integrates the Pi and touch screen into a single hinged unit that just needed to get bolted to the top of the deck. Plus it gave him an excuse to put a big rainbow ribbon cable on the back of it to reach the Pi’s GPIO ports, which as you know, instantly makes everything look more retro-futuristic.

It might not be packing the raw power of the Intel NUC cyberdeck we covered last year, or have the convincingly vintage look of the VirtuScope, but we’d take the XMT-19 Cutlass into the matrix any day.