Motorizing An IKEA SKARSTA Table

We’ve been told that standing at a desk is good for you, but unless you’re some kind of highly advanced automaton you’re going to have to sit down eventually no matter what all those lifestyle magazines say. That’s where desks like the IKEA SKARSTA come in; they use a crank on the front to raise and lower the desk to whatever height your rapidly aging corporeal form is still capable of maintaining. All the health benefits of a standing desk, without that stinging sense of defeat when you later discover you hate it.

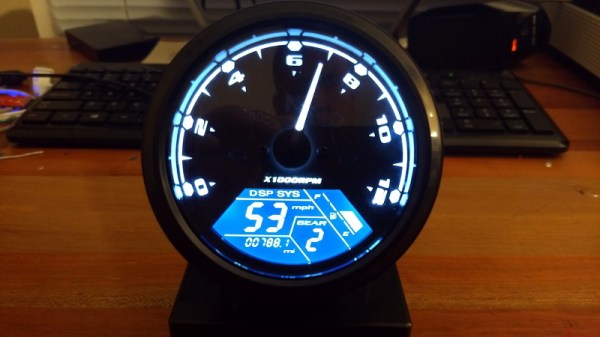
But who wants to turn a crank with their hand in 2019? Certainly not [iLLiac4], who’s spent the last few months working in conjunction with [Martin Mihálek] to add some very impressive features to IKEA’s adjustable table. Replacing the hand crank with a motorized system which can do the raising and lifting was only part of it, the project also includes a slick control panel with a digital display that shows the current table height and even allows the user to set and recall specific positions. The project is still in active development and has a few kinks to work out, but it looks exceptionally promising if you’re looking to get a very capable adjustable desk without breaking the bank.

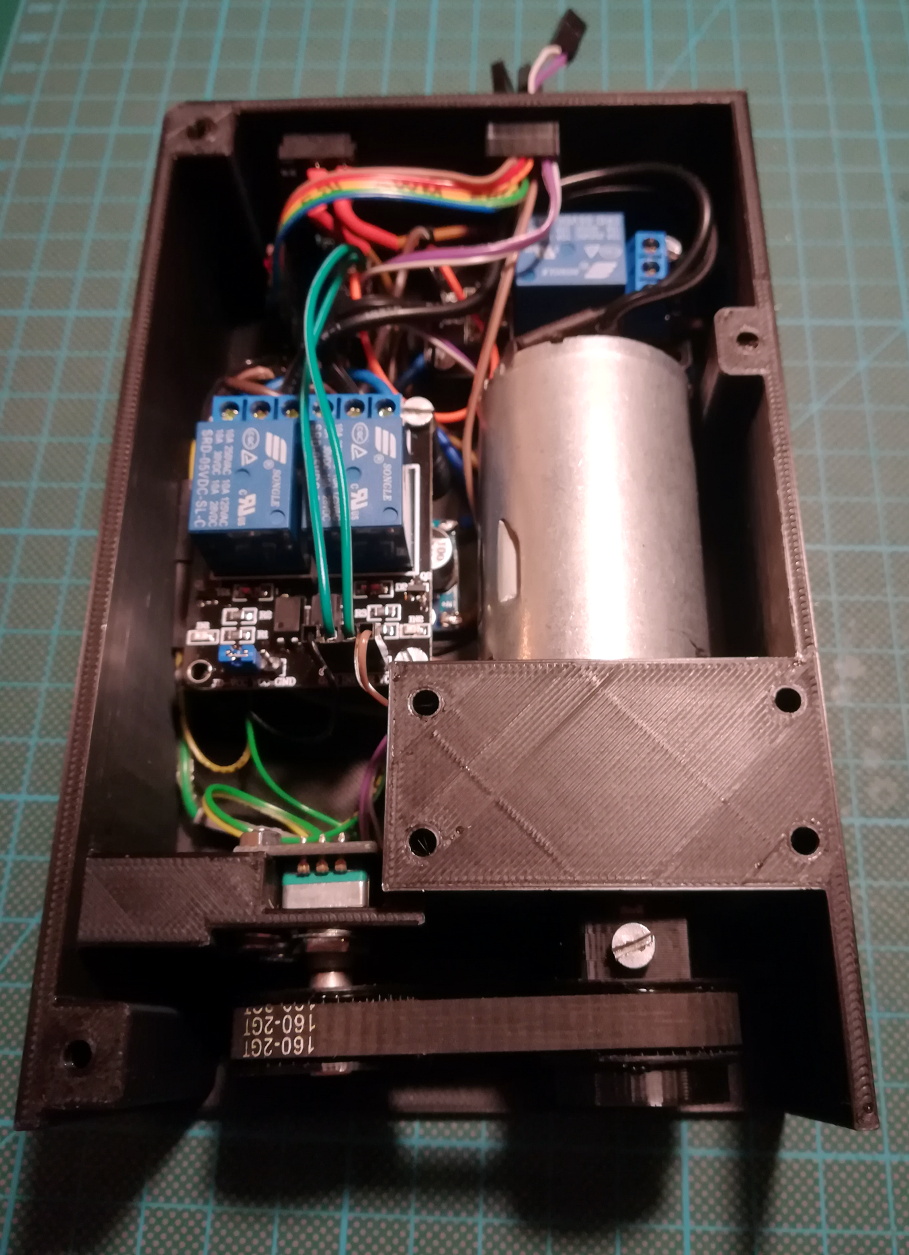
The heart of the project is a 3D printable device which uses a low-RPM DC gear motor to turn the hex shaft where the crank would normally go. A rotary encoder is linked to the shaft of the motor by way of printed GT2 pulleys and a short length of belt, which gives the system positional information and avoids the complexity of adding limit switches to the table itself.

For controlling the motor the user is given the option between using relays or an H-Bridge PWM driver board, but in either event an Arduino Nano will be running the show. In addition to controlling the motor and reading the output of the rotary encoder, the Arduino also handles the front panel controls. This consists of a TM1637 four digit LED display originally intended for clocks, as well as six momentary contact tactile switches complete with 3D printed caps. The front panel’s simple user interface not only allows for setting and recalling three preset desk heights, but can even be used to perform the calibration routine without having to go in and hack the source code to change minimum and maximum positions.

We’ve seen all manner of hacks and modifications dealing with IKEA products, from a shelving unit converted into a vivarium to a table doing double duty as a cheap plate reverb. Whether you’re looking for meatballs or some hacking inspiration, IKEA seems to be the place to go.

The Short And Tragic Story Of Life On The Moon

The Moon is a desolate rock, completely incapable of harboring life as we know it. Despite being our closest celestial neighbor, conditions on the surface couldn’t be more different from the warm and wet world we call home. Variations in surface temperature are so extreme, from a blistering 106 C (223 F) during the lunar day to a frigid -183 C (-297 F) at night, that even robotic probes struggle to survive. The Moon’s atmosphere, if one is willing to call the wispy collection of oddball gasses including argon, helium, and neon at nearly negligible concentrations an atmosphere, does nothing to protect the lunar surface from being bombarded with cosmic radiation.

Von Kármán Crater

Yet for a brief time, very recently, life flourished on the Moon. Of course, it did have a little help. China’s Chang’e 4 lander, which made a historic touchdown in the Von Kármán crater on January 3rd, brought with it an experiment designed to test if plants could actually grow on the lunar surface. The device, known as the Lunar Micro Ecosystem (LME), contained air, soil, water, and a collection of seeds. When it received the appropriate signal, LME watered the seeds and carefully monitored their response. Not long after, Chinese media proudly announced that the cotton seeds within the LME had sprouted and were doing well.

Unfortunately, the success was exceptionally short-lived. Just a few days after announcing the success of the LME experiment, it was revealed that all the plants which sprouted had died. The timeline here is a bit hazy. It was not even immediately clear if the abrupt end of the LME experiment was intentional, or due to some hardware failure.

So what exactly do we know about Chang’e 4’s Lunar Micro Ecosystem, and the lifeforms it held? Why did the plants die? But perhaps most importantly, what does all this have to do with potential future human missions to that inhospitable rock floating just a few hundred thousand kilometers away from us?

Continue reading “The Short And Tragic Story Of Life On The Moon”

Raspberry Pi Jukebox Hits All The Right Notes

We (and by extension, you) have seen the Raspberry Pi crammed into nearly every piece of gear imaginable. Putting one inside a game console is so popular it’s bordering on a meme, and putting them into old stereos and other pieces of consumer electronics isn’t far behind. It’s always interesting to see how hackers graft the modern Raspberry Pi into the original hardware, but we’ll admit it can get a bit repetitive. So how about somebody scratch building an enclosure for their jukebox project?

[ComfortablyNumb] took the road less traveled when he created this very nice wooden Raspberry Pi enclosure in the shape of an eighth note. Stained and varnished and with a nice big touch screen in the middle to handle the controls, it’s an attractive and functional piece of home audio gear that we imagine most people would be happy to hang on their wall.

The process starts by printing out the desired shape on a piece of paper to use as guide, and then gluing together strips of wood to create the rough outline. Then the surface was thoroughly sanded to bring all of the strips of wood to the same level, and the final design was cut out. On the back of the note, [ComfortablyNumb] boxed out an area to hold the Waveshare seven-inch touch screen panel and the Raspberry Pi itself.

Having seen so many projects where the Pi is rather unceremoniously shoehorned into another device, it’s refreshing to see the results of a purpose-built enclosure. Since [ComfortablyNumb] was able to build the electronics compartment to his exact dimensions, the final result looks exceptionally clean and professional. Not a drop of hot glue to be seen. It also helps that this build only required the Pi and the display; as the device is meant to be plugged into an existing audio setup, there’s no onboard amplifier. The audiophiles out there might recoil in horror, but adding a dedicated digital to analog converter (DAC) would be easy enough to add if the stock audio on the Pi isn’t good enough for you.

The project is finished off with stain and several coats of varnish to get that deep and rich color. We don’t often find ourselves working with dead trees around these parts, but we’ve got to admit that the final product does look quite handsome. Certainly beats the LEGO cases many of our Pi projects live in.

If you’re looking for more wooden-encased Pi jukeboxes, you might enjoy this somewhat abstract magstripe-based take on the concept. Of course, we’ve also seen our fair share of actual jukeboxes receive a Raspberry infusion over the years.

[via /r/raspberry_pi]

Building A 3D Printer That Goes Where You Do

Back when one of the best paths to desktop 3D printer ownership was building the thing yourself from laser cut wood with some string thrown in for good measure, just saying you had one at home would instantly boost your hacker street cred. It didn’t even need to work particularly well (which is good, since it probably didn’t), you just had to have one. But now that 3D printers have become so common, the game has changed. If you want to keep on the cutting edge, you’ve got to come up with a unique hook.

Luckily for us, [Thomas Sanladerer] is here to advance the status quo of desktop 3D printing. Not content with a 3D printer that spends its time loafing around the workshop, he decided to build a completely mobile 3D printer. For a guy who spends a lot of time traveling to different 3D printing conferences and shows, this is actually a pretty handy thing to have around, but there are probably some lessons to be learned here even if you aren’t a 3D printing YouTube celebrity.

Given the wide array of very popular low cost 3D printers out there, some will likely be surprised that [Thomas] decided to mobilize a printer which is nearly an antique at this point: the PrinterBot Play. But as he explains in the video after the break, the design of the Play really lends itself perfectly to life on the road. For one, it’s an extremely rigid printer thanks to its (arguably overkill) steel construction. Compared to most contemporary 3D printers which are often little more than a wispy collection of aluminium extrusion and zip ties, the boxy design of the Play also offers ample room inside for additional electronics and wiring

The most obvious addition to the PrintrBot is the six Sony NP-F camera batteries that [Thomas] attaches to the back of the printer by way of 3D printed mounts, but there’s also quite a bit of hardware hidden inside to break the machine free from its alternating current shackles. The bank of batteries feed simultaneously into a DC boost converter which brings the battery voltage up to the 12 V required for the printer’s electronics and motors, and a DC regulator which brings the voltage down to the 5 V required by the Raspberry Pi running OctoPrint. There’s even a charge controller hiding in there which not only frees him from carrying around a separate charger, but lets him top up the cells while the printer is up and running.

On the software side of things, the Raspberry Pi is configured to work as a WiFi access point so that OctoPrint can be controlled with a smartphone even if there’s no existing network in place. A fact demonstrated when he takes the printer outside for a walk while it’s in the middle of a job. The ability to control the printer without any existing infrastructure combined with the estimated six hour runtime on a charge means this modified PrinterBot can get the job done no matter where [Thomas] finds himself.

The hacker community was saddened by the news that PrintrBot was closing its doors last year, an unfortunate casualty of an increasingly competitive desktop 3D printing market. But perhaps we can take some comfort from the fact that their eminently hackable open source printers still live on in projects such as this.

Continue reading “Building A 3D Printer That Goes Where You Do”

Automate Your Home From The Clearance Rack

The month or so after the holidays have always been a great time to pick up some interesting gadgets on steep clearance, but with decorations and lights becoming increasingly complex over the last few years, the “Christmas Clearance” rack is an absolute must see for enterprising hackers. You might just luck out like [ModernHam] and find a couple packs of these dirt cheap wireless light controllers, which can fairly easily be hacked into the start of a home automation system with little more than the Raspberry Pi and a short length of wire.

In the video after the break, [ModernHam] walks the viewer through the start to finish process of commanding these cheap remote plugs. Starting with finding which frequencies the remotes use thanks to the FCC database and ending with using cron to schedule the transmission of control signals from the Pi, his video really is a wealth of information. Even if you don’t have this particular model of remote plug, or don’t necessarily want to setup a home automation system, there’s probably some element of this video that you could still adapt to your own projects.

The first step of the process is figuring out how the remote is communicating to the plugs. [ModernHam] noticed there was no frequency listed on the devices, but using their FCC IDs he was able to find the relevant information. In the United States, devices like these must have their FCC IDs visible (though they could be behind a battery door) by law, so the searchable database is an invaluable tool to do some basic reconnaissance on a poorly documented gadget.

An RTL-SDR receiver is then used to fine tune the information gleaned from the FCC filing. [ModernHam] found that the signals for all four of the remote plugs were being broadcast on the same frequency, which makes controlling them all the easier. Using the rtl-sdr command, he was able to capture the various signals from the transmitter and save them to separate files. Then it’s just a matter of replaying the appropriate file to get the plugs to do your bidding.

Of course, the RTL-SDR can’t transmit so you’ll have to leave your dongle behind for this last step. Luckily all you need to transmit is the rpitx package created by [F5OEO], along with a supported Raspberry Pi and a small length of wire attached to the appropriate GPIO pin. This package contains the tool sendiq which can be used to replay the raw captures made in the previous step. With some scripting, it’s fairly straightforward to automate these transmissions to control the remote plugs however you wish from the Pi.

The RTL-SDR Blog put together their own guide for “brute forcing” simple remote control devices like this as well, and we’ve even seen similar techniques used against automotive key fobs in the past. Amazing what a piece of wire and some clever code can pull off.

Continue reading “Automate Your Home From The Clearance Rack”

An Arduino Carbon Fiber Wrapping Machine

Many of the projects we feature on Hackaday are motivated by pure greed. Not on the part of the hacker, mind you; but rather the company that’s charging such an outrageous price for a mass produced item that somebody decides they can do the same thing cheaper as a one-off project. Which is precisely how [Bryan Kevan] ended up building his own carbon fiber tube wrapping machine. Not only do the finished tubes look fantastic, but they cost him a fraction of what even the “cheap” commercial ones cost.

The principle behind producing the tubes is really pretty simple: carbon fiber ribbon (or “tow”, in the official parlance) gets wrapped around a rotating mandrel, ideally in interesting patterns, and epoxy is added to bind it all together. When it’s hardened up, you slide the new carbon fiber tube off the mandrel and away you go building a bike frame or whatever it is you needed light and strong tubes for. You could even do it by hand, if you had enough patience.

[Bryan] had done it by hand before, but was looking for a way to not only automate the process but make the final product a bit more uniform-looking. His idea was to rotate a horizontal PVC pipe as his mandrel, and move a “car” carrying the carbon fiber ribbon back and forth along its length. The PVC pipe just needs to rotate along its axis so he figured that would be easy enough; and using a GT2 belt and some pulleys, getting the carbon-laying car moving back and forth didn’t seem like much of a challenge either.

The frame of the winder is built from the hacker’s favorite: 20/20 aluminum extrusion. Add to that an Arduino Uno, two stepper motors with their appropriate drivers, and the usual assortment of 3D printed odds and ends. [Bryan] says getting the math figured out for generating interesting wrap patterns was a bit tricky and took a fair amount of trial and error, but wasn’t a showstopper. Though we’d suggest following his example and using party ribbon during testing rather than the carbon stuff, as producing a few bird nests at the onset seems almost a guarantee.

One of the trickiest parts of the project ended up being removing the carbon fiber tubes from the PVC mandrel once they were done. [Bryan] eventually settled on a process which involved spraying the PVC with WD-40, wrapping it in parchment paper, and then using a strip of 3M blue painter’s tape to keep the parchment paper from moving. If you can toss the whole mandrel in the freezer after wrapping to shrink it down a bit, even better.

So was all this work worth it in the end? [Bryan] says he was originally looking at spending up to $70 USD per foot for the carbon fiber tubes he needed for his bike frame, but by buying the raw materials and winding them himself, he ended up producing his tubes for closer to $3 per foot. Some might question the strength and consistency of these DIY tubes, but for a ~95% price reduction, we’d be willing to give it a shot.

Years ago we covered a Kickstarter campaign for a very similar carbon winder. Probably due to the relatively limited uses of such a gadget, the winder didn’t hit the funding goal. But just like the current wave of very impressive homebrew laser cutters, the best results might come from just building the thing yourself.

Arduino Tachometer Clock Fires On All Cylinders

We’re certainly no strangers to unique timepieces around these parts. For whatever reason, hackers are obsessed with finding new and interesting ways of displaying the time. Not that we’re complaining, of course. We’re just as excited to see the things as they are to build them. With the assumption that you’re just as enamored with these oddball chronometers as we are, we present to you this fantastic digital tachometer clock created by [mrbigbusiness].

The multi-function digital gauge itself is an aftermarket unit which [mrbigbusiness] says you can get online for as little as $20 from some sites. All he needed to do was figure out how to get his Arduino to talk to it, and come up with some interesting way to hold it at an appropriate viewing angle. The mass of wires coming out of the back of the gauge might look intimidating, but thanks to his well documented code it shouldn’t be too hard to follow in his footsteps if you were so inclined.

Hours are represented by the analog portion of the gauge, and the minutes shown digitally were the speed would normally be displayed. This allows for a very cool blending of the classic look of an analog clock with the accuracy of digital. He’s even got it set up so the fuel indicator will fill up as the current minute progresses. The code also explains how to use things like the gear and high beam indicators, so there’s a lot of room for customization and interesting data visualizations. For instance, it would be easy to scrap the whole clock idea and use this gauge as a system monitor with some modifications to the code [mrbigbusiness] has provided.

The gauge is mounted to a small project box with some 3D printed brackets and bits of metal rod, complete with a small section of flexible loom to cover up all the wires. Overall it looks very slick and futuristic without abandoning its obvious automotive roots. Inside the base [mrbigbusiness] has an Arduino Nano, a DS1307 RTC connected via I2C, a voltage regulator, and a push button to set the time. It’s a perfectly reasonable layout, though we wonder if it couldn’t be simplified by using an ESP8266 and pulling the time down with NTP.

We’ve seen gauges turned into a timepiece before, but we have to admit that this is probably the most practical realization we’ve seen of the idea yet. Of course if you want to outfit the garage with something a bit more authentic, you can always repurpose a Porsche brake rotor.