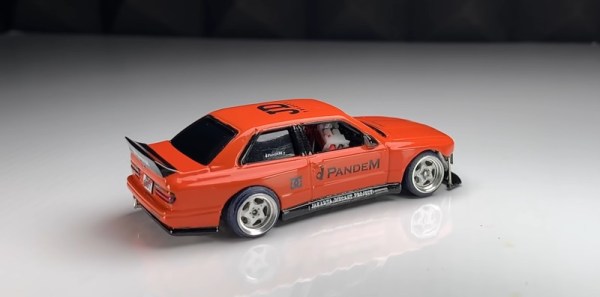
Mechanical Seven-Segment Display, Smaller And Better Than The Original

One thing we love here at Hackaday is when we get to track the evolution of a project over time. Seeing a project grow over time is pretty typical — scope creep is real, after all. But watching a project shrink can be a real treat too, as early versions get refined into sleeker and more elegant solutions.

This slimmed-down mechanical seven-segment display is a perfect example of that downsizing trend. When we saw [IndoorGeek]’s first vision of an electromechanical display, it was pretty chunky. Then as now, each segment is a 3D-printed piece with a magnet attached to the rear. The segments hover over solenoid coils, which when energized repel the magnet and protrude the segment, forming the desired digit. The old version used large, hand-wound coils, though, making the display pretty bulky front to back.

Version 2 of the display takes a page from [Carl Bugeja]’s playbook and replaces the wound coils with PCB coils. We’ve seen [Carl]’s coils on both rigid substrates and flex PCBs; [IndoorGeek] used plain old FR4 here. The coils occupy four layers so they have enough oomph to extend and retract each segment, and the PCB includes space for H-bridge drivers for each segment. The PCB forms the rear cover for the display, which is also considerably slimmed down for this version. What’s the same, though, is how good this display looks, especially with strong side-lighting — the shadows cast by the extended segments are striking against the plain white face of the display.

Congratulations to [IndoorGeek] on a great-looking build and a useful improvement over the original.

Continue reading “Mechanical Seven-Segment Display, Smaller And Better Than The Original”

Sewage Maceration Is As Gross As It Sounds

Day to day, few of us really contemplate what’s happening on a deep, mechanical level when we use the toilet. The business is done, the toilet is flushed, and we go about our day. However, the magnificent technology of indoor sanitation should not be sniffed at, given the manner in which it facilitates a cleaner, more comfortable existence for us all.

The vast majority of flush toilets rely on the benefit of gravity to remove waste from the house. This necessitates that the toilet be installed above the sewage lines that exit the house. For most installations at ground floor and above, this isn’t a problem. However, on occasions you may encounter basements or houses with rooms at lower levels where a regular toilet simply won’t work. Obviously, a pump is in order, but human sewage being a mixture of liquids and solids makes this impractical. Instead, it must be turned into a slurry that can be pumped; a process known as sewage maceration. Buckle up!

Continue reading “Sewage Maceration Is As Gross As It Sounds”

Zoom Out Of The Classroom With A Mushroom Button

Considering the state of well, everything, we can’t tell you how glad we are to be out of school. That goes double for not being a teacher these days. [Elena] had some awesome light-up tactile buttons set aside for a killer Kerbal Space Program controller, but it’s funny how a pandemic will change your priorities. Instead, those buttons found a good home in this colorful and enticing Zoom control panel.

[Elena]’s ready pile of Arduinos yielded no Leonardos or Pro Micros, but that’s okay because there’s a handy bootloader out there that allows you to reprogram the USB interface chip of an Uno or a Mega and use it as a keyboard. After setting that up, it was mostly a matter of wiring all those latching and momentary buttons and LEDs to the Mega and making them look fantastic with a set of icons. (We all know the big red mushroom button is for aborting the call; so does it really need an icon?)

[Elena] was inspired by the Zoom call-terminating pull chain we saw a month or so ago as well as the pink control box that launched a thousand or so macro keyboards. Have you made your own sanity-saving solution for our times? Let us know!

A Four-Year-Old Event Badge Makes An Environmental Sensor

By now we’re all used to the requirements imposed by the pandemic, of social distancing and wearing masks indoors. But as [polyfloyd] and the rest of the board at Bitlair hackerspace in Amersfoort in the Netherlands were concerned, there are still risk factors to consider when inside a building.  Without fresh air the concentration of virus-bearing droplets can increase, and the best way they could think of to monitor this was to install a set of CO2 sensors. To run them they didn’t need to buy any new hardware, instead they turned to a set of event badges, from 2017s SHA hacker camp.

This badge sported an ESP32 module with an e-ink screen, and of most interest for this project it still has a supported software platform and comes with a handy expansion connector on the rear. The commonly-available MH-Z19 infra-red CO2 sensor and BME280 humidity sensor fit on a PCB that follows the shape of the badge with a protrusion at the top on which they appear as an integrated unit. Processing those readings is a MicroPython badge app that issues warnings via MQTT and plots a CO2 graph on the screen. Everything is available, both the hardware in a GitHub repository and the software as a badge.team app.

We applaud anyone who makes use of an event badge for a project, and especially so for using one years after the event. The SHA badge and its descendants are uniquely suited to this through their well-supported platform, so if you have one in a drawer we’d urge you to pull it out and give it a try.

A Not-So-Alarming Clock

By and large, alarm clocks (including phones that double as alarm clocks) are annoyingly alarming. If it’s not the light or the sound, it’s both. Yes, we know that’s the point of an alarm clock, but sometimes life presents opportunities to check the time and/or the weather and sleep in a little bit longer based on the result. We don’t know about you, but loud noises and eye-blasting light are not conducive to getting back to sleep, especially if you’re a light sleeper.

In [Stavros Korokithakis]’ case, if it’s a tennis practice morning but it’s raining, then it’s no longer a tennis practice morning and he can go back to sleep for a while. A phone seems perfect for this, but the problem is that it provides too much information: the phone can’t check the weather without the internet, and once it has internet access, a bunch of eye-opening notifications come flooding in.

[Stavros] had a long list of must-haves when it came to building the ultimate alarm clock, and we can totally get behind that. He needed something smarter than the average off-the-shelf clock radio, but nothing too smart. Enter the ESP8266. As long as it has an internet connection, it can fetch the time and the weather, which is really all that [Stavros] needs. It gets the current temperature, wind speed, and forecast for the next two hours with the OpenWeather API, and this information is converted to icons that are easy to read at a sleepy, one-eyed glance at the OLED.

Adaptive brightness was high on the list of must-haves, which [Stavros] solved by adding a photoresistor to judge the ambient light and adjust the OLED screen brightness appropriately. And he really did think of everything — the octagonal shape allows for the perfect angle for reading from bed. There’s just one problem — it can’t accept input, so it doesn’t actually function as an alarm clock. But it makes a damn good bedside clock if you ask us.

If you really want to start the morning right, use a winch to yank the covers off of you.

Via Adafruit

Retrotechtacular: Design For Assembly, 1980s-Style

To get its engineers thinking about design for assembly back in the 1980s, Westinghouse made a video about a product optimized for assembly: the IBM Proprinter. The technology may be dated, but the film presents a great look at how companies designed not only for manufacturing, but also for ease of assembly.

It’s not clear whether Westinghouse and IBM collaborated on the project, but given the inside knowledge of the dot-matrix printer’s assembly, it seems like they did. The first few minutes are occupied by an unidentified Westinghouse executive talking about design for assembly in general terms, and how it impacts the bottom line. Skip ahead to 3:41 if talking suits aren’t your thing.

Once the engineer gets going on the printer, though, things get really interesting. The printer’s guts are laid out before him, ready to be assembled. What’s notably absent from the table are tools — the Proprinter was so well designed that the only tool needed is a pair of human hands. And they don’t have to be particularly dexterous hands, either — the design favors motions that are straight down, letting gravity assist the assembly process and preventing assemblers from the need to contort their bodies. Almost everything is held in place by compliant mechanisms built into the plastic parts. There are a few gems in the film, like the plastic lead screw that drives the printhead, obviating the need to string a fussy timing belt, or the unique roller that twists to lock onto a long shaft, rather than having to be pushed to its center.

We found this film which we’ve placed below the break to be very instructive, and the fact that a device as complex as a printer can be assembled in just a few minutes without picking up a single tool is pretty illustrative of the power of designing for assembly. Slick designs that can’t be manufactured at scale are all too common in this age of powerful design tools and desktop manufacturing, so these lessons from the past might be worth relearning.

Continue reading “Retrotechtacular: Design For Assembly, 1980s-Style”

Driving Upside Down With An RC Fan Car

We’ve all seen those tiny little RC cars that can climb walls thanks to the suction generated with fans. Their principle is essentially the opposite to that of a hovercraft. [Engineering After Hours] wanted to build his own RC car that could do the same, driving upside down and generating huge amounts of grip.

The build is based on a Traxxas RC car, but heavily modified for the task. An undertray is crafted, with ducts feeding a pair of twin 50mm electric fans. A skirt is fitted around the edge of the undertray, helping create a seal to maximise the downforce generated. This skirt is the area of much engineering effort, as it must form a good seal with the ground, particularly over minor pertubations, without creating undue levels of friction. Suspension components correspondingly need to be beefed up to stop the car bottoming out with the huge downforce generated by the fan system.

After much experimentation, the kinks are worked out, and the car is able to drive upside down successfully. It generates far more downforce than earlier wing experiments from [Engineering After Hours], as expected – with a tradeoff of higher weight and complexity. With the plan to create an RC car capable of huge lateral acceleration, we can’t wait to see what comes next. Video after the break.

Continue reading “Driving Upside Down With An RC Fan Car”