Dissecting The TL-WR841N For Fun And Profit

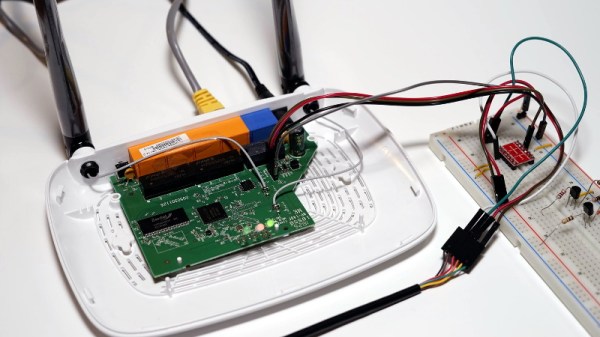
The TP-Link TL-WR841N isn’t a particularly impressive piece of hardware, but since it works decently well and sells for under $20 USD, it’s one of the most popular consumer routers on Amazon. Now, thanks to [TrendyTofu] of the Zero Day Initiative, we now have a concise step-by-step guide on how to hack your way into the newer versions of the hardware and take full control over this bargain WiFi device. This work was initially done to help test out reported vulnerabilities in the router’s firmware, but we’re sure the readers of Hackaday can come up with all sorts of potential uses for this information.

TP-Link helpfully labeled the UART pins

The story starts, as so many before it have, with a serial port. Finding the UART pads on the PCB and wiring up a level shifter was no problem, but [TrendyTofu] found it was only working one-way. Some troubleshooting and an oscilloscope later, the culprit was found to be a 1kΩ pull down resistor connected to the RX line that was keeping the voltage from peaking high enough to be recognized.

Once two-way communication was established, proper poking around inside the router’s Linux operating system could begin. It wasn’t a huge surprise to find the kernel was ancient (version 2.6.36, from 2010) and that the system utilities had been stripped to the absolute bare minimum to save space. Replacing the firmware entirely would of course be ideal, but unfortunately OpenWRT has dropped support for the newer hardware revisions of the TL-WR841N.

To teach this barebones build of Linux some new tricks, [TrendyTofu] used the mount command to find a partition on the system that actually had write-access, and used that to stash a pre-compiled build of BusyBox for MIPS. With a more complete set of tools, the real fun could begin: using GDB to debug TP-Link’s binaries and look for chinks in the armor. But feel free to insert your own brand of mayhem here.

You might think that in the era of the Raspberry Pi, abusing cheap routers to turn them into general purpose Linux boxes would be somewhat out of style. Frankly, you’d be right. But while the days of strapping Linksys WRT54Gs to remote controlled cars might be long be gone, there are still some routers out there interesting enough to make it worth dusting off this time-honored hardware hacker tradition.

Smoothieboard Gets An Ambitious Update For V2

If you’ve been reading Hackaday for awhile, there’s an excellent chance you’ve seen a project or two powered by the Smoothieboard. The open source controller took Kickstarter by storm in 2013, promising to be the last word in CNC thanks to its powerful 32-bit ARM processor. Since then we’ve seen it put to use in not only the obvious applications like 3D printers and laser cutters, but also for robotic arms and pick-and-place machines. If it moves, there’s a good chance you can control it with the Smoothieboard.

But after six years on the market, the team behind this motion control powerhouse has decided it’s time to freshen things up. The Kickstarter for the Smoothieboard v2 has recently gone live and, perhaps unsurprisingly, already blown past its funding goal. Rather than simply delivering an upgraded Smoothieboard, the team has also put together a couple “spin-offs” targeting different use cases. If Smoothie v1 was King of CNC boards, then v2 is aiming to be the Royal Family.

Smoothieboard v2-Prime with breakouts

The direct successor to the original board is called v2-Prime, and it’s everything you’d expect in an update like this. Faster processor, more RAM, more flash, and improved stepper drivers. There’s also available GPIO expansion ports to connect various breakout boards, and even a header for you to plug in a Raspberry Pi. If you’re looking to upgrade your existing Smoothieboard machines to the latest and greatest, the Prime is probably what you’re after.

Then there’s the v2-Mini, designed to be as inexpensive as possible while still delivering on the Smoothieboard experience. The Mini has the same basic hardware specs as the Prime, but uses lower-end stepper drivers and deletes some of the protection features found on the more expensive model. For a basic 3D printer or laser cutter, the Mini and its projected $80 price point will be a very compelling option.

In the other extreme we have the v2-Pro, which is intended to be an experimenter’s dream come true. It features more stepper drivers, expansion ports, and even an integrated FPGA. Realistically, this board probably won’t be nearly as popular as the other two versions, but the fact that they’ve even produced it shows how committed the team is to pushing the envelope of open source motion control.

Our coverage of the original Smoothieboard campaign back in 2013 saw some very strong community response, with comments ranging from excited to dismissive. Six years later, we think the team behind the Smoothieboard has earned a position of respect among hackers, and we’re very excited to see where this next generation of hardware leads.

Continue reading “Smoothieboard Gets An Ambitious Update For V2”

10-Way Game Console Lets Everyone Play

[Bitluni]’s motto seems to be, “When you’re busy, get busier.” At least that would explain adding even more work to his plate in the run-up to the Hanover Maker Faire and coming up with a ten-player game console from scratch.

As for this being extra work, recall that [bitluni] had already committed to building a giant ping pong ball LED wall for the gathering. That consisted of prototyping a quarter-scale panel, building custom tooling to get him past the literal pain point of punching 1200 holes, and wiring, programming and testing the whole display. Building a game console that supports ten players at once seems almost tame by comparison. The console is built around an ESP32 module, either WROOM or WROVER thanks to a clever multifunctional pad layout on the slick-looking white PCBs. [bitluni] went with a composite video output using the fast R-2R ladder network DAC that he used for his ESP32 VGA project. The console supports ten Nintendo gamepads for a simple but engaging game something like the Tron light cycles. Unsurprisingly, players found it more fun to just crash into each other on purpose.

Sure, it could have been biting off more than he could chew, but [bitluni] delivered and we appreciate the results. There’s something to be said for adding a little pressure to the creative process.

Continue reading “10-Way Game Console Lets Everyone Play”

Custom Lego Server Case Looks As Though It Came Straight From A Data Center

The picture above appears to show two unremarkable 2U rack servers, of the kind that are probably hosting the page you’re reading right now. Nothing special there – until you look carefully and realize that the rack server case on the left is made entirely from Lego. And what’s more, the server even works.

When it comes to building Lego computers, [Mike Schropp] is the guy to call. We’ve previously featured his Lego gaming computer, a striking case wrapped around what was a quite capable machine by 2016 standards, as well as an earlier case that reminds us a little of a NeXT. His reputation for Lego-clad computers led server maker Silicon Mechanics to commission a case for a trade show, and [Mike] jumped at the challenge.

Making a home-grade machine is one thing, but supporting all the heavy drives, power supplies, and fans needed to make the machine work is something else. He used a combination of traditional Lego pieces along with a fair sampling of parts from the Lego Technics line to pull off the build, which looks nearly perfect. Sadly, the Lego unit sizes make the case slightly taller than 2U, but that’s a small quibble when everything else matches so well, even the colors. And the fact that the server works, obviously important for a trade show demo, is pretty amazing too. The power supplies are even hot-swappable!

Congratulations to [Mike] on yet another outstanding Lego creation.

Rideable Tank Tread: It’s A Monotrack Motorcycle That Begs You To Stop Very Slowly

There will always be those of us who yearn for an iron steed and the wind through your hair. (Or over your helmet, if you value the contents of your skull.) If having fun and turning heads is more important to you than speed or practicality, [Make it Extreme] has just the bike for you. Using mostly scrapyard parts, they built a monotrack motorcycle — no wheels, just a single rubber track.

[Make it Extreme] are definitely not newcomers to building crazy contraptions, and as usual the entire design and build is a series of ingenious hacks complimented by some impressive fabrication skills. The track is simply a car tyre with the sidewalls cut away. It fits over a steel frame that can be adjusted to tension the track over a drive wheel and a series of rollers which are all part of the suspension system.

Power is provided by a 2-stroke 100cc scooter engine, and transmitted to the track through a drive wheel made from an old scuba tank. What puts this build over the top is that all of this is neatly located inside the circumference of the track. Only the seat, handlebars and fuel tank are on the outside of the track. The foot pegs are as far forward as possible, which helps keep your center of gravity when stopping. It’s not nearly as bad as those self-balancing electric monocycles, but planning stops well in advance is advisable.

While it’s by no means the fastest bike out there it definitely looks like a ton of fun. Build plans are available to patrons of [Make it Extreme], but good luck licensing one as your daily driver. If that’s your goal, you might want to consider adding a cover over the track between the seat and handlebars to prevent your khakis from getting caught on your way to the cubicle farm.

Continue reading “Rideable Tank Tread: It’s A Monotrack Motorcycle That Begs You To Stop Very Slowly”

Handheld LoRa Joystick For Long-Range Bots

Wanting a simple tool to aid in the development of LoRa controlled robotic projects, [Jay Doscher] put together this very slick one-handed controller based on the 900 MHz Adafruit Feather M0. With a single trigger and a miniature analog joystick it’s a fairly simple input device, but should be just enough to test basic functionality of whatever moving gadget you might find yourself working on.

Wiring for this project is about as simple as you’d expect, with the trigger and joystick hanging off the Feather’s digital ports. The CircuitPython code is also very straightforward, though [Jay] says in the future he might expand on this a bit to support LoRaWAN. The controller was designed as a barebones diagnostic tool, but the hardware and software in its current form offers an excellent opportunity to layer additional functionality on a known good base.

Everything is held inside a very well designed 3D printed enclosure which [Jay] ran off on his ELEGOO Mars, one of the new breed of low-cost resin 3D printers. The machine might be pretty cheap, but the results speak for themselves. While resin printing certainly has its downsides, it’s hard not to be impressed by the finish quality of this enclosure.

While LoRa is generally used for transmitting small bits of information over long distances, such as from remote sensors, this isn’t the first time we’ve seen it used for direct control of a moving object. If you’re not up to speed on LoRa, check out this excellent talk from [Reinier van der Lee] that goes over the basics of the technology and how he used it to build a community sensor network.

Smart Buoy Rides The Citizen Science Wave

Those beautiful and dangerous ocean waves that beckon us to the coast are more than just a pretty sight. They can tell us a lot about weather patterns and what the sea itself is doing. As vital as this information is, the existing methods of doing wave research are pretty expensive. The team at [t3chflicks] wanted to show it can be done fairly cheaply, to encourage more citizen scientists to contribute. More data means a better understanding, and open research benefits even those who don’t actively participate.

They have developed a smart buoy that collects wave data and transmits it back to a base station for real-time display. The buoy runs on an 18650 that gets recharged by four 5V solar panels situated around the top half of the 3D-printed hull. An Arduino inside the buoy controls the sensors, most of which are baked into the GY-86 10-DOF module. The antenna on top sends the data back to a Raspi Zero base station, which charts wave height, wave period, wave power, water and air temperature, and barometric pressure in real-time on a spiffy Vue JS dashboard.

The team had their ups and downs during this project. They wanted to measure wave direction, but it proved a bit too complicated. And memory issues prevented them from backing up the data to an on-buoy SD card. You can catch the more in-depth hardware and software videos on their YouTube channel. We’ve got the smart buoy summary video tied up and floating just after the break.

Want to help buoy wave research, but don’t have a 3D printer? Sealed PVC makes a fine flotation device, as we saw in this water quality-sensing buoy.

Continue reading “Smart Buoy Rides The Citizen Science Wave”