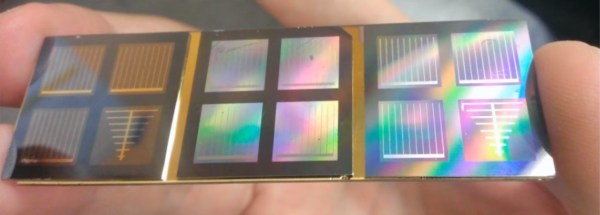
Cocktail mixing machine

Cocktail Machine Mixes Perfect Drinks Every Time

For many of us. the holiday season is coming up and that means hosting parties and mixing drinks, which can get tiresome. [GreatScott] has come up with a solution, what he calls a crude cocktail mixing machine. But don’t be fooled — it may look crude on the surface, and vibrate a bit while working, but the mechanism is plenty sound and functional.

The machine can mix three different liquids and does so using three peristaltic pumps. In typical [GreatScott] style, while he tears apart the pumps to replace the tubes, he gives us a good glimpse of just how they work. Using a knob and LCD screen, you can enter any quantity you want for the three liquids, though you’ll have to edit the Arduino code if you want to change the liquids’ names.

Load cell
Load cell

How does the machine know when to stop pumping a certain liquid? Each pump is rated for a specific quantity per second, though he tests this for each liquid anyway and finds a slight variation which he accounts for in the code. After the machine turns a pump on, a load cell located under the glass tells it when liquid has started arriving at the glass. A simple calculation based on the pump’s quantity per second and the desired quantity tells it how long to leave the pump on for. When the times up, it stops the pump. The result is a machine that’s sure to be a centerpiece for any hacker-filled party. Check out his build and the pump in action in the video below.

Continue reading “Cocktail Machine Mixes Perfect Drinks Every Time”

Keep Track Of Your Weight While Sleeping

When the average person looks at a bed, they think about sleeping. Because that’s what beds are for. You cover them with soft, warm cloths and fluffy pillows and you sleep on them. [Peter] is not your average person. He’s a maker. And when he looks at a bed, he thinks about giving it the ability to track his weight.

The IKEA bed has four Chinese-made TS-606 load cells under each foot with custom aluminum enclosures. Each one goes to an HX711 analog-to-digital converter, which offers a 24 bit resolution. These feed an Arduino Nano which in turns connects to a Raspberry Pi via USB to UART bridge. Connecting to the Pi allows [Peter] to get the data onto his home network, where he plots the data to gnuplot.

This smart bed doesn’t just track [Peter’s] weight. It can also track the weight of other people in the house, including his pets. Be sure to check his GitHub for full source code.

Laser Cutter Alignment Mod Skips Beam Combiner

A lot of the DIY laser engravers and cutters we cover here on Hackaday are made with laser diodes salvaged from Blu-ray drives and projectors, which are visible lasers in the 400 – 450nm range (appearing as violet or blue). Unfortunately there is an upper limit in terms of power on visible diode lasers, most builds max out at 5W or so. If you need more power than that, you’ll likely find yourself looking at gas laser cutters like the K40. While the K40 is a great starting point if you’re looking to get into “real” lasers, it’s a very different beast from the homebrew builds using visible lasers.

With a gas laser the beam itself is invisible, making it much more difficult to align or do test runs. One solution is to add a visible laser to the K40 which can be used to verify alignment, but making sure it’s traveling down the same path as the primary laser usually requires an expensive beam combiner. Looking to avoid this cost, [gafu] wanted to see if it was possible to simply move the visible laser into the path of the primary beam mechanically.

An adjustable microswitch detects when the lid has been opened.

In the setup that [gafu] has come up with, a cheap laser module (the type from a handheld laser pointer) is moved into the path of the primary laser on an arm that’s actuated by a simple hobby servo. To prevent the primary and visible lasers from firing at the same time, an Arduino is used to control the servo given the current state of the K40’s lid. If the lid of the K40 is open, the primary laser is shutoff and the visible laser is rotated into position so the operator can see where the primary laser’s beam would be hitting. Once the lid is closed, the visible laser rotates out of the way and the primary is powered back up.

Running the cutting or engraving job with the lid of the K40 machine open now let’s [gafu] watch a “dry run” of the entire operation with the visible laser before finally committing to blasting the target with the full power beam.

We’ve covered many hacks and modifications for everyone’s favorite entry-level CO2 laser cutter. From replacing the controller to making it bigger, K40 owners certainly seem like a creative bunch.

Make Christmas Commercial Again With This Tiny TV Ornament

Readers of a certain age will remember a time when the Christmas season in the US officially kicked off after Thanksgiving. That was when advertisers began saturation bombing the communal mind with holiday-themed TV commercials night and day. Broadcast TV no longer holds sway like it did back then, and advertisers now start their onslaught in September, but you can put a little retro-commercialism back to Christmas with this 90s Christmas commercial-playing ornament for your tree.

The idea came to [SeanHodgins] after stumbling upon a collection of Christmas commercials from the 1990s on YouTube. With his content identified, he set about building a tree-worthy display from a Pi Zero W and a TFT LCD display. An audio amp and tiny speaker from an old tablet and a LiPo battery and charger form the guts of [Sean]’s TV, which were stuffed into a 3D-printed TV case, appropriately modeled after the TV from The Simpsons. The small fresnel lens that mimics the curved screens of yore is a nice touch. The software has some neat tricks, such as an HTTP server that accepts the slug of a YouTube video, fetches the MP4, and automatically plays it. We prefer our Christmas tree ornaments a little quieter, so a volume control would have been nice, but aside from that this looks like a ton of fun.

This isn’t [Sean]’s first foray into tricked-out ornaments, of course; readers might recall his IoT cheer-measuring Christmas ornaments from last season.

Continue reading “Make Christmas Commercial Again With This Tiny TV Ornament”

The Internet Of Blast Gates

There’s nothing quite like building out a shop filled with tools, but even that enviable task has a lot of boring work that goes into it. You’ve got to run power, you’ve got to build benches, and you need to build a dust collection system. That last one is usually just fitting a bunch of pipe and tubes together and adding in a few blast gates to direct the sucking of your dust collection system to various tools around the shop.

For most shops with a handful of tools and dust collection ports, manually opening and closing each blast gate is an annoying if necessary task. What if all of this was automated, though? That’s what [Bob] over on I Like To Make Stuff did. He automated his dust collection system. When a tool turns on, so does the vacuum, and the right blast gate opens up automatically.

The first part of this build is exactly what you would expect for installing a dust collection system in a shop. The main line is PVC sewer pipe tied to the rafters. Yes, this pipe is grounded, and s otherwise not very interesting at all. The real fun comes with the bits of electronics. [Bob] modified standard blast gates to be servo-actuated. Each individual tool was wired up to a current sensor at the plug, and all of this was connected to an Arduino. With a big ‘ol relay attached to the dust collection system, the only thing standing in the way of complete automation was a bit of code.

This project is a continuation of [Bob]’s earlier Arduinofication of his dust collection system where all the blast gates were controlled by servos, an Arduino, and a numeric keypad. That’s an exceptionally functional system that gets around the whole ‘leaning over a machine to open a gate’ problem, but it’s still not idiot-proof – someone has to press a button to open a gate. This new system is, for the most part, completely automatic and doesn’t really require any thought on the part of the operator. It’s neat stuff, and a great application of cheap Arduinos to make shop life a bit easier.

Continue reading “The Internet Of Blast Gates”

A Remote Controlled Air-Plane

The Air Hogs Sky Shark was a free-flying model airplane powered by compressed air. When it was released in the late ’90s, it was a fairly innovative toy featuring a strikingly novel compressed air engine made entirely out of injection molded plastic. Sales of these model planes took off, and landed on the neighbor’s roof, never to be seen again.

A few weeks ago, [Tom Stanton] revisited this novel little air-powered motor by creating his own 3D printed copy. Yes, it worked, and yes, it’s a very impressive 3D print. That build was just on a workbench, though, and to really test this air motor out, [Tom] used it to propel a remote-controlled plane through the air.

The motor used for this experiment is slightly modified from [Tom]’s original air-powered motor. The original motor used a standard 3-blade quadcopter prop, but the flightworthy build is using a much larger prop that swings a lot more air. This, with the addition of a new spring in the motor and a much larger air tank constructed out of plastic bottles results in a motor that’s not very heavy but can still swing a prop for tens of seconds. It’s not much, but it’s something.

The airframe for this experiment was constructed using [Tom]’s 3D printed wing ribs, a carbon fiber boom for the tail, and only rudder and elevator controls. After figuring out some CG issues — the motor doesn’t weigh much, and planes usually have big batteries in the nose — the plane flew remarkably well, albeit for a short amount of time.

Continue reading “A Remote Controlled Air-Plane”

Mike Harrison At The Superconference: Flying LCD Pixels

Mike Harrison, perhaps better known to us as the titular Mike of YouTube channel mikeselectricstuff, is a hardware hacking genius. He’s the man behind this year’s Superconference badge, and his hacks and teardowns have graced our pages many times. The best thing about Mike is that his day job is designing implausibly cool one-off hardware for large-scale art installations. His customers are largely artists, which means that they just don’t care about the tech as long as it works. So when he gets together with a bunch of like-minded hacker types, he’s got a lot of pent-up technical details that he just has to get out. Our gain.

He’s been doing a number of LCD installations lately. And he’s not using the standard LCD calculator displays that we all know and love, although the tech is exactly the same, but is instead using roughly 4″ square single pixels. His Superconference talk dives deep into the behind-the-scenes cleverness that made possible a work of art that required hundreds of these, suspended by thin wires in mid-air, working together to simulate a flock of birds. You really want to watch this talk.


Continue reading “Mike Harrison At The Superconference: Flying LCD Pixels”