Helicopter Pendulum Is PID-licious

If you’ve ever tried to tune a PID system, you have probably encountered equal parts overwhelming math and black magic folk wisdom. Or maybe you just let the autotune take over. If you really want to get some good intuition for motion control algorithms, PID included, nothing beats a little hands-on experimentation.

To get you started, [Clovis] wrote in with his budget propeller-based PID demo platform (Portuguese, translated shockingly well here).

The basic setup is a potentiometer glued to a barbecue skewer with a mini-quadcopter motor and rotor on the end of it. A microcontroller reads the voltage and PWMs the propeller through a MOSFET. The goal is to have the pendulum hover stably in midair, controlled by whatever algorithms you can dream up on the controller. [Clovis]’ video demonstrates on-off and PID control of the fan. Adding a few more potentiometers (one for P, I, and D?) would make hands-on tweaking even more interactive.

In all, it’s a system that will only set you back a few bucks, but can teach you more than you’d learn in a month in college. Chances are good that you’re not going to have exactly the same brand of sardine can on hand that he did, but some improvisation is called for here.

If you don’t know why you’d like to master open-loop closed-loop control algorithms, here’s one of the best advertisements that we’ve seen in a long time. But you don’t have to start out with hand-wound hundred-dollar motors, or precisely machined bits. As [Clovis] demonstrates, you can make do with a busted quadcopter and whatever you find in your kitchen.

Continue reading “Helicopter Pendulum Is PID-licious”

Furuta Style Inverted Pendulum Is King Of Geek Desk Ornaments

Newton’s Cradle is thought of as the most elegant of executive desk toys. But that 20th-century dinosaur just got run off the road as [Ben Katz]’s Furuta pendulum streaks past in the fast lane, flipping the bird and heralding a new king of desk adornments.

This Furata pendulum has wonderfully smooth movement. You can watch it go through its dance in the video after the break. Obviously you agree that this is the desk objet d’art for the modern titan of industry (geek). Just don’t stop at watching it in action. The best part is the build log that [Ben] put together — this project has a little bit of everything!

Continue reading “Furuta Style Inverted Pendulum Is King Of Geek Desk Ornaments”

Hand Gestures Play Tetris

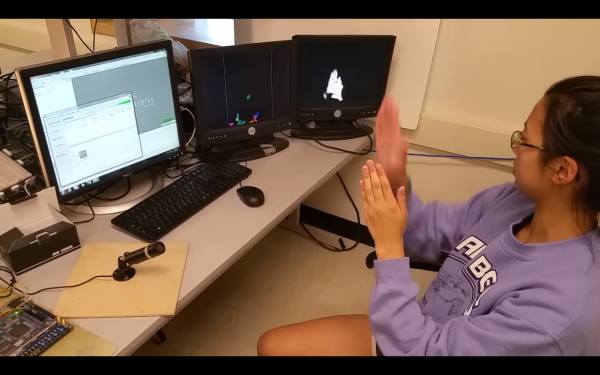
There are reports of a Tetris movie with a sizable budget, and with it come a plentiful amount of questions about how that would work. Who would the characters be? What kind of lines would there be to clear? Whatever the answers, we can all still play the classic game in the meantime. And, thanks to some of the engineering students at Cornell, we could play it without using a controller.

This hack comes from [Bruce Land]’s FPGA design course. The group’s game uses a video camera which outputs a standard NTSC signal and also does some filtering to detect the user. From there, the user can move their hands to different regions of the screen, which controls the movement of the Tetris pieces. This information is sent across GPIO to another FPGA which uses that to then play the game.

This game is done entirely in hardware, making it rather unique. All game dynamics including block generation, movement, and boundary conditions are set in hardware and all of the skin recognition is done in hardware as well. Be sure to check out the video of the students playing the game, and if you’re really into hand gesture-driven fun, you aren’t just limited to Tetris, you can also drive a car.

Continue reading “Hand Gestures Play Tetris”

Tiling Your TV Remote

The Tile is a small Bluetooth chip, speaker, and enough battery for a year in a keychain format. If you lose your keys in the morning, simply use the app on your phone to find the keychain. If you lose your phone simply get out your second phone.

This planned obsolescence didn’t jive with [JM] when his Tile stopped being discoverable. He didn’t want to toss a gadget that had served him so well into the landfill. So, like any good hacker, he cracked its plastic case open.

The Tile itself is a really interesting product. The largest component is the battery which has tabs spot-welded to its surface. Attached to those is a well laid out board. [JM] points out the clever use of spring contacts to engage the piezo element for the speaker as a nice example of good design for manufacture.

The hack itself was pretty easy to complete. Some electrical tape and soldering was all it took to embed the tile into the remote. Now he can take out his phone and press a button to hear a forlorn beep coming from under the couch cushions.

EPROM Timer

[glitch] had a cheap EPROM eraser with very few features. Actually, that might be giving it too much credit: it’s barely more than a UV light that turns on when it’s plugged in and turns off when it’s plugged out unplugged. Of course it would be nice to implement some safety features, so he decided he’d hook it up to a software-controlled power outlet.

Of course, controlling a relay that’s wired to mains is old hat around here, and in fact, we’ve covered [glitch]’s optoisolated mains switch already. He’s gone a little beyond the normal mains relay project with this one, though. Rather than use a microcontroller to run the relay, [glitch] wrote a simple Ruby script on his computer to turn the EPROM eraser on for the precise amount of time that is required to erase the memory.The Ruby script drives the relay control directly over a USB to serial adapter’s RTS handshake pin.

[glitch]’s hack reminds us that if you just need a quick couple bits of slow output, a USB-serial converter might be just the ticket. You could imagine driving everything from standard lamps to your 3D printer’s bed heater (provided you use similar hardware), but it’s especially helpful for [glitch] who claims to forget to turn off the eraser when it’s done its job, which leaves a potentially dangerous UV source just lying about. It’s always a good idea to add safety features to a dangerous piece of equipment!

Hand Gestures Drive Car

There are a number of ways to control an automobile without using the pedals, and sometimes even without using the steering wheel. Most commonly these alternative control mechanisms are installed in vehicles whose owners are disabled in some way, but [Anurag] has taken this idea of alternative control one step further. He has built a car that can be driven by hand gestures alone.

On a remote controlled car, a Raspberry Pi 2 was installed that handles processing and communication. A wireless network is created on the Pi, and a laptop connects to the Pi over the network. The web camera on the laptop regularly captures frames at 15 fps to check for the driver’s hand gestures. The image is converted to gray scale, thresholded, contours are obtained, and the centroid and farthest points are obtained.

After some calculations are done, a movement decision is taken. The decision is passed to the Pi, which in turn, passed that to the internal chip of the car. All of the code is available on the project’s github page. [Anurag] hopes that this can be scaled up to full sized cars in the future. We’ve seen gesture-based remote controls before that rely on Sonar sensors, so it’s interesting to see one that relies strictly on image processing.

Continue reading “Hand Gestures Drive Car”

Telegram Your Devices

[Erhan] has been playing around with the Telegram instant messaging service. Initially, he worked out how to turn on and off LEDs from his cell phone: he sent commands from the phone through the Telegram bot API, to a computer that’s connected over serial to an MSP430 board that actually controlled the LEDs.

But that’s a little bit complicated. Better to cut out the middleman (err…microcontroller) and implement the Telegram reception and LED blinking on a Raspberry Pi. For a project that’s already using a Pi, using the instant messaging service’s resources is a very simple way to interface to a cellphone.

The code for both the standalone RPi project and the MSP430-based microcontroller application are available at [Erhan]’s GitHub. You’re going to be installing Node.js for their telegram-bot-api and jumping through the usual OAuth hoops to get your bot registered with Telegram. But once you’ve done that all on the Raspberry Pi (or target computer of your choice) it’s all just a few lines of fairly high-level code.

We’ve only seen one other Telegram application on Hackaday.io and we’re wondering why. It looks pretty slick, and with the bot’s ability to send a custom “keyboard” to the phone along with the message, it could make cell-phone-based control interfaces a cinch. Anyone else using Telegram for bots?